A repository that holds Qlik apps usually holds other things too: pipeline files, scripts, documentation. Having every app folder sit at the top level next to all of that gets crowded. With AppSubfolders you give the apps a folder of their own, such as apps/, and keep the repository root for everything else.
One line in the repository configuration
AppSubfolders is a setting in the repository's .qopsconfig. It lists the folders where QOps should look for apps, written relative to the repository root and separated by ;:
AppSubfolders: apps;partners/emea
QOps always checks the repository root. Each folder you list is checked as well. In every one of these folders, QOps treats each child folder that contains an App.yaml (or App.json) as an app. You can set the value in the file, with QOps-SetConfig -AppSubfolders, or in the Portal under the repository's settings, in the App subfolders field.
Plain folder paths. List each folder by its path. Wildcards are not applied.
One level deep. QOps looks at the child folders of the repository root and of each listed folder. To use apps/team, list apps/team.
An empty list means the repository root only.
QOps-SetConfig checks your entries. If a folder does not exist, it says so and changes nothing.
What happens in each command
QOps-Prepare finds an app's existing folder in the root or in any listed folder and updates it there.
QOps-Build and QOps-Release take their apps from the root and from every listed folder.
A new app that Prepare writes for the first time is created next to the .qopsconfig, as <Name>-prj. Move that folder into apps/ once. After that, Prepare and Build keep using it where it is.
The configuration at the repository root
You can keep the .qopsconfig at the repository root and run QOps from anywhere inside the repository. QOps walks up from the current folder until it finds the configuration, moves there, and tells you which folder it chose.
To move an existing setup, put the .qopsconfig at the root, add AppSubfolders: apps, merge the .gitignore lines for App.local files into the root .gitignore, and run a build for one app to confirm it is found.
In the Portal
Prepare, Build and Release started from the Portal follow AppSubfolders. The Portal's own app list looks for folders ending in -prj anywhere in the repository, so name your app folders <Name>-prj and the list and the commands agree.
The full guide, with example layouts and the messages you may meet, is in the Portal's Help panel under How-to guides: Keep applications in subfolders with AppSubfolders.
QOps started as a set of PowerShell commands for Qlik developers. It is no longer only that. Over the last couple of months QOps has grown the Portal: a browser window where you run commands, edit files, work with Git, keep QOps up to date and manage your settings. The Portal runs the same QOps commands you would type, so the results are the same. Each release it covers more of the daily work, and we are steadily heading toward a point where you do not need the command line at all. QOps also has an MCP server and a chat now, which we come back to at the end.
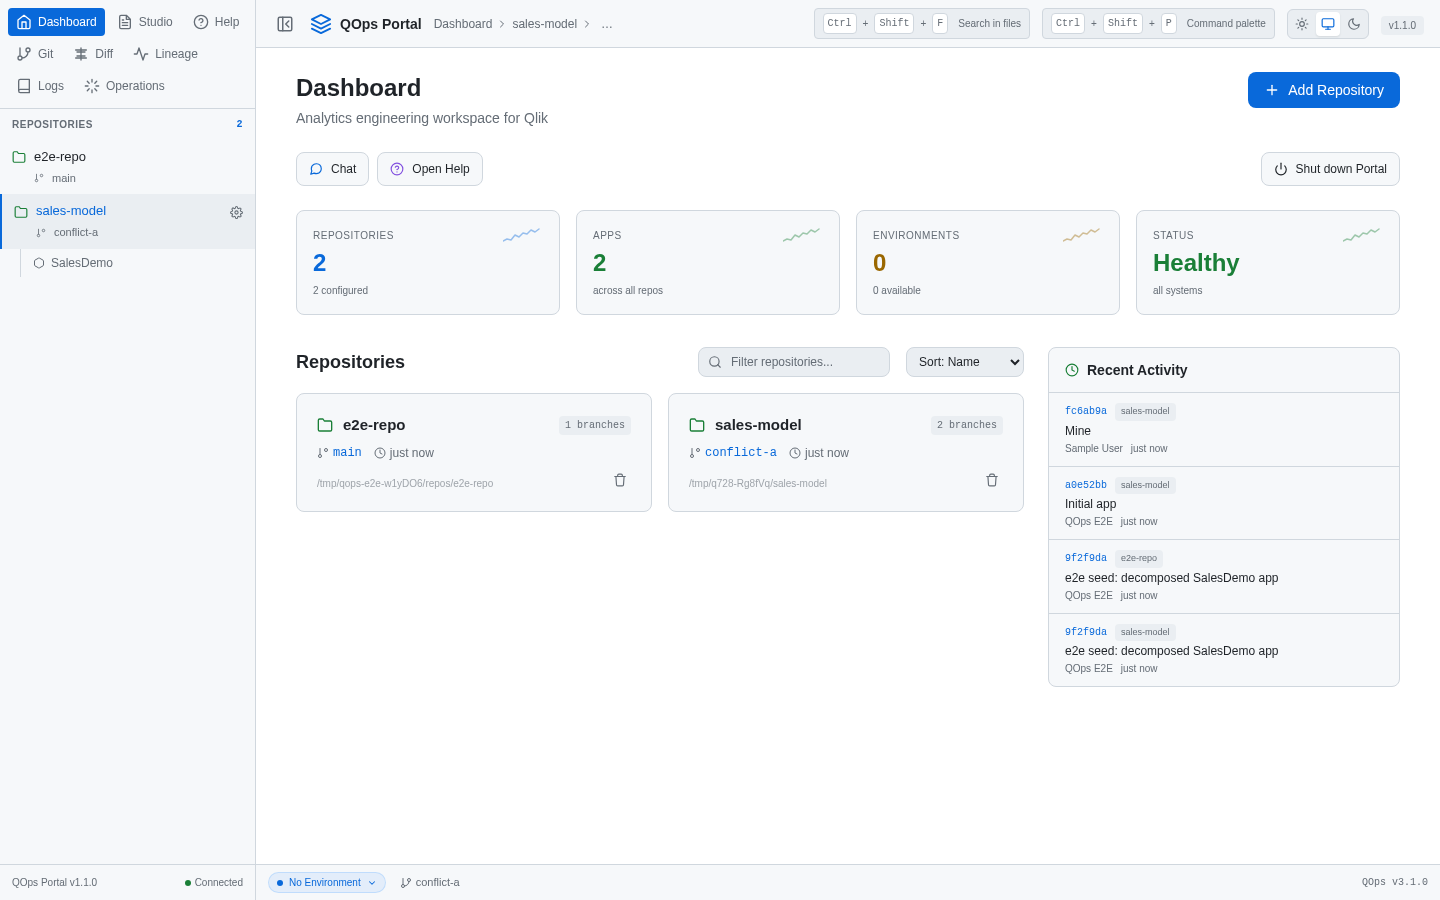
The Portal Dashboard with repositories, environments and recent activity
One window for the whole workflow
You start the Portal with QOps-StartPortal, and it opens in your browser on your own computer. On Windows, if you installed QOps with the installer, you can also start it from the QOps Portal shortcut on the desktop or in the Start menu. The Dashboard lists your repositories with their branch, apps and recent activity. From the menu you reach Studio, Git, Diff, Lineage, Logs, Operations and Help, and the repository you picked stays selected as you move between them.
Run commands
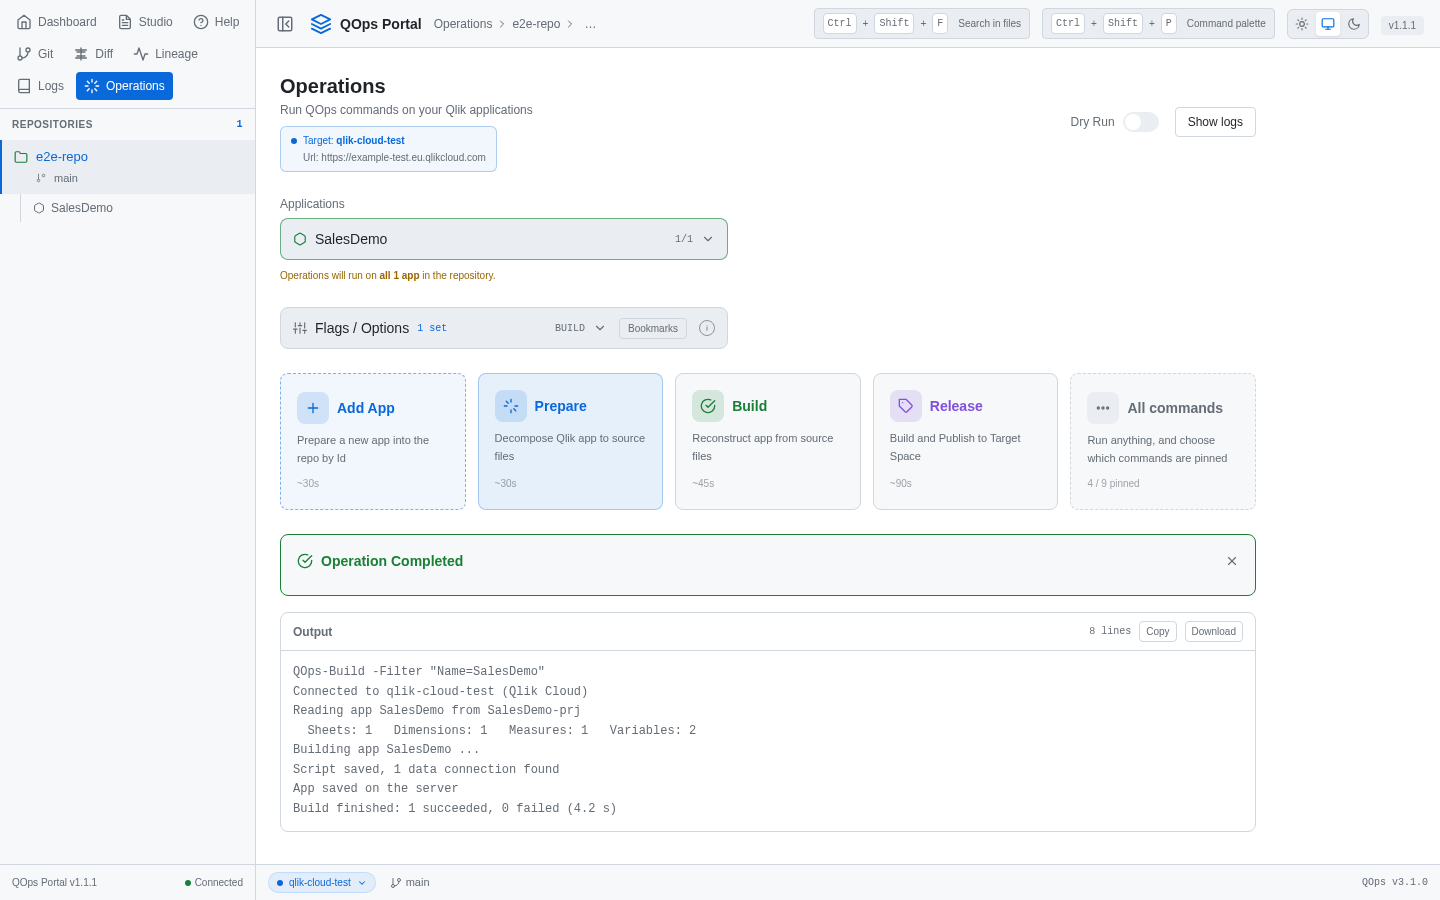
The Operations panel has a button for each step of the QOps workflow: Add App, Prepare, Build and Release, plus All commands for everything else, including Reload and Publish. You choose the apps (one, a few, or all in the repository), set the options for the command, and read the live output as it runs.
Dry Run shows the exact command that would run and starts nothing.
Options such as Update only on Build are switches, so you do not have to remember the flag names.
Long runs can be stopped, and every run is kept in the history with its log, which you can copy or download.
The Operations panel after a Build with Update only, with the finished log
Edit files
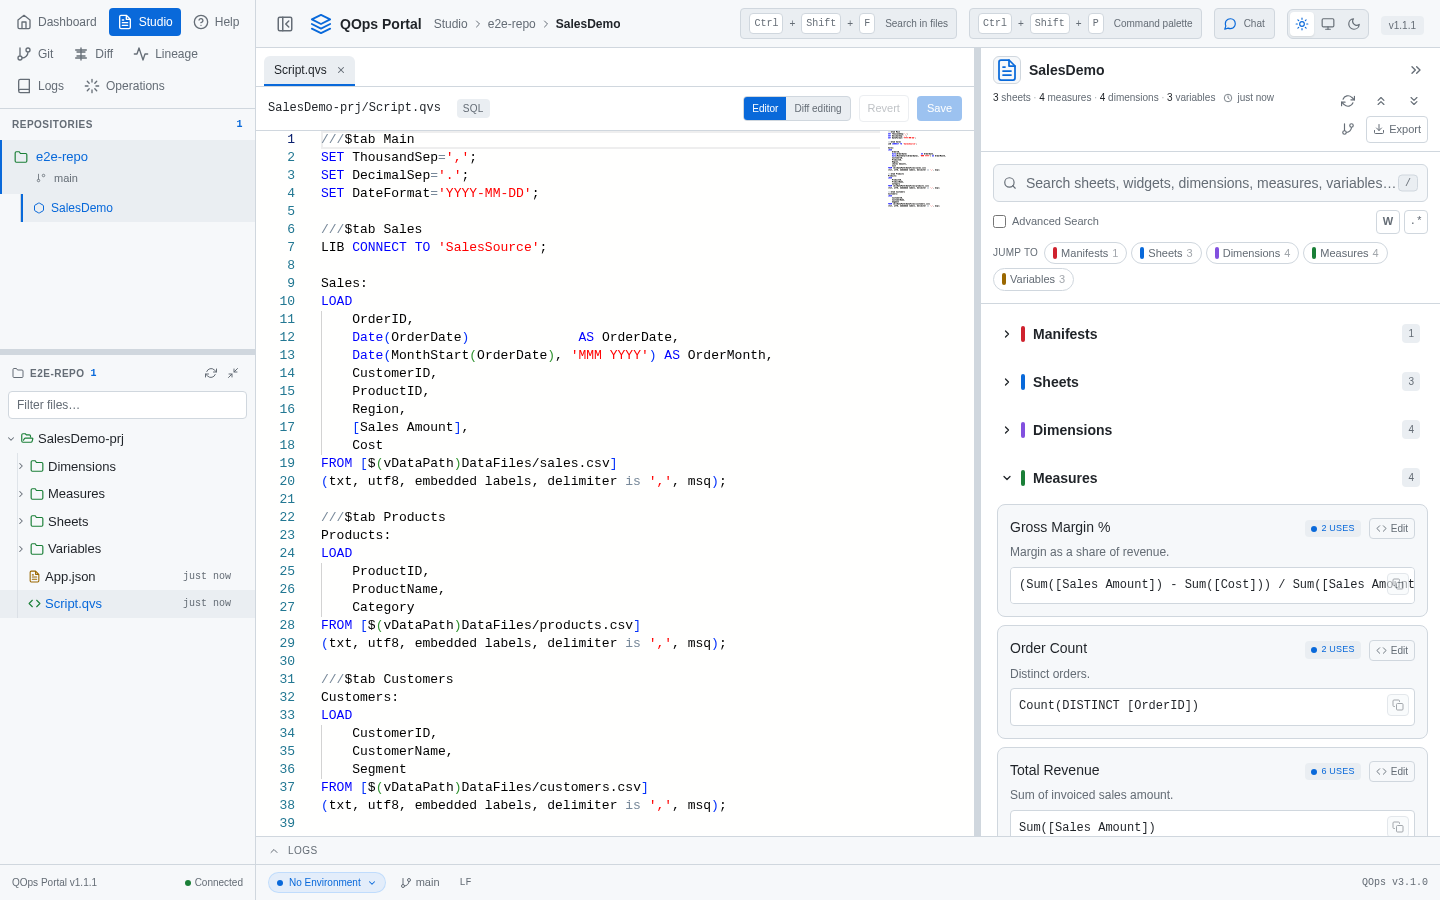
Studio is where you work on an app's source files. It has a tabbed editor and a file tree, and you can create, rename and delete files there. Next to the editor sits the generated documentation of the app: sheets, master measures and dimensions, variables. You can search it, see where a master item is used, and export it. Right-click an app folder or any object in the tree to run Prepare or Build on exactly that part, without leaving Studio.
Studio with an app selected: the load script open in the editor and the app's documentation in the side panel
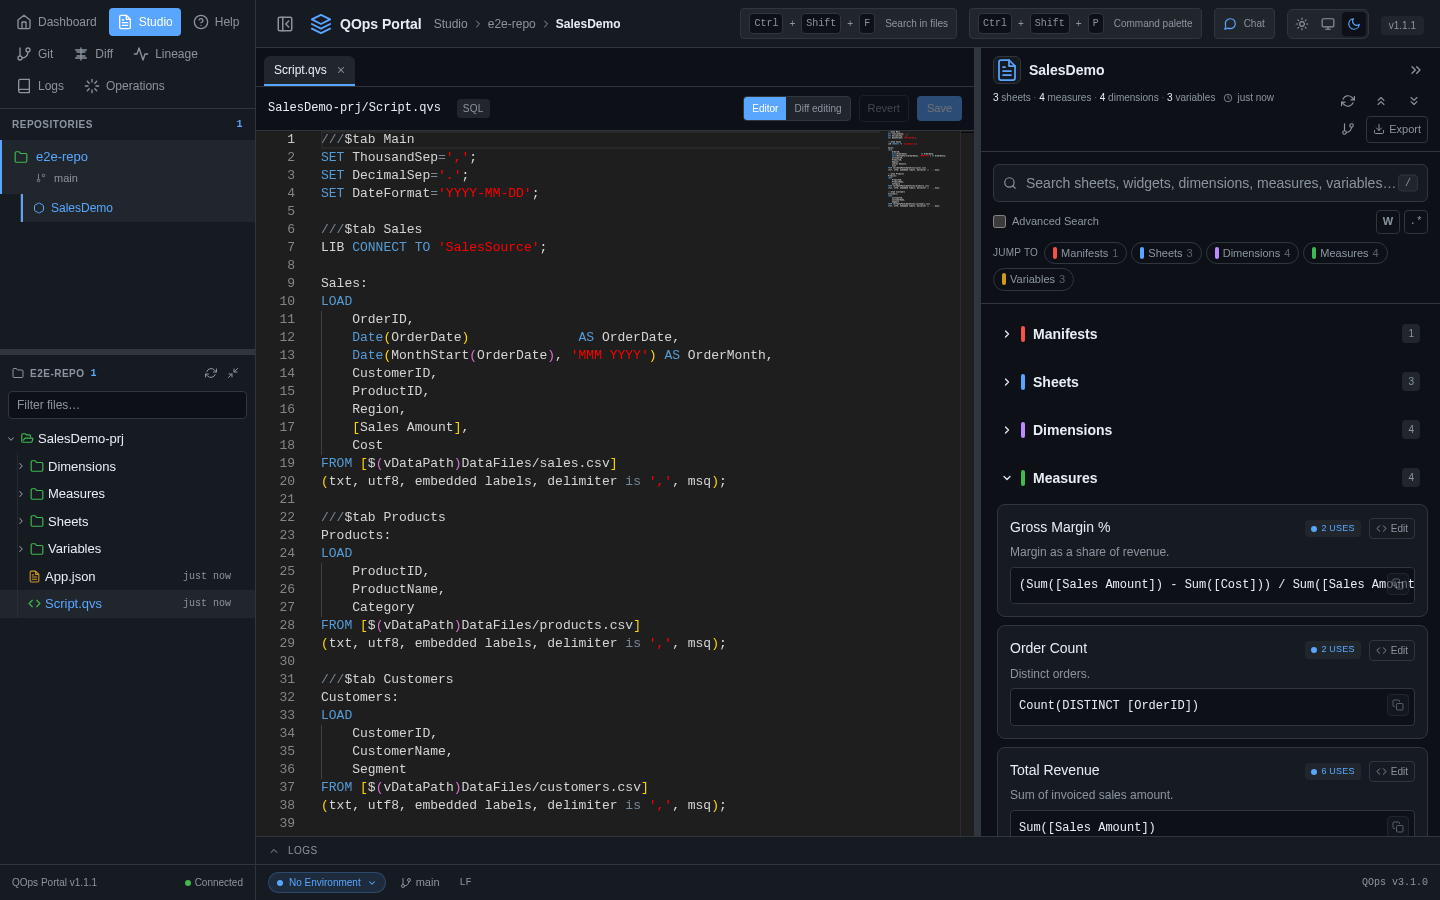
The Portal also comes in a dark theme. Use the theme buttons at the right of the header to pick light, dark, or follow your system setting; the browser remembers your choice.
The same Studio view in the dark theme
Work with Git
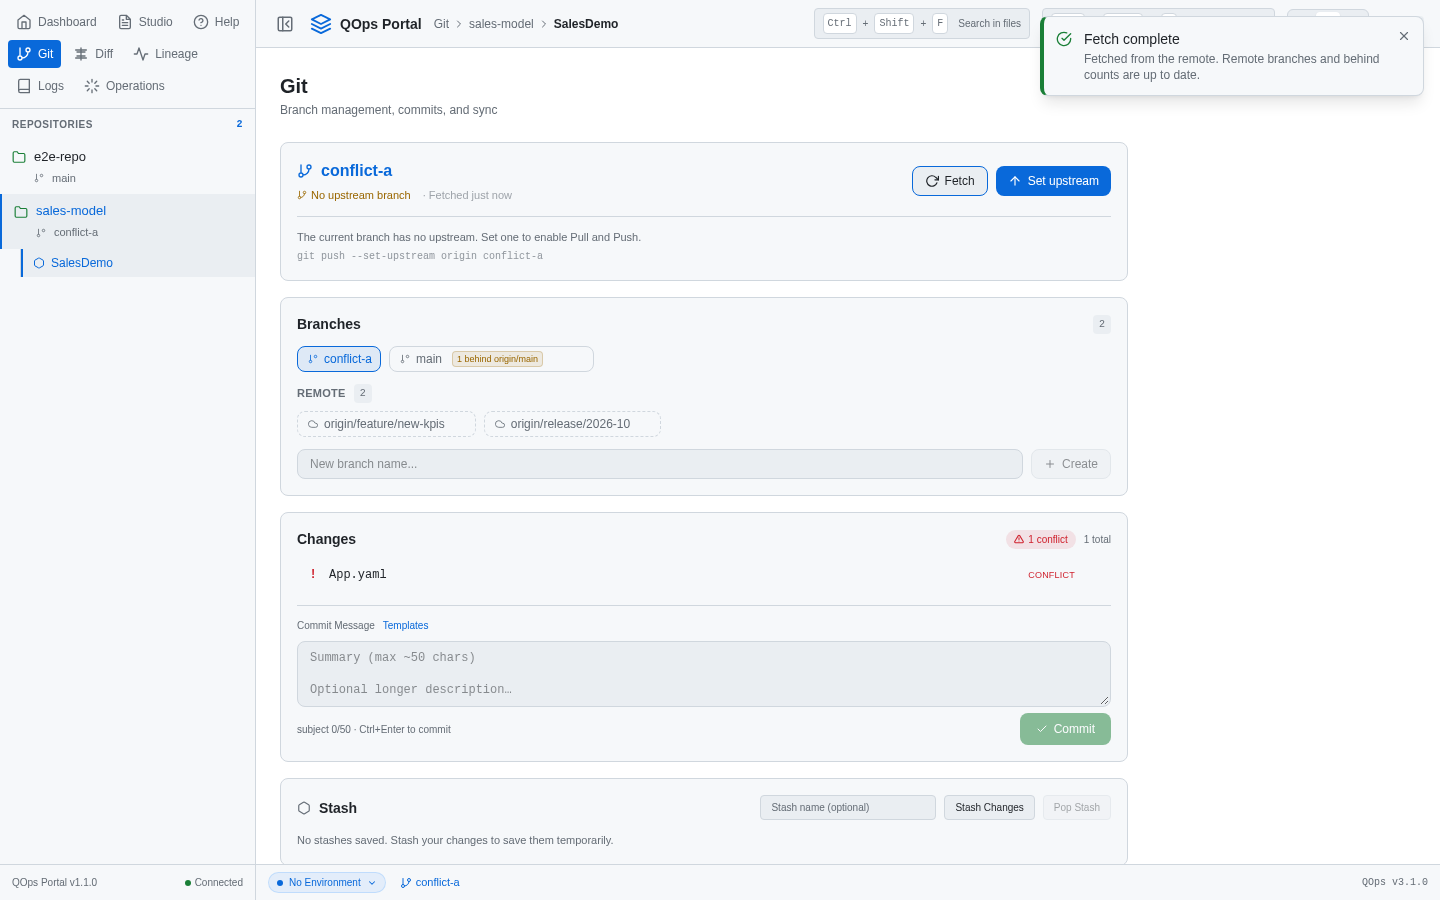
The Git panel covers the daily routine: stage, commit with templates, push, pull, stash, create and switch branches, and browse the history. The Branches card lists the branches of your remotes next to the local ones. Fetch refreshes them and shows how far behind you are, and one click checks out a remote branch as a local one.
The Git panel with local and remote branches
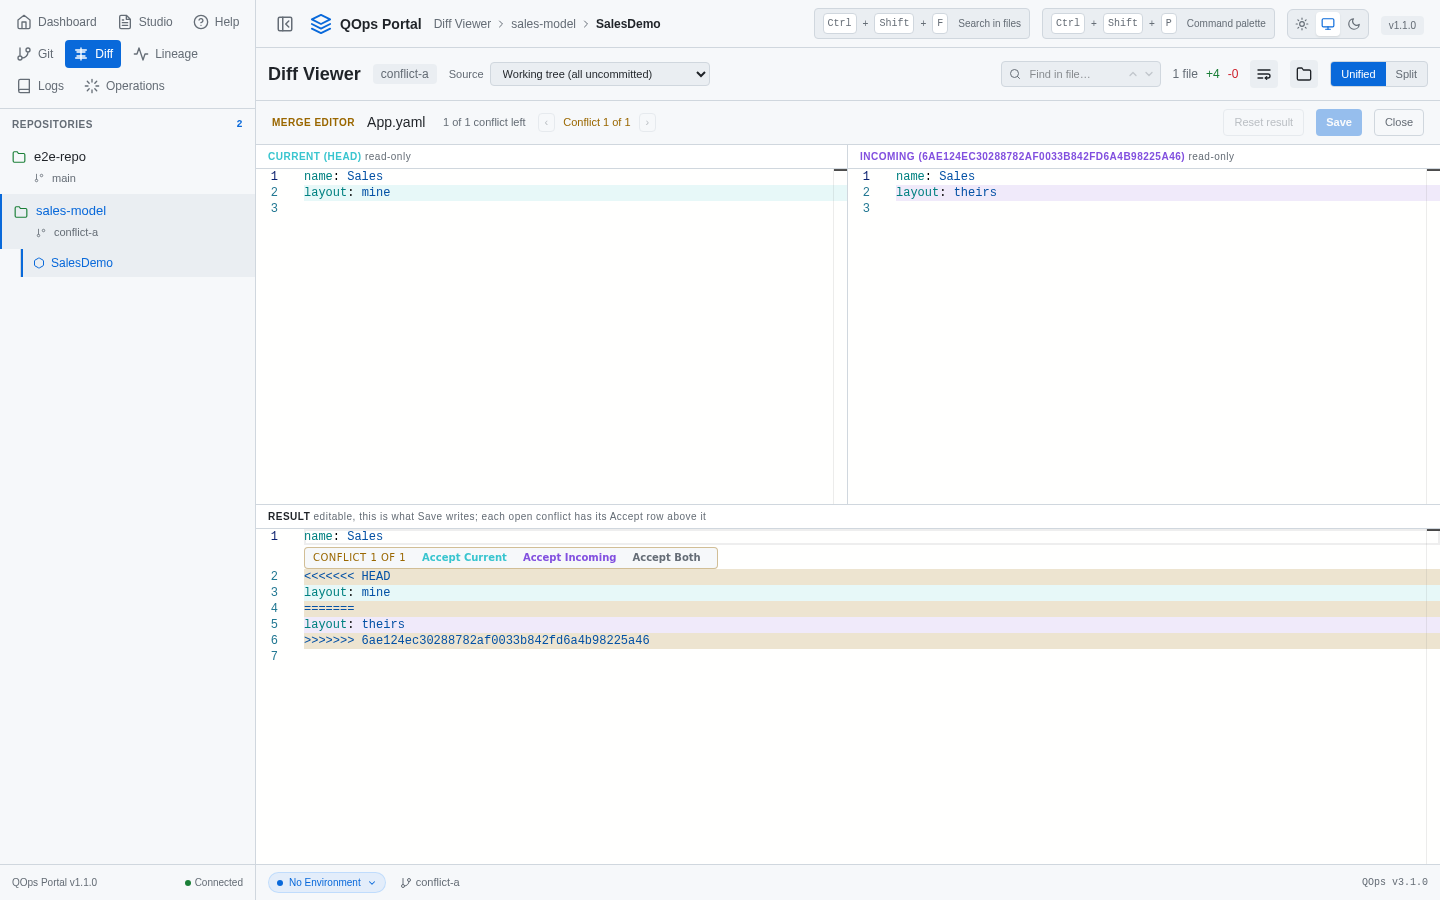
When a merge leaves conflicts, the merge editor shows Current and Incoming side by side with an editable Result below. For each conflict you accept current, incoming or both, and you can fine-tune the text by hand before you save.
The merge editor with Current, Incoming and an editable Result
Keep QOps up to date
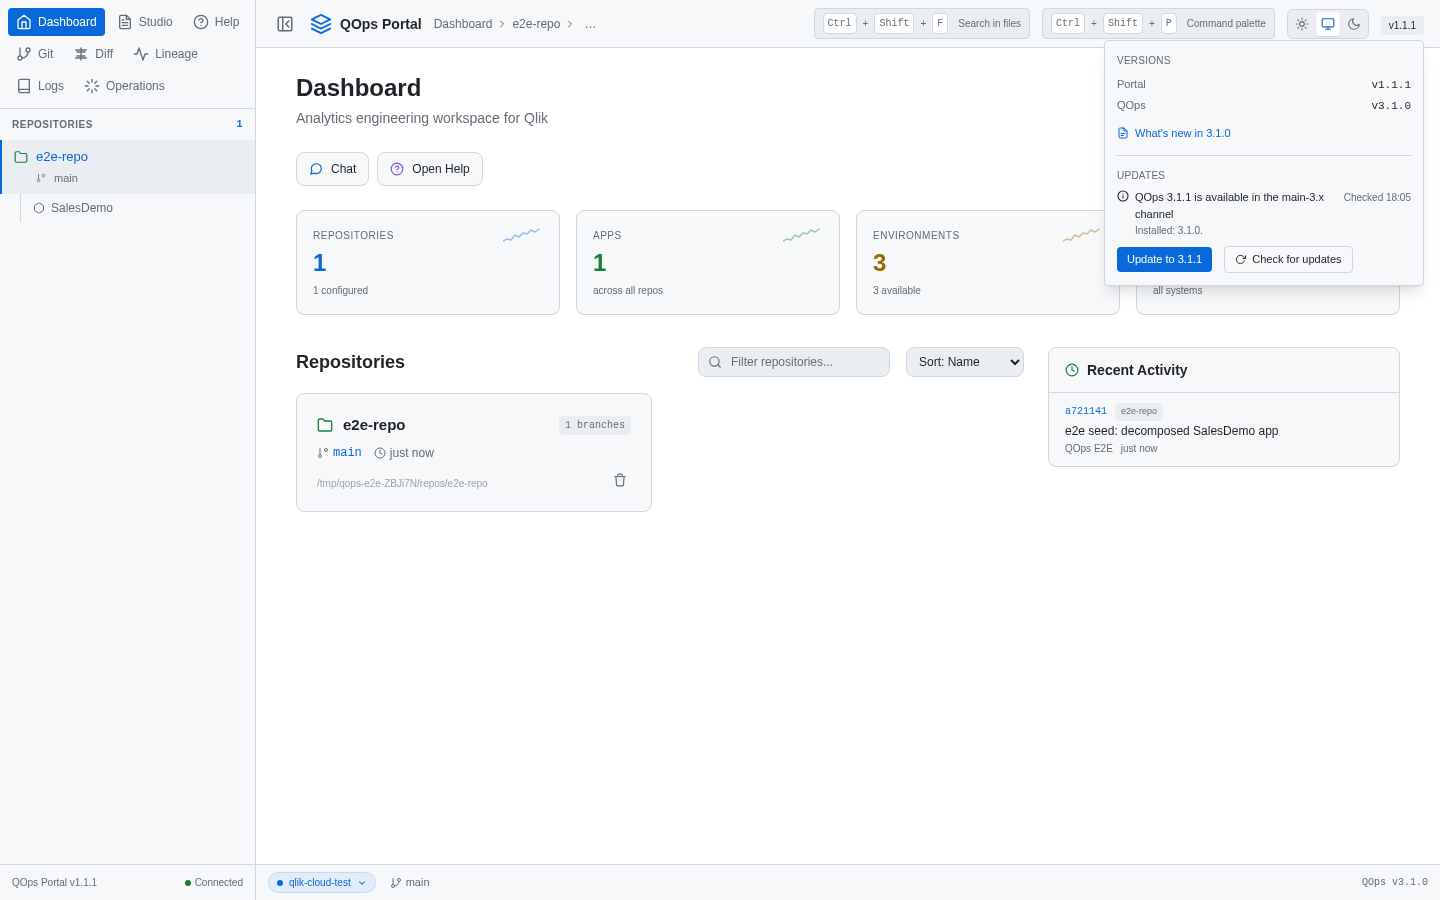
Click the version number in the header to open the Versions panel. It shows the Portal and QOps versions and links to the release notes for the version you run. Check for updates tells you whether a newer build exists in your update channel, and Update installs it after you confirm. When a Portal started with QOps-StartPortal has a new version installed, it can restart itself on it at the same address.
The Versions panel with an update available
Settings and environments
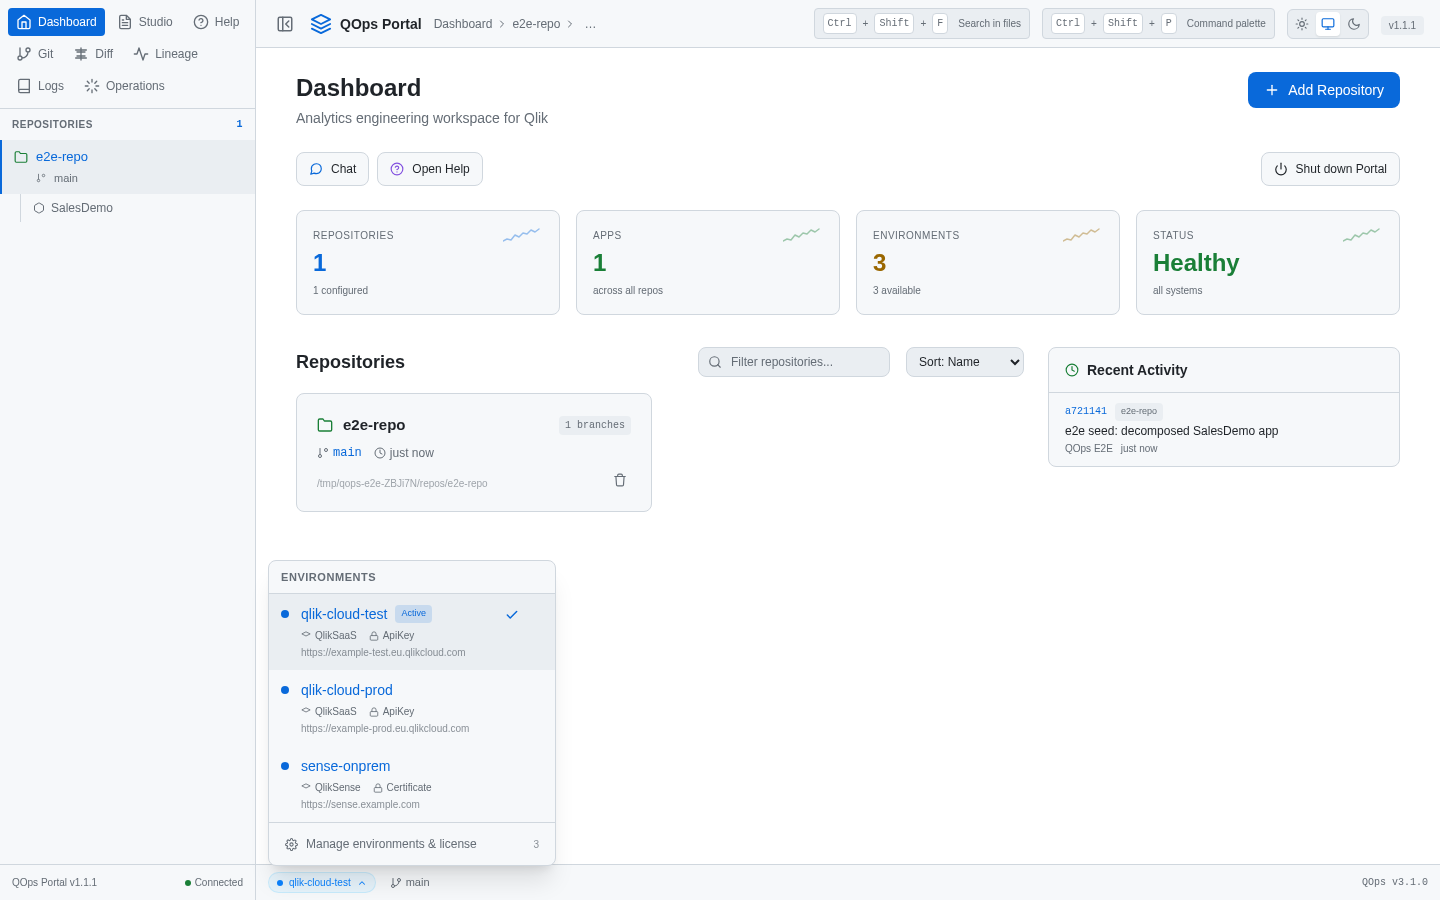
The environment switcher in the status bar lists your connection profiles, for Qlik Cloud and Qlik Sense, and shows which one is active. Pick another and the next run uses it, so the same sources can go to test and then to production.
The environment switcher with three profiles
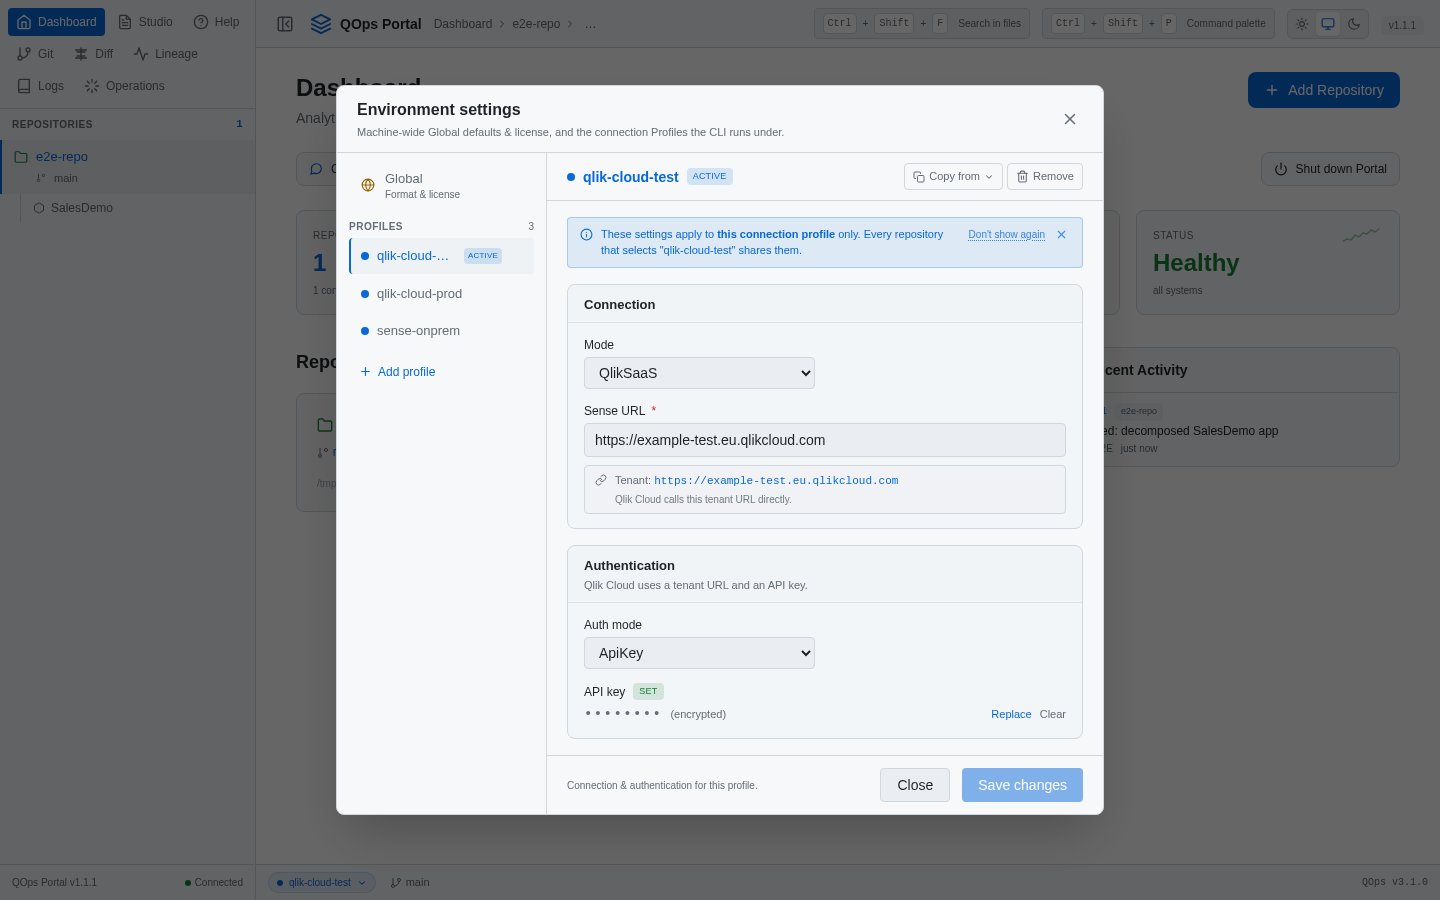
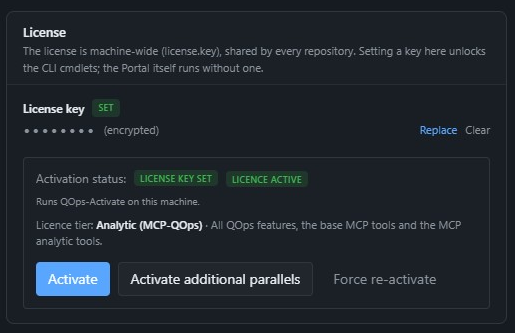
Manage environments & license opens the settings. There you edit each profile's connection and sign-in, and the defaults that apply to the whole machine: serialization format, line endings, license and a GitHub token for updates. Secrets are stored encrypted and are never shown again. Per repository, Settings holds placeholders and hook scripts.
The settings for one connection profile
Chat and MCP
QOps also has an MCP server, so AI assistants can work with your repositories and apps, and the Portal has a chat built on it. You choose the provider and model, and the key stays on the Portal's own server. We cover both in the MCP post.
Get started
Open PowerShell and run QOps-StartPortal, or on Windows use the QOps Portal shortcut. The Help panel has a reference for every panel and step-by-step guides, for example for connecting a freshly cloned repository to your existing apps. Everything you do in the Portal can still be done from the command line, so use whichever suits the moment.
QOps 3.1 brings a new feature: an MCP server that gives an AI assistant the tools to work with your QOps repositories and Qlik apps. The easiest way to try it is the chat in the Portal, where you ask in plain words instead of looking for the right command: "Which apps are in this repository?" "Make a sheet with Total Sales and Order Count as bars and Average Order as a line, by Region." "Run Prepare, then Build." The server runs on your own machine and uses the connection profiles and licence you already have. Your Qlik credentials are never passed to the assistant.
Try it in three steps
1. Update to 3.1
Run QOps-Update, then start the Portal with QOps-StartPortal.
2. Add your key in Settings
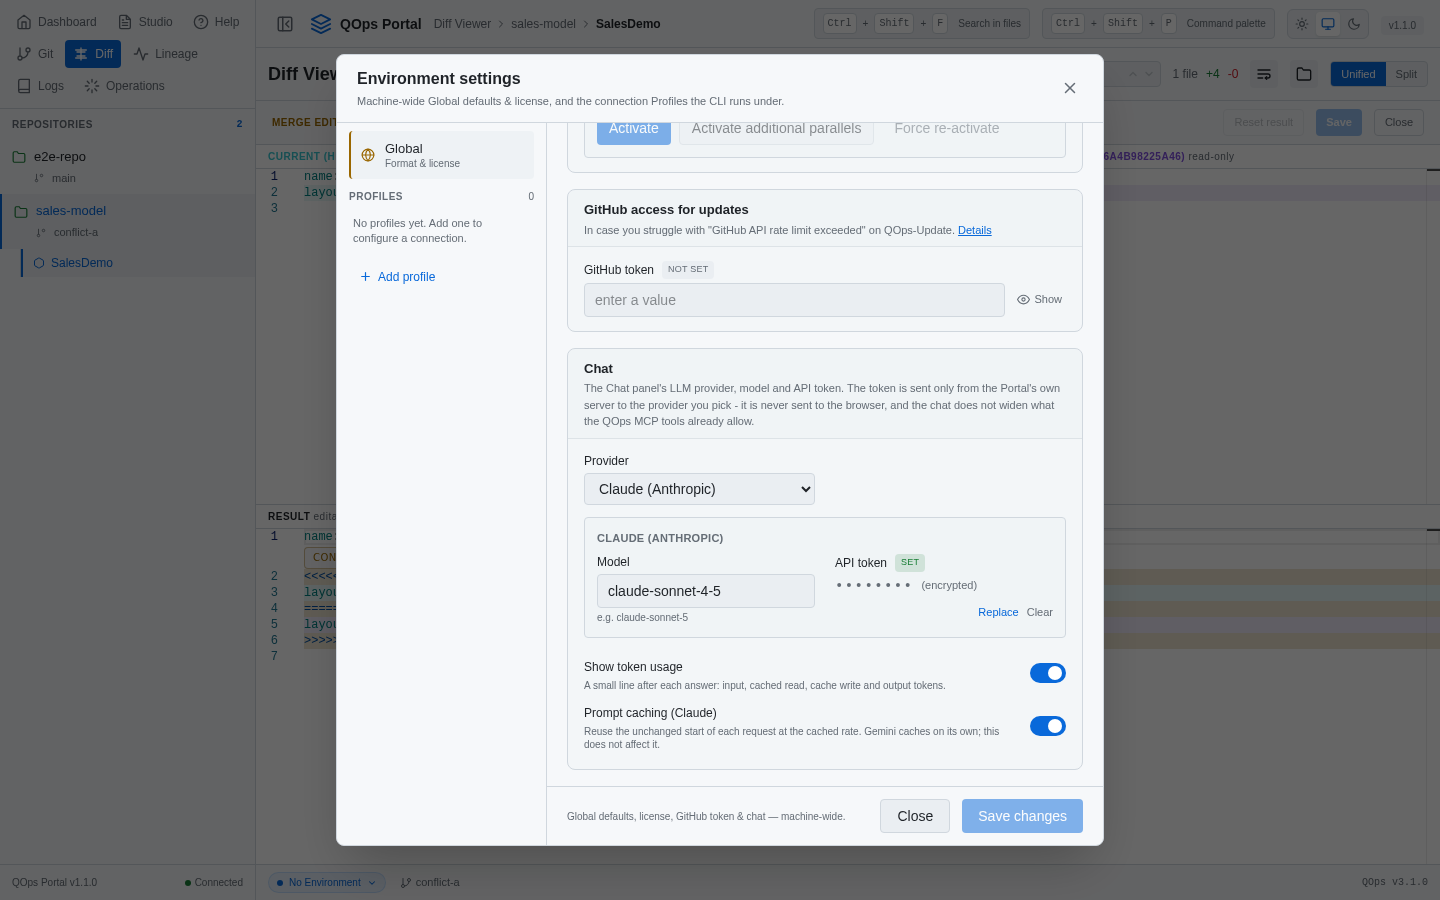
The chat uses your own AI account, so it needs a key before it can answer. Under Settings, Global, Chat you choose Claude or Gemini, pick a model and store your own API token. The token is kept encrypted on your machine and is sent only from the Portal's own server to the provider you chose. It never reaches the browser.
Provider and model per chat. The header of each chat has a provider and model picker, filled from the provider's own model list. Change them halfway through a conversation if you like.
Prompt caching. On by default for Claude, so long chats use fewer full-price tokens. You can switch it off.
Token line. Turn on Show token usage and each answer ends with a short line showing the input, cached, and output tokens it used.
Saved chats. Chats are saved, listed under History, and can be copied or downloaded as Markdown.
3. Open the chat from the Dashboard or Studio
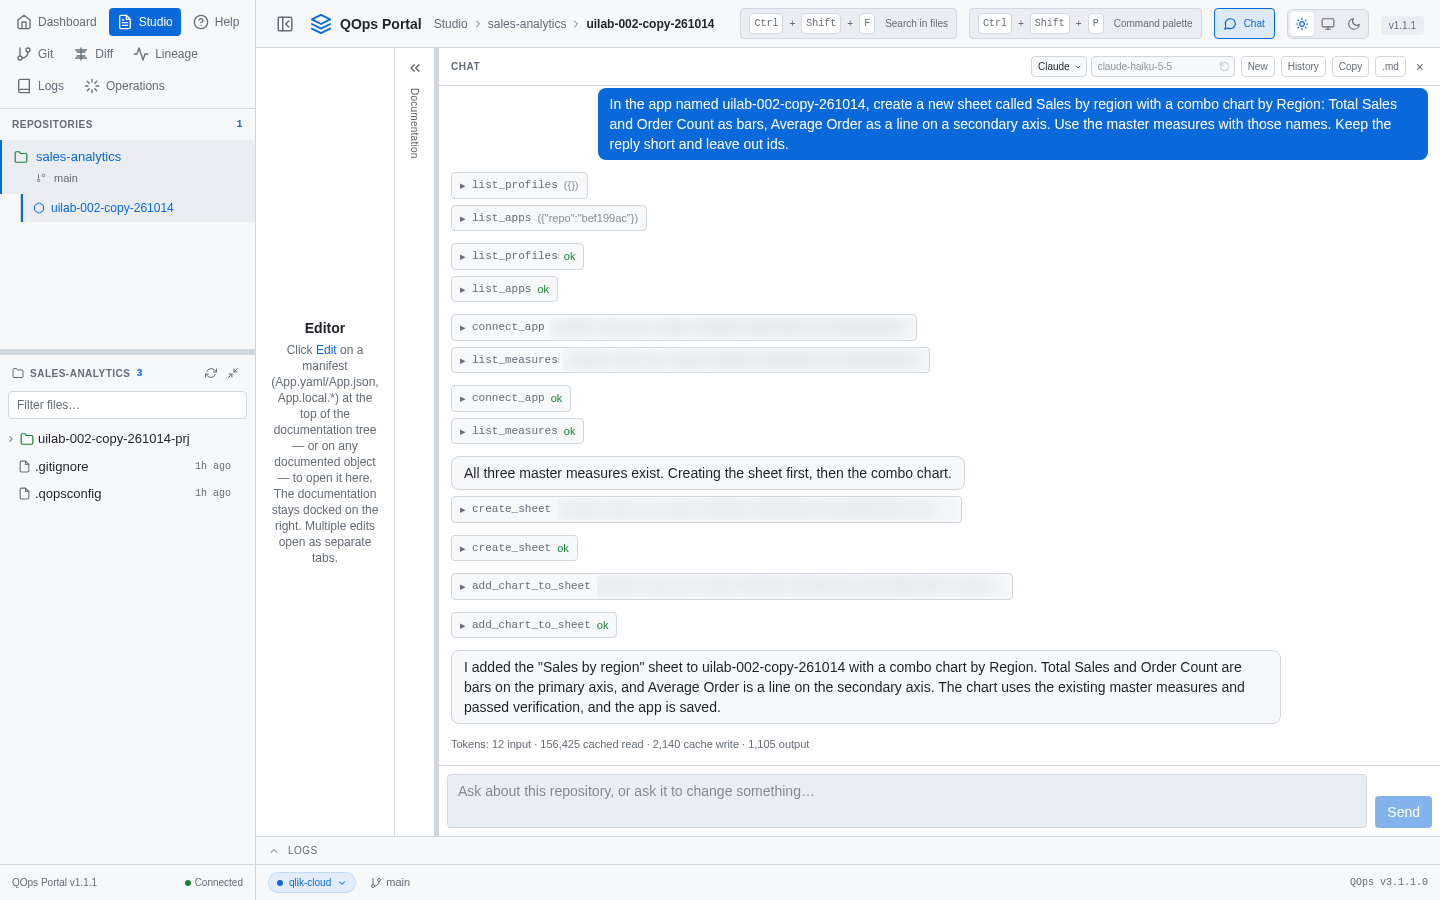
Open the Chat panel from the Dashboard, or dock it beside the editor in Studio so it stays open while you work. Then ask for a sheet in plain words, for example: "Create a new sheet called Sales by region with a combo chart by Region: Total Sales and Order Count as bars, Average Order as a line."
The Chat panel docked in Studio: one request in plain words creates a sheet with a combo chart from three master measures, and every tool step is listed above the answer
In the example above the request names the app and the master measures the way you would say them: Total Sales, Order Count and Average Order. The assistant finds the app in your repository, looks up the measures by name, creates the sheet and the chart, and reads the result back before it answers. Each tool step it took is listed in the chat, so you can see what was done.
Or connect your own assistant
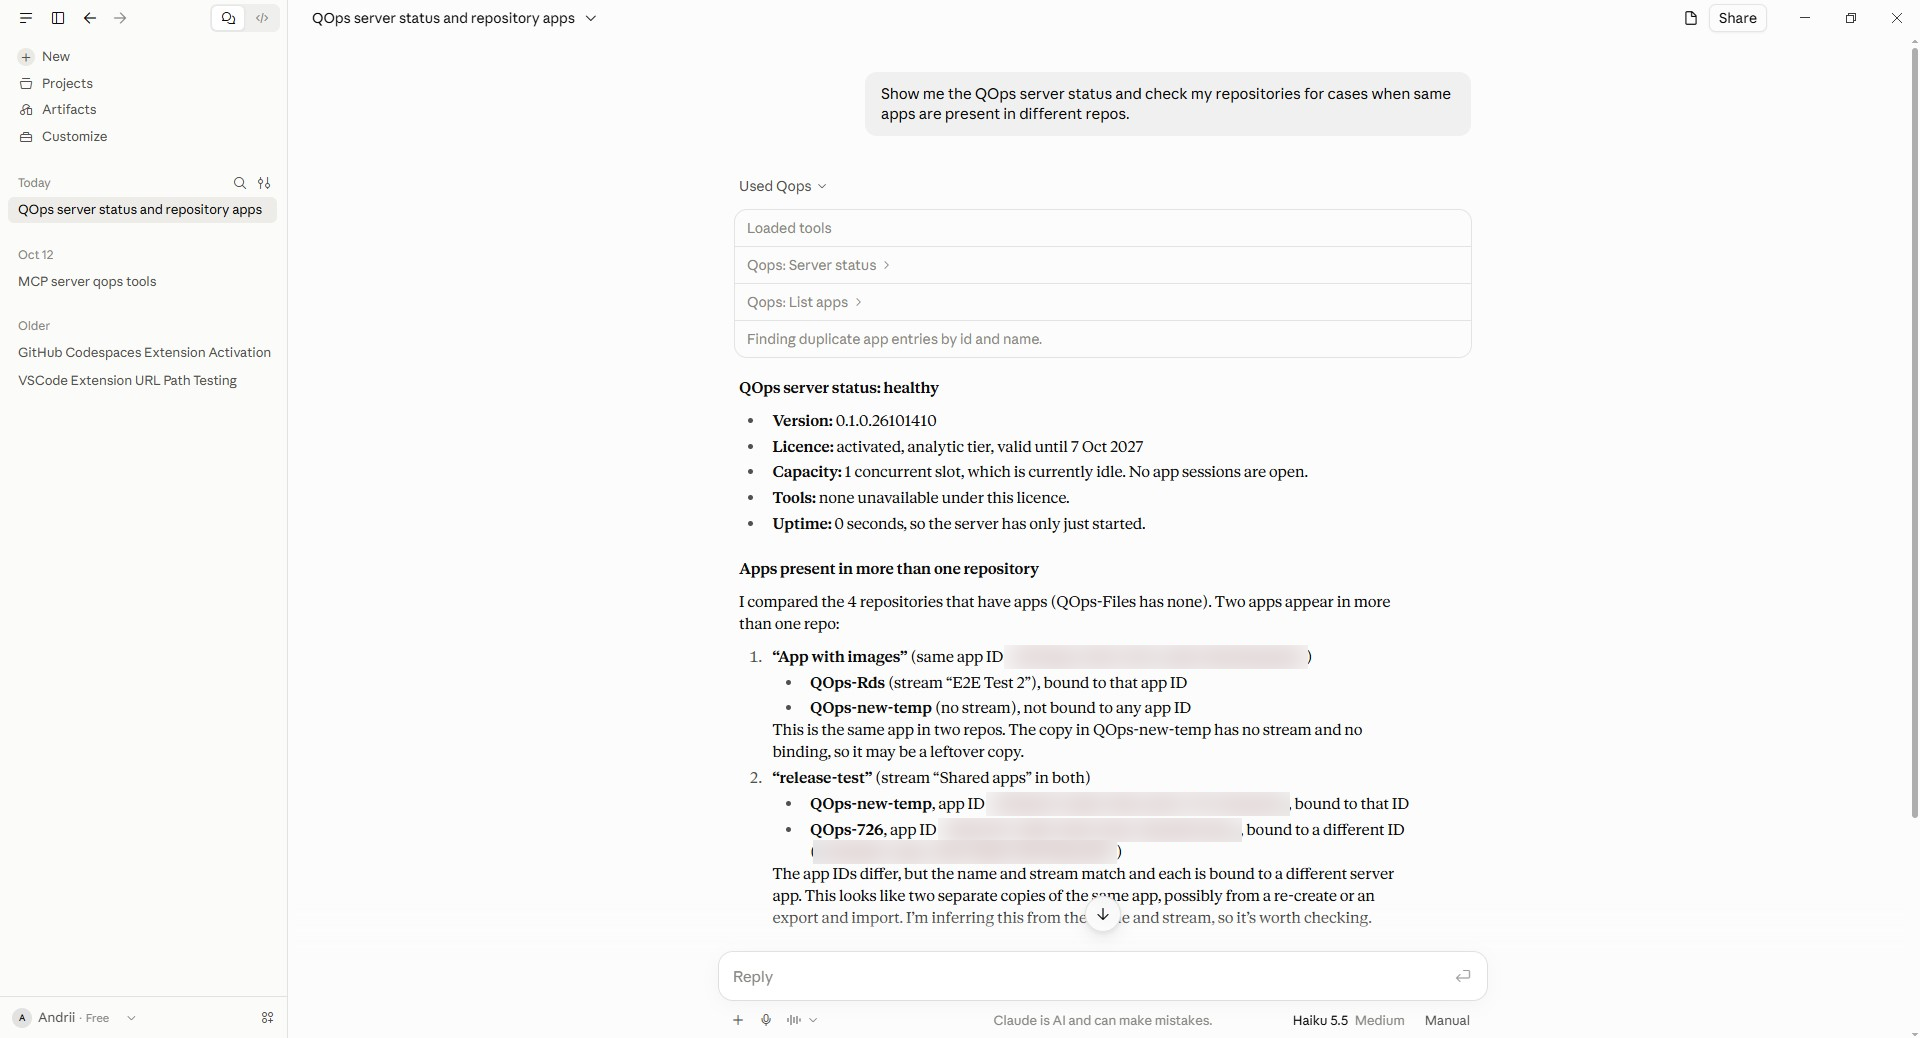
You can also chat from your own client. If you prefer Claude Desktop, Claude Code or Cursor, you can connect them to the same tools. Run QOps-StartPortal once. It writes a small launcher file to a fixed place and prints its path. Point your assistant at that launcher. Because the launcher never moves, the connection keeps working after QOps-Update.
Claude Desktop with the QOps server connected: one question returns the server status, the licence tier and the apps that appear in more than one repository
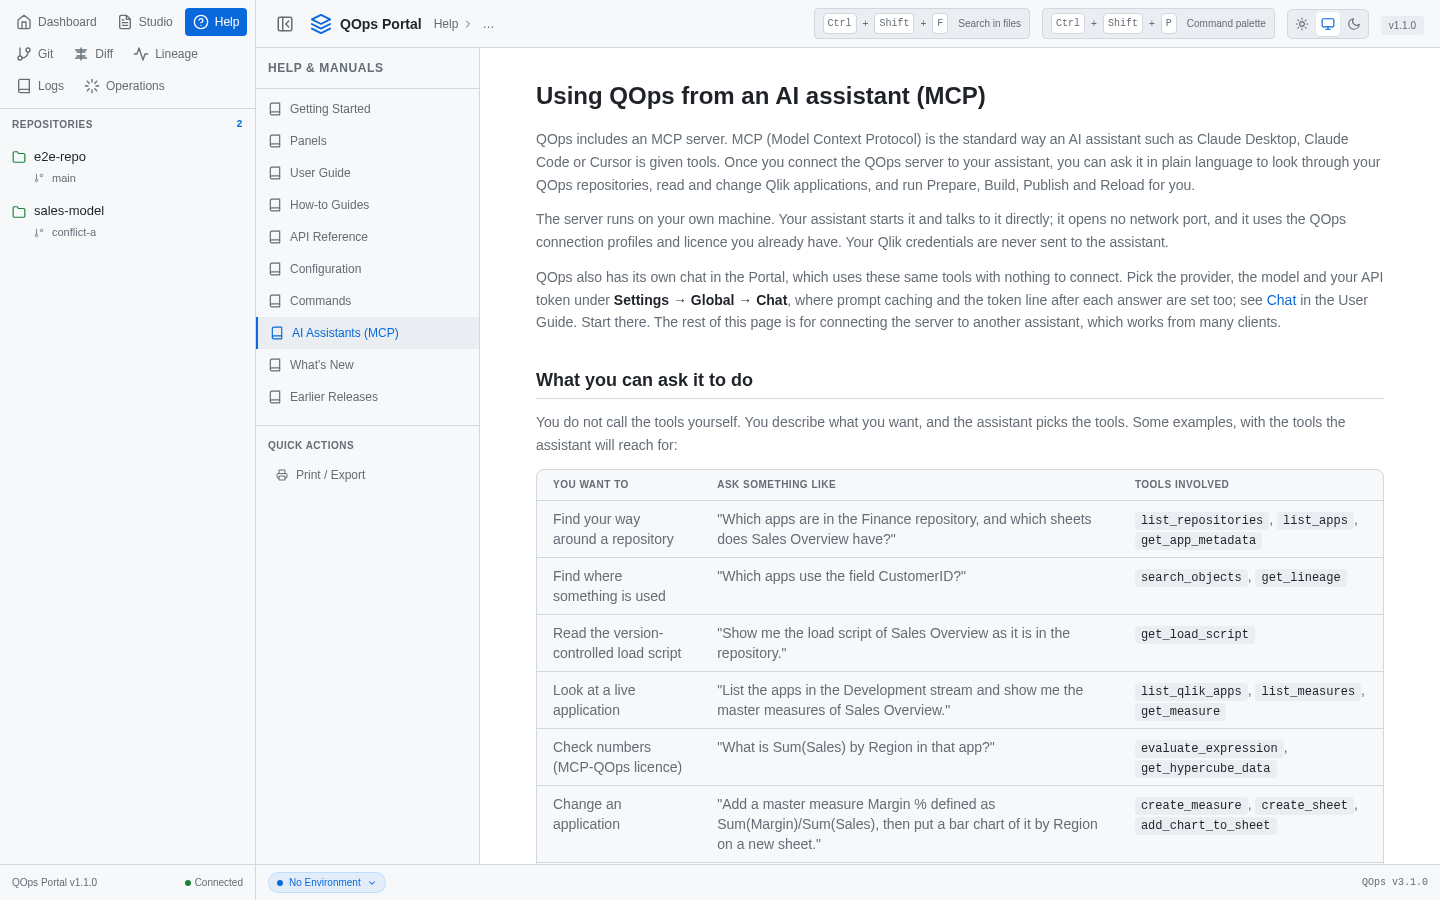
The Help panel has a full page on this, with the settings to paste for each assistant.
The AI Assistants (MCP) page in Help
What the base level can do
Repositories: which apps and sheets a repository has, where a field is used, and what the version-controlled load script says.
Live apps: list apps, read master measures, sheets and charts on Qlik Sense or Qlik Cloud.
Build and change: create master items, variables, sheets and charts, and edit the load script. Charts cover bar, line, combo, pie, table, KPI, scatter, gauge, treemap and pivot table. Refer to master measures by their names, for example "Total Sales and Order Count as bars, Average Order as a line on a second axis".
Share a sheet: on Qlik Cloud, ask the assistant to make a sheet public.
Run QOps: Prepare, Build, Publish and Reload in a repository folder, exactly as the commands do.
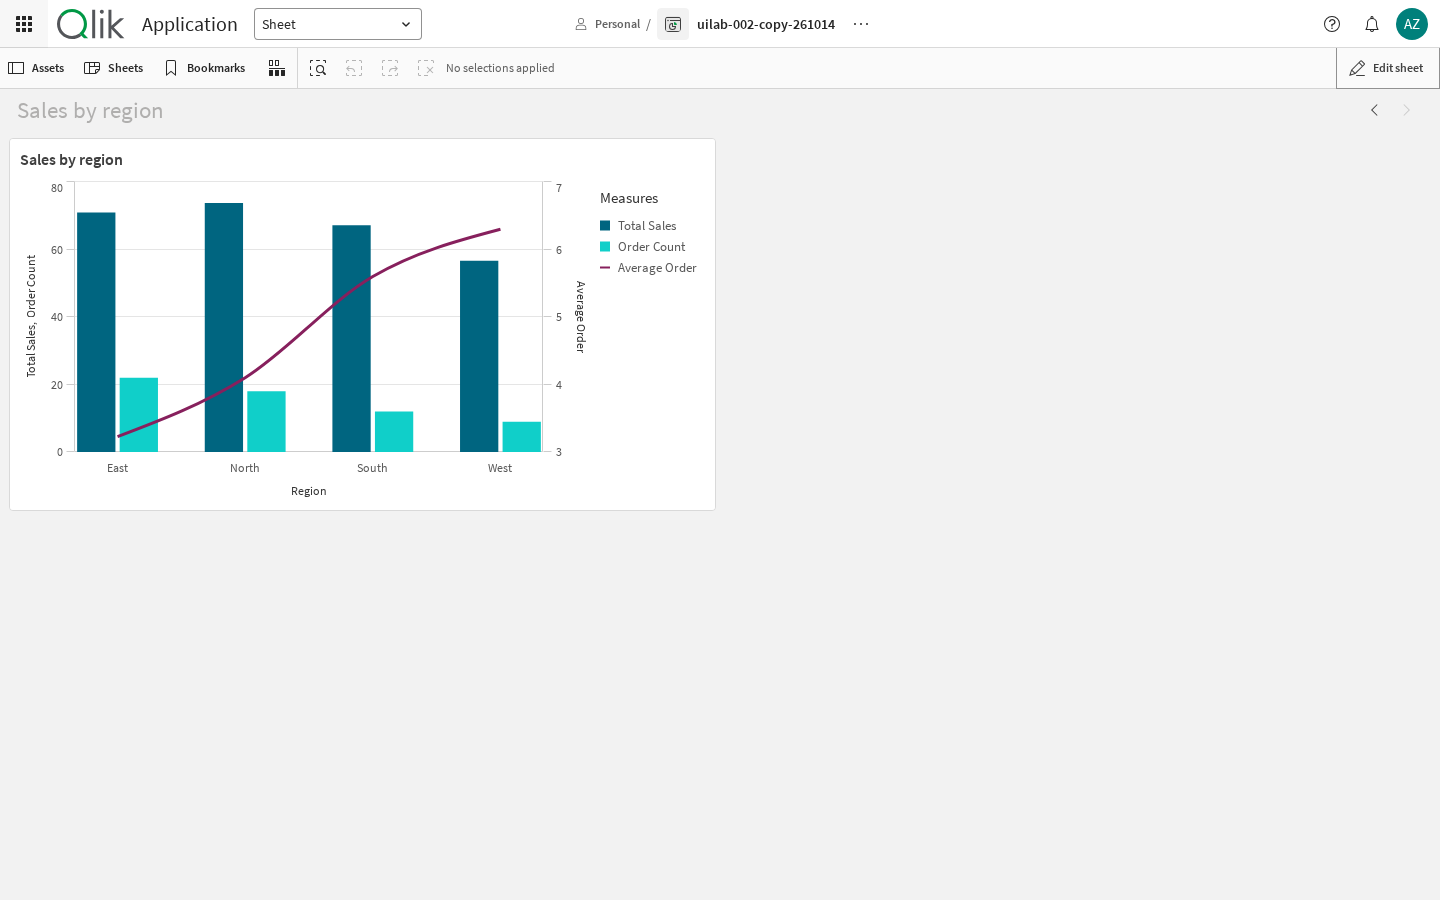
The sheet from the chat, open in Qlik Cloud: Total Sales and Order Count as bars and Average Order as a line on its own axis, by Region
Two licence levels
There are two licence levels.
QOps licence. Covers every tool except the analytic ones. The assistant can read how an app is built, create and change sheets, charts and master items, and run QOps, but data values are left out of what it sees.
Analytic level (MCP-QOps licence). Includes all of QOps and adds the analytic tools, which let the assistant calculate from the data in an app: field values, calculated expressions and selections.
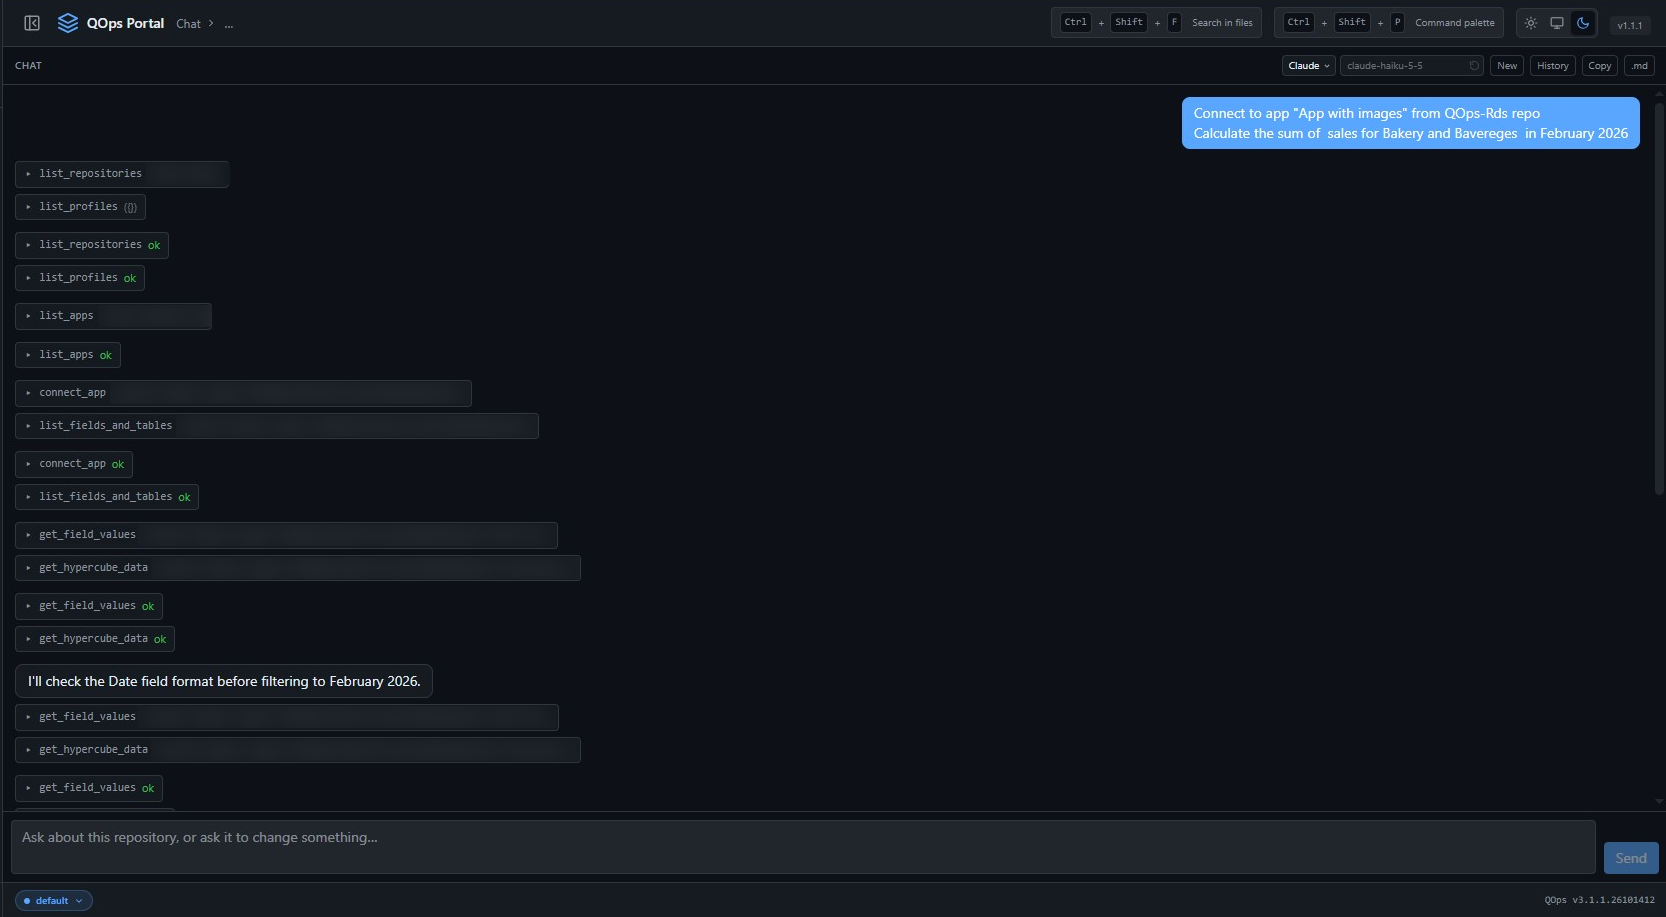
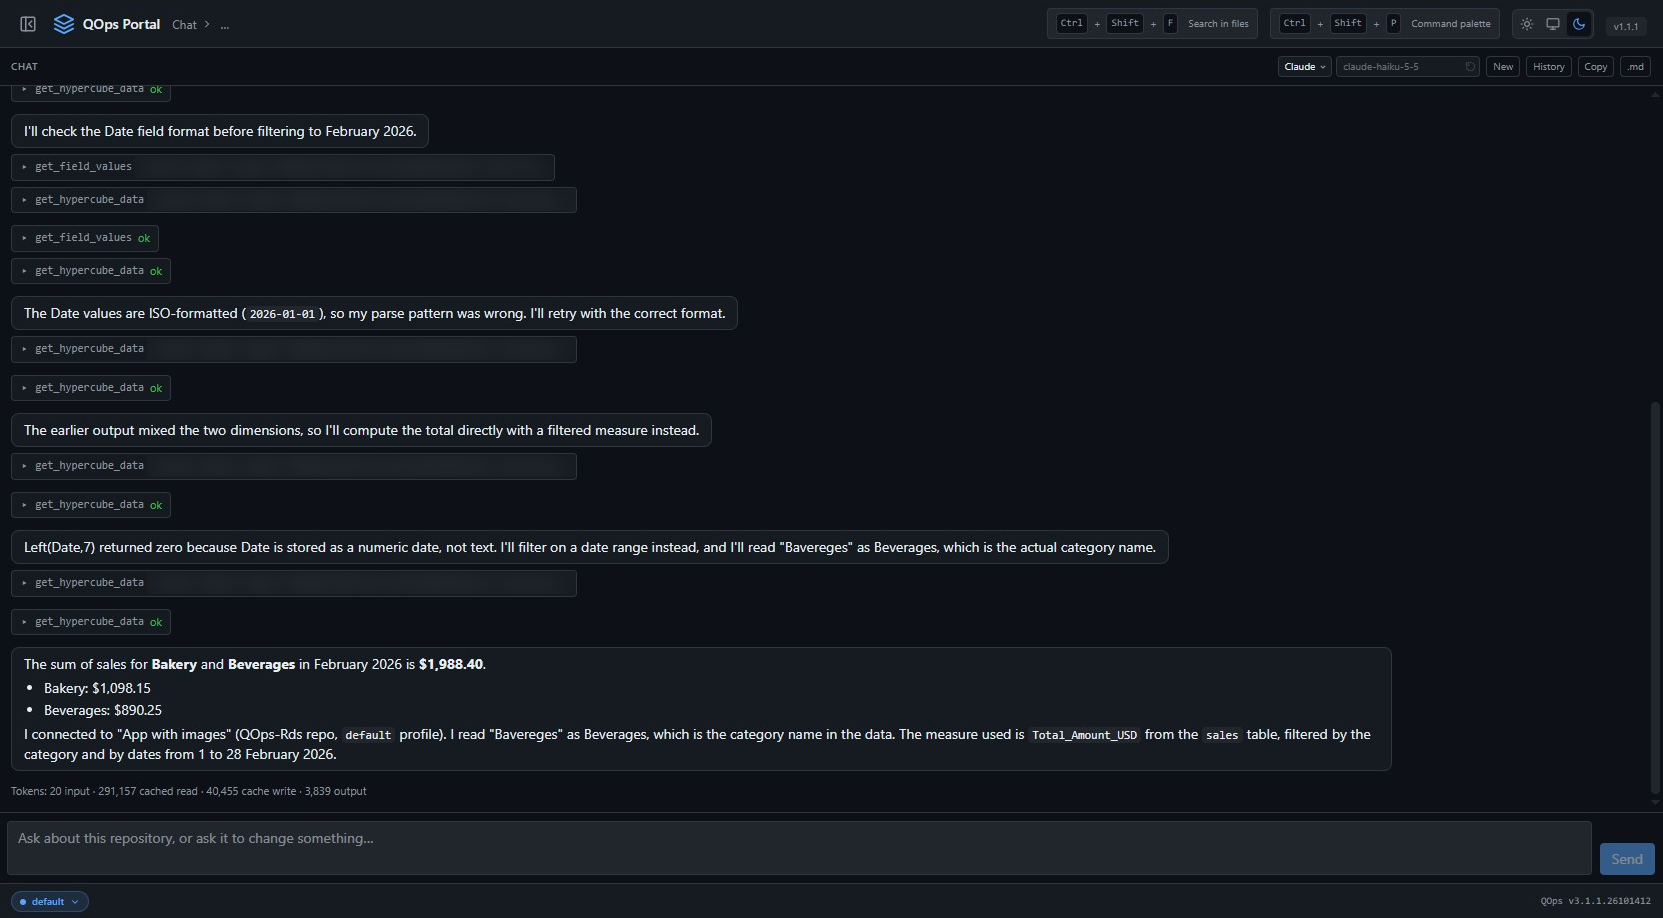
For example, with the Analytic level you can ask "Connect to App with images from the QOps-Rds repo and calculate the sum of sales for Bakery and Beverages in February 2026". The assistant looks up the fields, checks how dates are stored, filters by category and date range and returns the totals.
The chat working out a calculation on app data: each tool step is listed as it runsThe answer: sales for Bakery and Beverages in February 2026, with the measure, table and date range it used
Settings, Global, License shows your level.
Settings, Global, License: the licence key is masked and the tier reads Analytic (MCP-QOps)
Safety you control
You can ask the assistant for each of these in plain words.
Read-only. Connect to an app read-only and every tool that would change it is refused.
Checked writes. After each write the assistant reads the result back. It reports a broken expression, a chart that cannot draw, or a change that was not stored as sent.
One save for several changes. Keep changes in the open session and save once at the end.
Deleting an app needs the app's Id repeated as confirmation, and cannot be undone.
Announced: 1 August 2026. End of support: 1 February 2027.
QOps 2.x is being retired so development stays focused on the current 3.x line. QOps 3.x is a superset of 2.x: it keeps dual-target support (Windows PowerShell 5.1 and PowerShell 7, on Windows, Linux, and macOS), adds Qlik Cloud support and the QOps Portal, and receives all ongoing fixes and features.
We are giving six months of notice, on this schedule:
1 August 2026: this notice is published and the 2.x update channel is marked deprecated. QOps 2.x keeps working and remains downloadable throughout the heads-up period.
1 February 2027: end of support. The 2.x update channel closes. No further 2.x builds, updates, or downloads will be published. Existing 2.x installations keep running but become unsupported and no longer receive updates.
What you need to do
Upgrade to QOps 3.x (current: v3.0.10, tagged 2026-07-28) by running QOps-Update -Force, which moves a 2.x installation onto the current 3.x stable channel — now shipping QOps Portal 1.0.0. Alternatively, download and install the latest 3.x release directly from the installation guide. If you are already on 3.x, no action is needed.
Not sure which version you are on? Run QOps-Version.
Who is affected
Only installations still running QOps 2.x. Enterprise customers still on 2.x are also contacted directly.
QOps 3.0.4 is a maintenance release that upgrades the runtime to .NET 8.0, adds hot-reload updates, and reduces log noise across all cmdlets — while maintaining full backwards compatibility with Windows PowerShell 5.1.
Breaking Changes
QOps-Update -Force behavior changed. The -Force parameter no longer kills PowerShell processes. Instead, it performs a hot-reload — downloading the update to a versioned subdirectory and prompting for a session restart. If your automation scripts relied on the old process-kill behavior, add explicit session restart logic after the update.
Default log verbosity reduced. All cmdlets now produce concise output summaries by default (HTTP response bodies truncated to 500 chars, no per-file "Reading" messages). To restore the previous full output, add the -VerboseLog parameter to any cmdlet.
.NET 8.0 Support
QOps now targets .NET 8.0 for PowerShell 7+ users, bringing improved performance and long-term support. Full backwards compatibility with Windows PowerShell 5.1 is maintained via netstandard2.0 — both platforms ship in a single module.
Hot-Reload Updates
No more restarting PowerShell after updating QOps. The new QOps-Update -Force performs an in-session hot-reload — the updated module is downloaded to a versioned subdirectory and loaded without interrupting your workflow. A new -NoAutoUpdate switch disables the daily automatic update check, useful for CI/CD pipelines or air-gapped environments.
Platform Mode Override
A new -Mode parameter (QlikSense, QlikSaaS, QlikView) has been added to 11 cmdlets: QOps-Build, QOps-Pull, QOps-Push, QOps-Commit, QOps-Release, QOps-Publish, QOps-Reload, QOps-Prepare, QOps-Apps, QOps-Version, and QOps-Configure. This allows explicit platform override instead of relying on config auto-detection.
VerboseLog Parameter
All QOps cmdlets now inherit a -VerboseLog switch from the base class. By default, logs are summarized — HTTP response bodies truncated to 500 characters, PropertiesJson shows length only, no per-file "Reading" messages. With -VerboseLog, you get the full verbose output. This prevents log files from bloating to 150+ MB during large reload operations.
Improved License Diagnostics
License activation errors (QOps-Activate) now display the specific InvalidReason from the server instead of generic messages. Additionally, license validation now performs silent auto-refresh — when a locally expired license is detected, QOps checks with the LicenseSpot server before failing, without risking quarantine.
Per-Profile Self-Signed Certificate Trust
You can now configure TrustSelfSignedCerts individually per authentication profile. This is useful when connecting to multiple Qlik environments with different certificate configurations.
Enhanced Credential Security (Non-Windows)
On Linux and macOS, credentials are now encrypted using machine-derived AES-256 keys via PBKDF2, with automatic migration from DPAPI format. This ensures credentials are tied to the specific machine and user account.
At QOps, we’ve spent years helping Qlik teams adopt the workflows modern engineers rely on — version control, CI/CD, automation, and true collaboration through Git.
Today we’re thrilled to announce two milestones that make those workflows even easier:
Native integration with GitHub Codespaces — available to all QOps clients.
A new Community Edition License — a free, Codespacesonly way for anyone to start using QOps in minutes.
So we asked ourselves:
What if working with GitHub didn’t require any local setup at all?
Native Integration with GitHub Codespaces (All Tiers)
Launching a fully configured QOps environment now takes just some clicks. Open any repository, drop there Codespace settings file, start a Codespace, and you’re ready to develop, test, and deploy Qlik apps - no local installs required.
What your team gets
Preinstalled QOps tools
Git already configured for commit, branch, and PR workflows
Builtin CI/CD via GitHub Actions
Seamless connectivity to Qlik Sense SaaS and ClientManaged*
Whether you’re onboarding a new hire or spinning up a quick hotfix branch, Codespaces removes the “worksonmymachine” hurdle and keeps every contributor in a consistent, cloudhosted workspace.
*Connection to Client-Managed environment can require adding VPN or other connection adjustments
Community Edition License (Free · Codespaces‑Only)
Modern DevOps shouldn’t be gated behind complex setup. The Community Edition lets individual developers and consultantsexperience Gitbased Qlik workflows - 100% in the browser and 100% free.
Community Edition highlights
Runs exclusively in GitHub Codespaces - no local configuration
Includes all core QOps functionality: version control, GitHub Actions and pipelines
Connects to both Qlik Sense SaaS and ClientManaged*
Perfect for learning, prototyping, or piloting Git workflows before upgrading to a paid tier
Note: Community Edition is limited to Codespaces usage and does not include onpremise runners or selfhosted deployments. Upgrade anytime to unlock the full QOps feature set.
*Connection to Client-Managed environment can require adding VPN or other connection adjustments
Why This Matters (Even If You Already Use QOps)
QOps already enables full Git-based workflows:
Track every Qlik app change in Git
Collaborate with pull requests and branching
Automate deployments across environments
Maintain consistency and auditability
What Codespaces adds is frictionless access.
No need to install QOps locally. No setting up dev environments for each new team member.
Now, anyone - even Git newcomers - can open a browser and start working in minutes.
Community Edition Means Community First
The Community Edition License isn’t just a freemium model. It’s a strategy to open up Git workflows to more Qlik developers- especially those who want to modernize but don’t know where to start.
We believe that the BI space is ready for modern tooling - and that GitHub can be the home for that transformation.
Try It Now - Free for the Community
The Community Edition is available today for early access.
If you're a Qlik developer, tech lead, or part of a consulting team, and you're looking for a way to simplify your setup and work smarter — this is for you.
No local setup. Still learning curve. No cost overheads.
Just you, GitHub, and a better way to build in Qlik.
Git is a distributed file version control and collaboration system that was developed in 2005 by Linus Torvalds. The developer explains its name (git) with a bit of sarcasm: «I am a selfish scoundrel, and therefore I name all projects after myself. First Linux, now git.»
Now Git is the most popular and free tool that is a set of command line utilities. It allows to track the history of software development and work with entire teams from anywhere in the world on one project. Each change is added in the form of commits that allows to track, revert the change if it’s necessary and revert to previous versions.
In addition to being comfortable, flexible, and able to maintain development history, using Git greatly reduces development errors and data loss. Similar SCM version control systems are Mercurial, Subversion, Darks, Bazaar. However, Git has some advantages:
high speed and transparency;
ease of use in non-linear development;
efficiency for projects of any scale, including large systems with 1000 participants;
saving snapshots of repositories that ensures high speed;
the ability to restore the code from a local copy in case the server with the remote repository fails;
the ability to quickly download code from a remote server if the local copy is damaged.
Git main tasks:
saving code and changes history;
saving information about the user who makes changes to the code;
recovery of any code version;
consolidation of different versions, version changes;
preparing code for release.
The use of Git is carried out with the help of special hosting and repositories.
GitHub was created in 2008 and bought out by Microsoft for $7.5 billion in 2018. GitHub is a source code hosting site and a large social network for developers with 20 million users who can view each other's code, help to develop, and leave comments, and 80 million repositories worldwide. Users can create their own repository and publish their work. Free use is possible only for public open-source projects. The platform is written in Ruby on Rails and has a large number of open-source projects available to the public.
GitHub benefits:
free service;
high search speed in the structure of repositories;
a large number of users, which ensures a quick search for help in solving a problem;
availability of practical tools for collaboration and integration with Git;
easy process of integration with other services;
the ability to work on TFS, HG, SVN.
GitLab is an alternative to GitHub and is a web repository that provides free public and private repositories. GitLab was developed by 2 Ukrainians: Dmitry Zaporozhets and Valery Sizov, using Ruby and some parts of Go. The architecture was later enhanced with Go, Vue.js and Ruby on Rails.
GitLab is a complete DevOps platform for project planning, source code management, monitoring, security, and more. It also offers wiki hosting and a bug tracking system. Using GitLab significantly shortens the product life cycle and increases productivity. This, in turn, adds value to the customer.
Gitlab benefits:
ease of setting;
user-friendly interface and tools;
unlimited number of free private storages;
the ability to integrate a large number of APIs and third-party services;
reliability and non-failure operation;
the possibility of self-hosting;
open-source license.
BitBucket is an analogue of GitHub that is designed for hosting projects and their joint development. The service was developed by the Australian company Atlassian, which created Jira and Confluence. It allows to create public and private repositories based on Git technologies for free, has the ability to integrate with Jira and Snyk, and built-in CI/CD capabilities. The service is a great solution for small teams.
BitBucket benefits:
unlimited number of open and private repositories;
support for public and private Git repositories;
possibility of integration with other solutions (Jira, Trello);
the ability to integrate with third-party services (Twitter, Google Analytics);
the possibility of using the service for more than a million teams with 10 million developers around the world.
Jenkins is an open-source system based on Java. It provides automation of software development process parts without involving people and the process of continuous software integration. Jenkins is widely used in companies where there is a need for automatic applications deployment. The system is free, runs on Windows, macOS and other Unix-like operating systems, as well as has integration with Docker and Kubernetes. Jenkins does not contain a repository with source code, but connects to existing ones via web hooks. Thus is a universal tool for CI/CD regardless of the chosen hosting of remote repositories.
Jenkins benefits:
free use;
wide possibilities of integration, large plug-ins library;
large and active community;
distribution of load on different machines;
great option for large projects.
QOps can work effectively with all the above services.
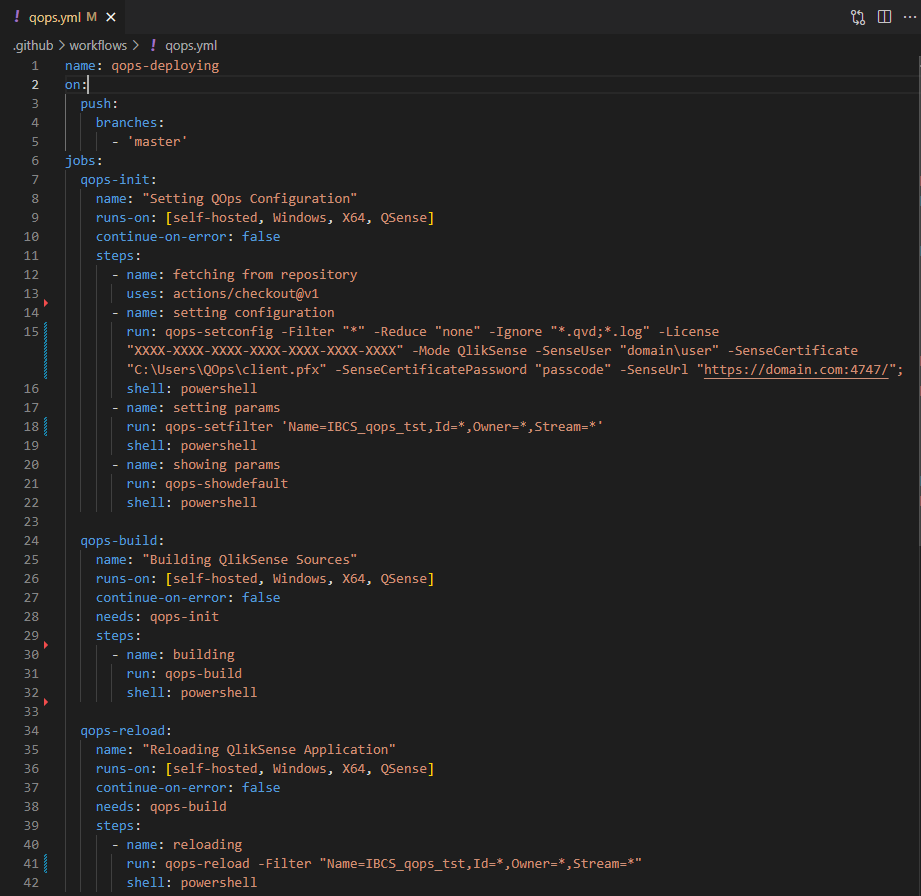
GitHub and GitLab include the ability to install runners that will later execute commands from a .yml file included in the source code repository when a certain event is reached. Usually such an event is sending source codes (push) or merging branches (merge) in a remote repository. At the same time, the syntax for compiling .yml files is slightly different, although it describes the same essence of runner behavior and managing the process of application building, testing and subsequent deployment. Both hosting systems allow to install their runners in a Windows environment that is not yet available for BitBucket hosting.
Below is QOps usage with the above systems. For GitHub, a .yml file is a structured steps set that consists of successive steps. The example below describes 3 steps – init-build-reload.
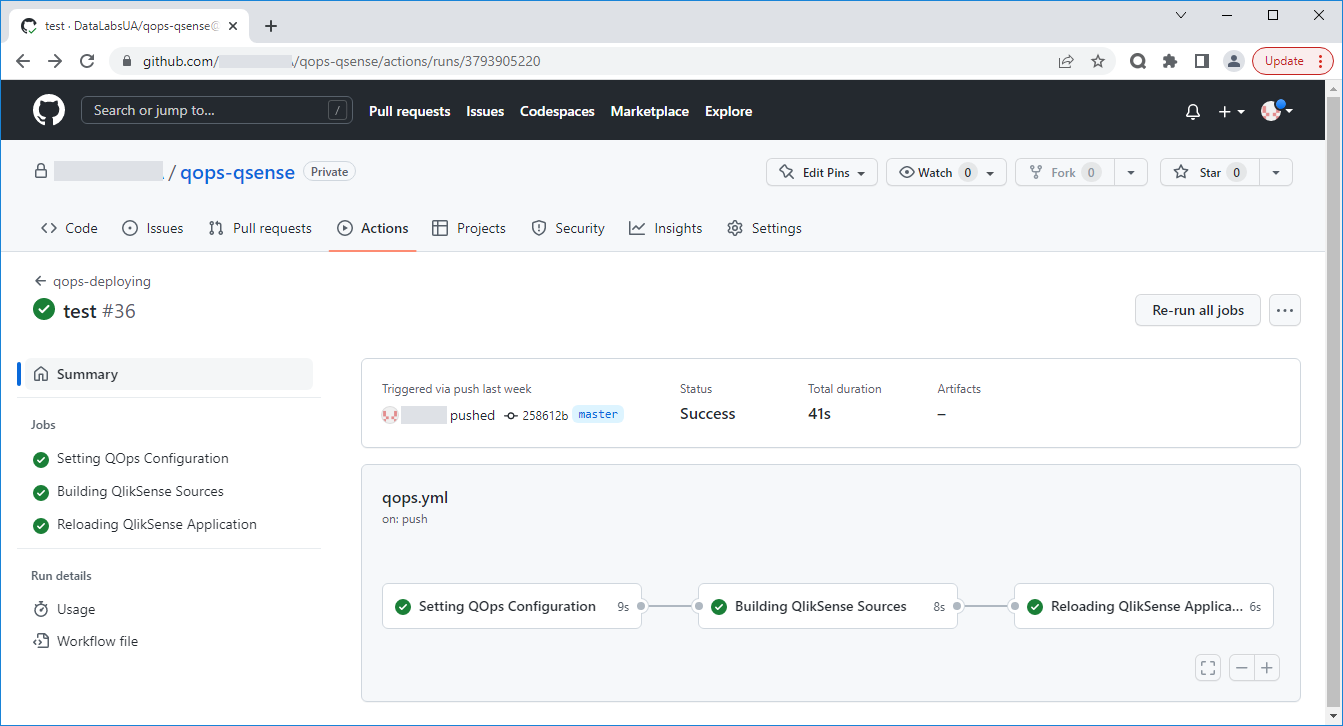
Successfully executes pipeline looks like this.
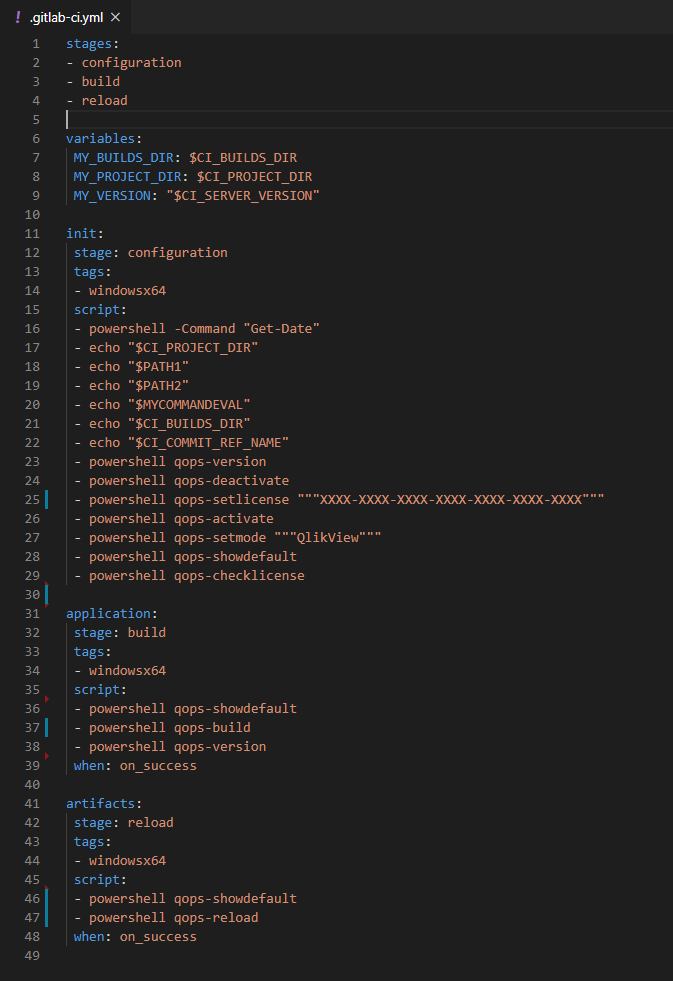
For GitLab, the .yml file is the same structured steps set, the differences are a different name for the keywords and more flexible work with variables. Unfortunately, developers don’t use a unified .yml file format and there is no interoperability between them.
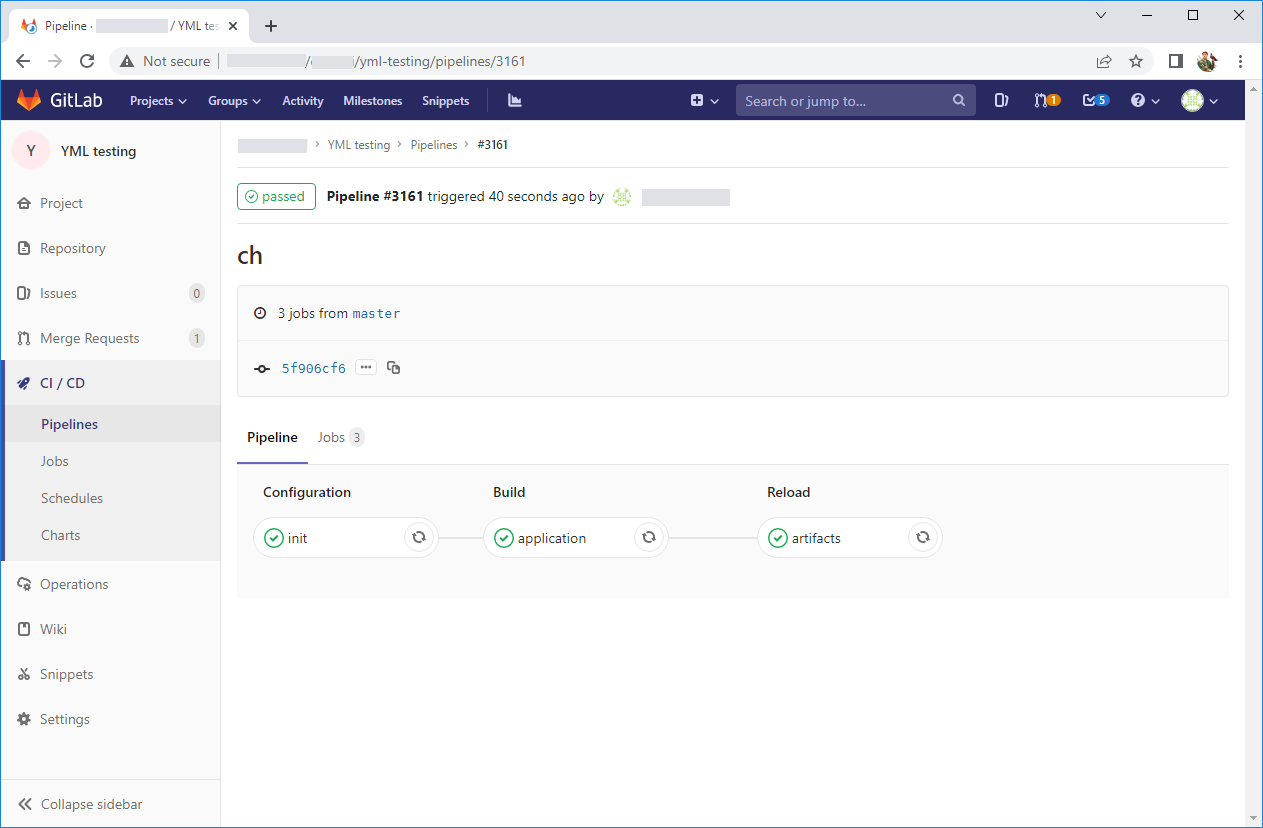
Upon successful completion, a pipeline view consisting of the same stages is presented below. It is worth noting here that GitLab has more developed interactivity. For example, in the pipeline, it’s possible to set up manual confirmation from the user.
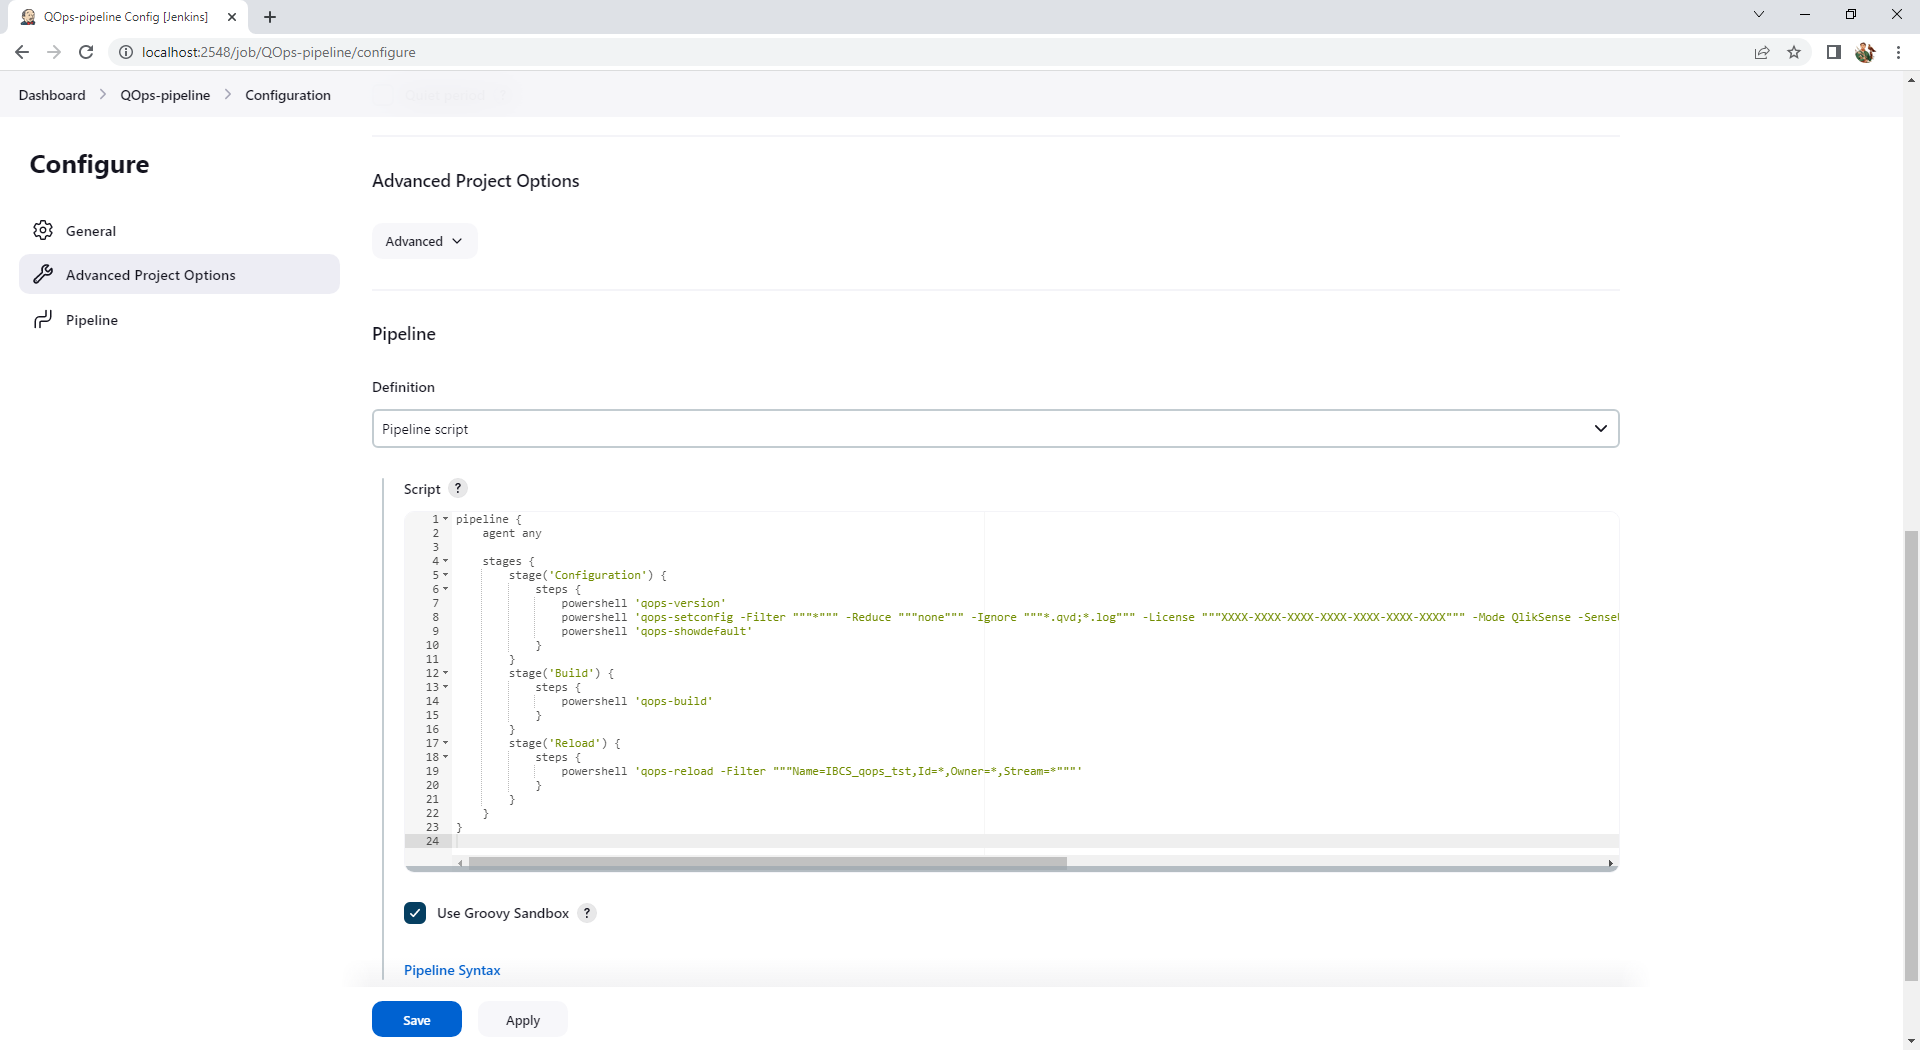
QOps currently works exclusively in the Windows environment. If BitBucket is chosen for source code hosting, the automatic pipeline can be developed using the Windows version of Jenkins. The versatility of the latter and plugins variety allows to link any remote repository through web hooks. The pipeline structure is written as a JSON object, if configured through the interface of Jenkins itself. And for our example it contains all the same 3 stages – Configuration-Build-Reload.
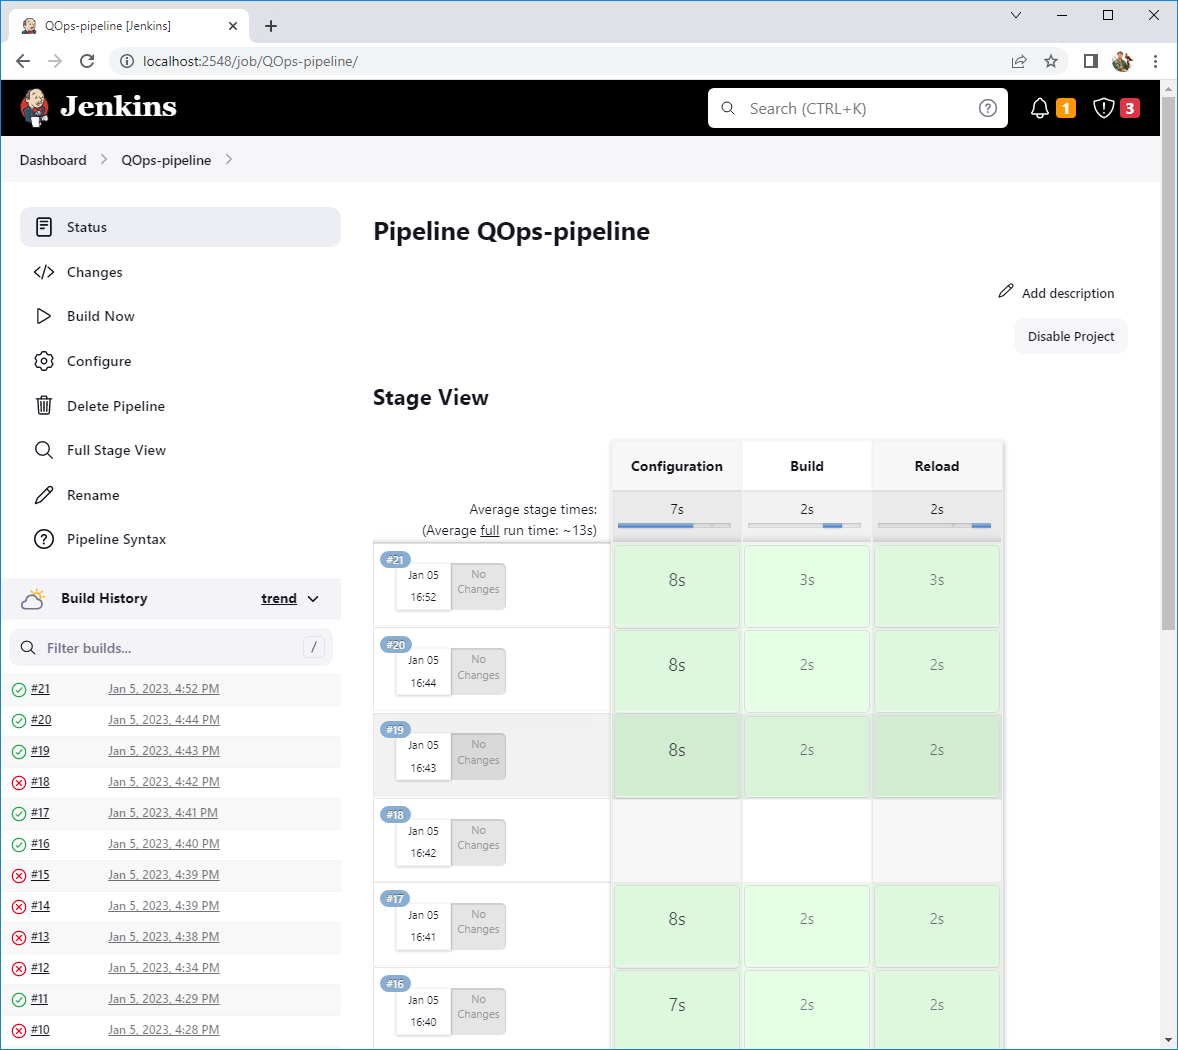
The result of successful pipeline execution in Jenkins is shown below. At the same time, the interface compares the results of previous launches in an interesting way.
Speed and flexibility of software development play an important role. However, with a large development team working at the same time, branching and merging code can get messy. These teams need to be provided with a process to implement changes concurrently. An effective branching strategy is a priority in resolving this issue.
A branching strategy is a set of rules that developers follow when writing, merging, and deploying code when using version control. In situations where multiple developers are working and adding changes at the same time, the branching strategy structures the repository and avoids merge confusion. Merge conflicts hinder rapid code delivery and hinder the creation and maintenance of an effective DevOps process.
Thus, the branching strategy creates a clear process for making changes to the system. This helps to solve this problem and provides the ability for multiple developers to work in parallel and independently to release faster and minimize conflicts.
The branching strategy allows to:
ensure coordination between developers and improve productivity;
parallel development;
implement planned and structured releases;
make changes to the software;
maintain bug-free code and the ability to quickly fix issues and push changes back into production without interrupting workflow.
The branching strategy is an important working tool. Arbitrarily creating branches in Git by different developers can lead to chaos. A branching strategy will allow to redirect attention to the development process itself, rather than version control.
Branches in Git are represented by tags or pointers. All changes are tracked as a directed acyclic graph, each node of which is a set of changes made simultaneously. Git branches provide developers with the ability to deviate from the master branch and create separate branches to isolate code changes. The default branch in Git is «main branch». The main advantage of a Git branch is its «light weight». That is, the data consists of snapshots series, and each time Git commits changes. It takes a snapshot of the current files state and keeps a link to this one. Such branches are not just copies, but also a pointer to the latest commit.
Basic Git branching strategies:
GitFlow is a model that shows the ability to develop in a team and individually. At the same time, only 2 main branches (master and develop) accompany the development life cycle. Other branches are temporary, which ensures a permanent order in the repository;
GitHub Flow is a simpler version. It only has master and feature branches. Consolidating all changes to master and deploying frequently allowed changes to be released immediately, following the principles of production and continuous delivery;
GitLab Flow – offers a dedicated production branch for managing code release to production. It is possible to configure automatic code deployment from this branch with each change in it. The release is provided through a merge from the master branch to production. With the help of this branch, it is possible to obtain data on the released code version. It is possible to determine the approximate release time by the time the merge commit was created;
Trunk-based development – an approach that involves development based on a single trunk branch. The key approach features are temporary branches existence (several days), continuous code review (the process of checking and analyzing the code by the developer before release), master readiness to release at any time. This approach ensures conflicts minimization during development, readiness for release without preparation, fast and high-quality feedback on PR/MR.
An example of a merge conflict and its resolution
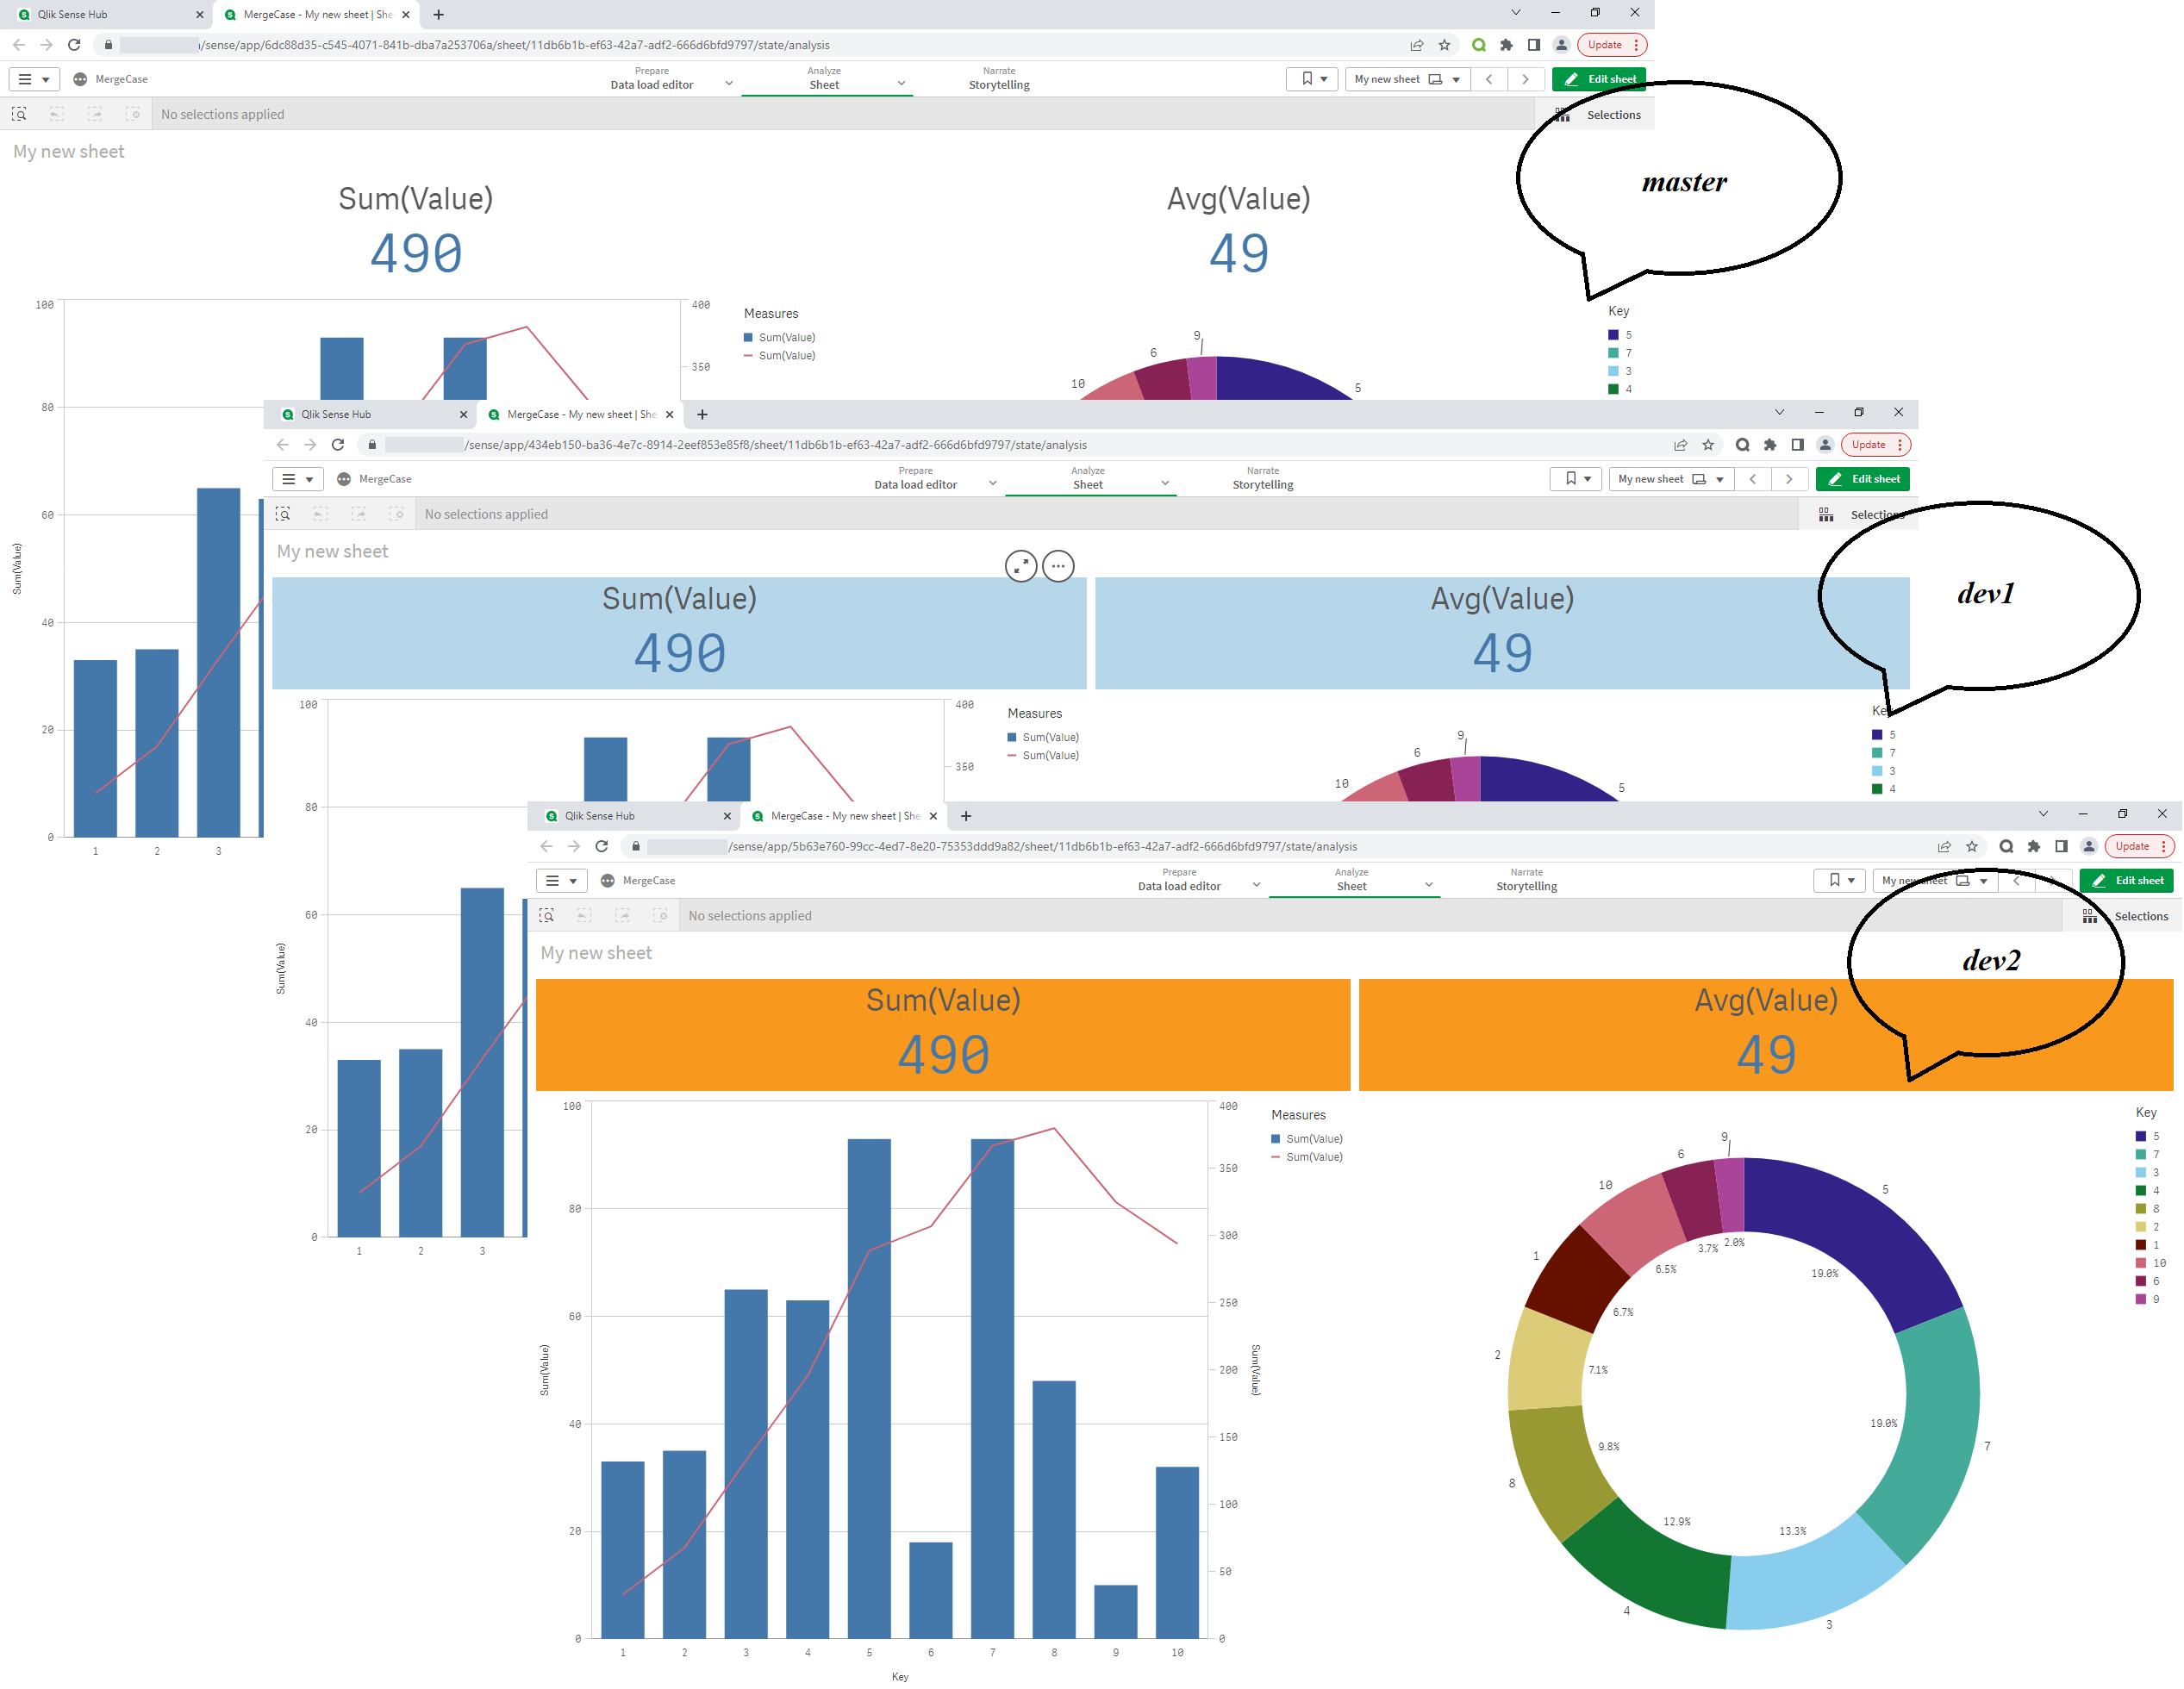
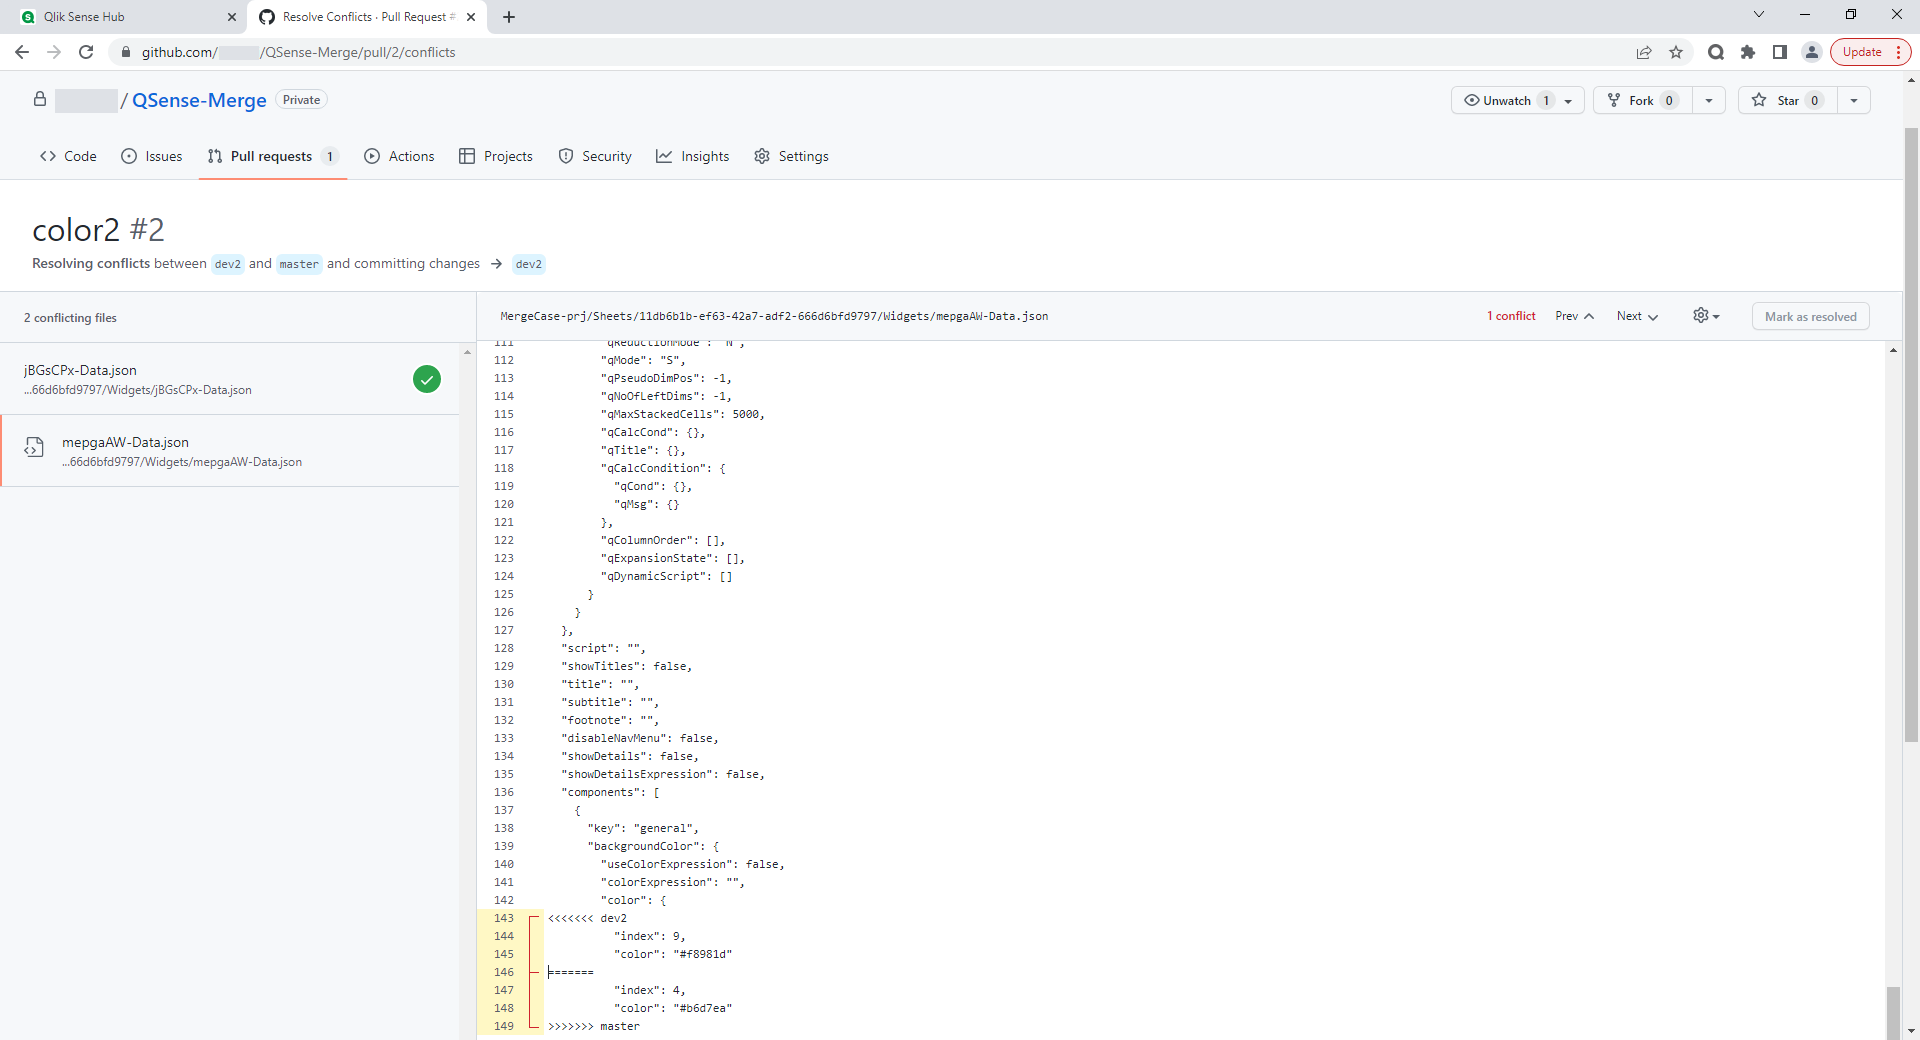
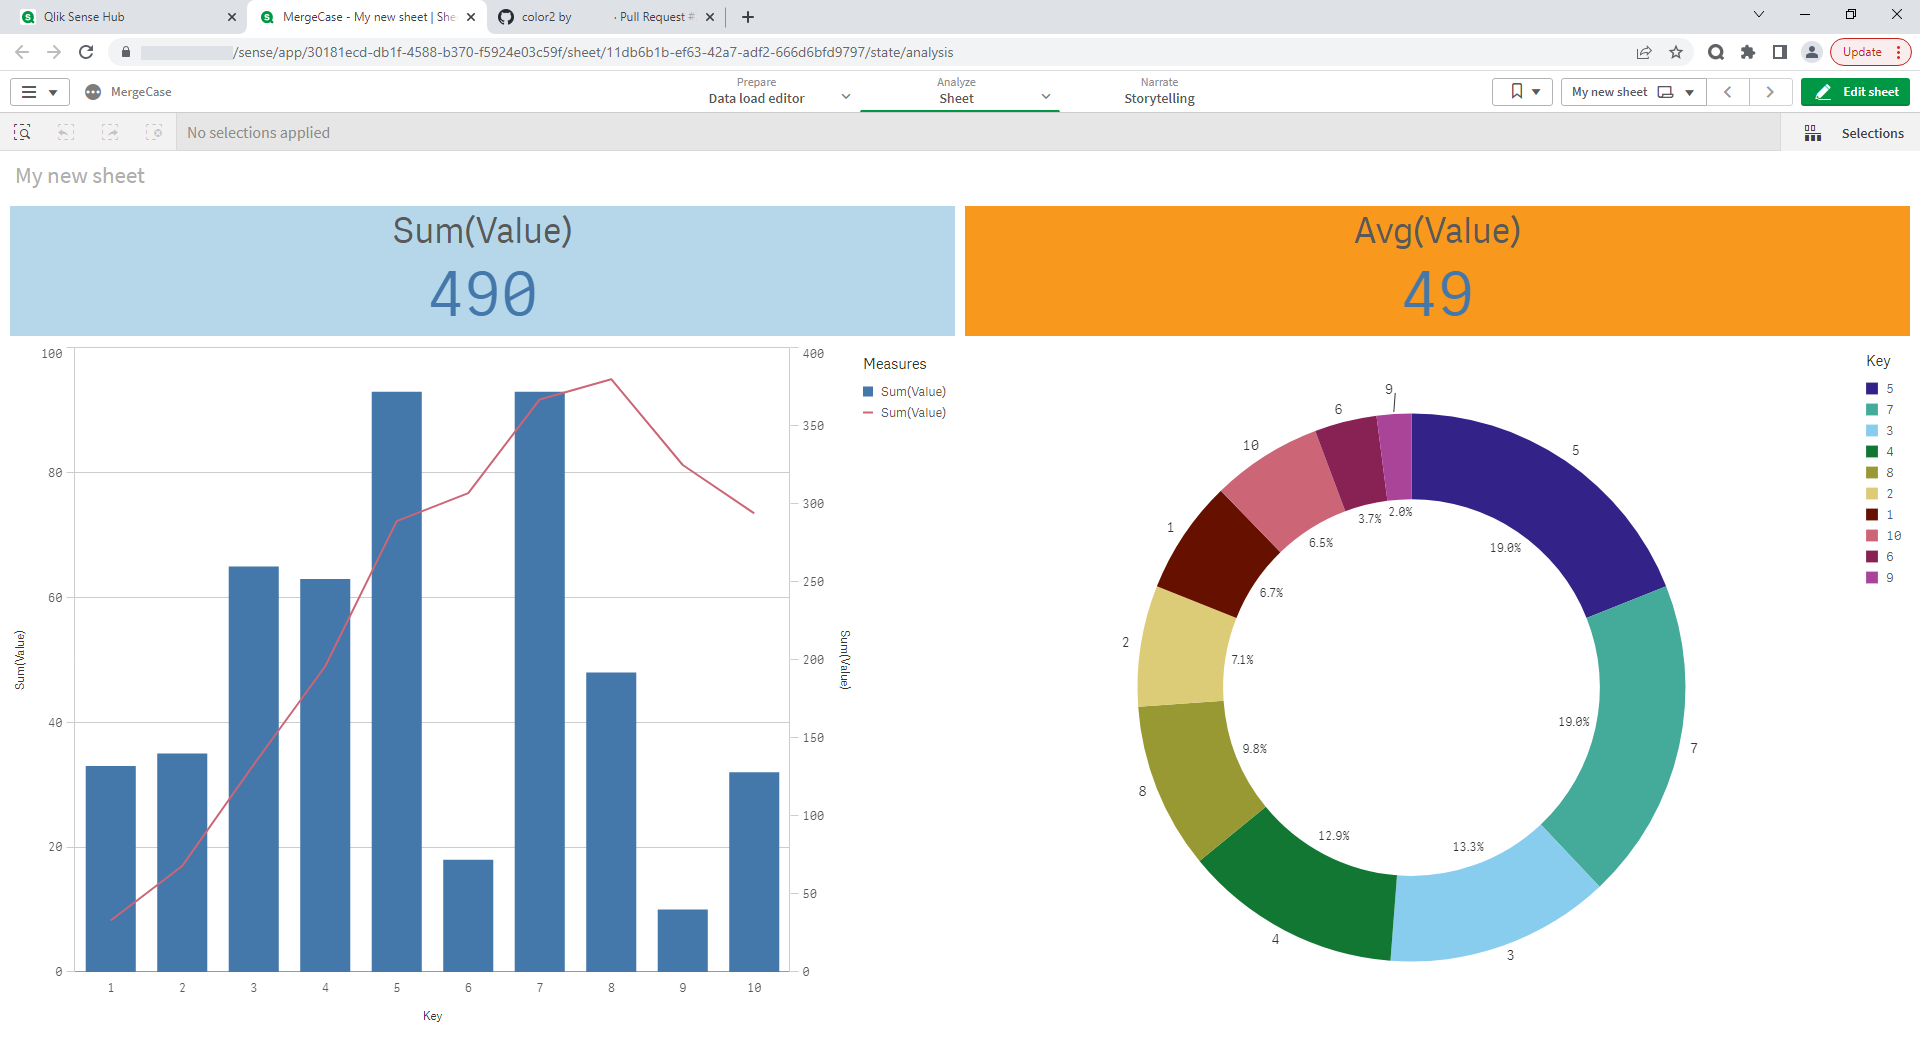
Let's look at an example of a merge conflict and possible ways to resolve it using QOps to control versions of a Qlik Sense application. Let's take a Qlik Sense application and use QOps to create a source code repository and 2 branches dev1 and dev2 for individual developers. Imagine a situation where each of the developers changed some common element (for example, the background objects color with the output of KPI values).
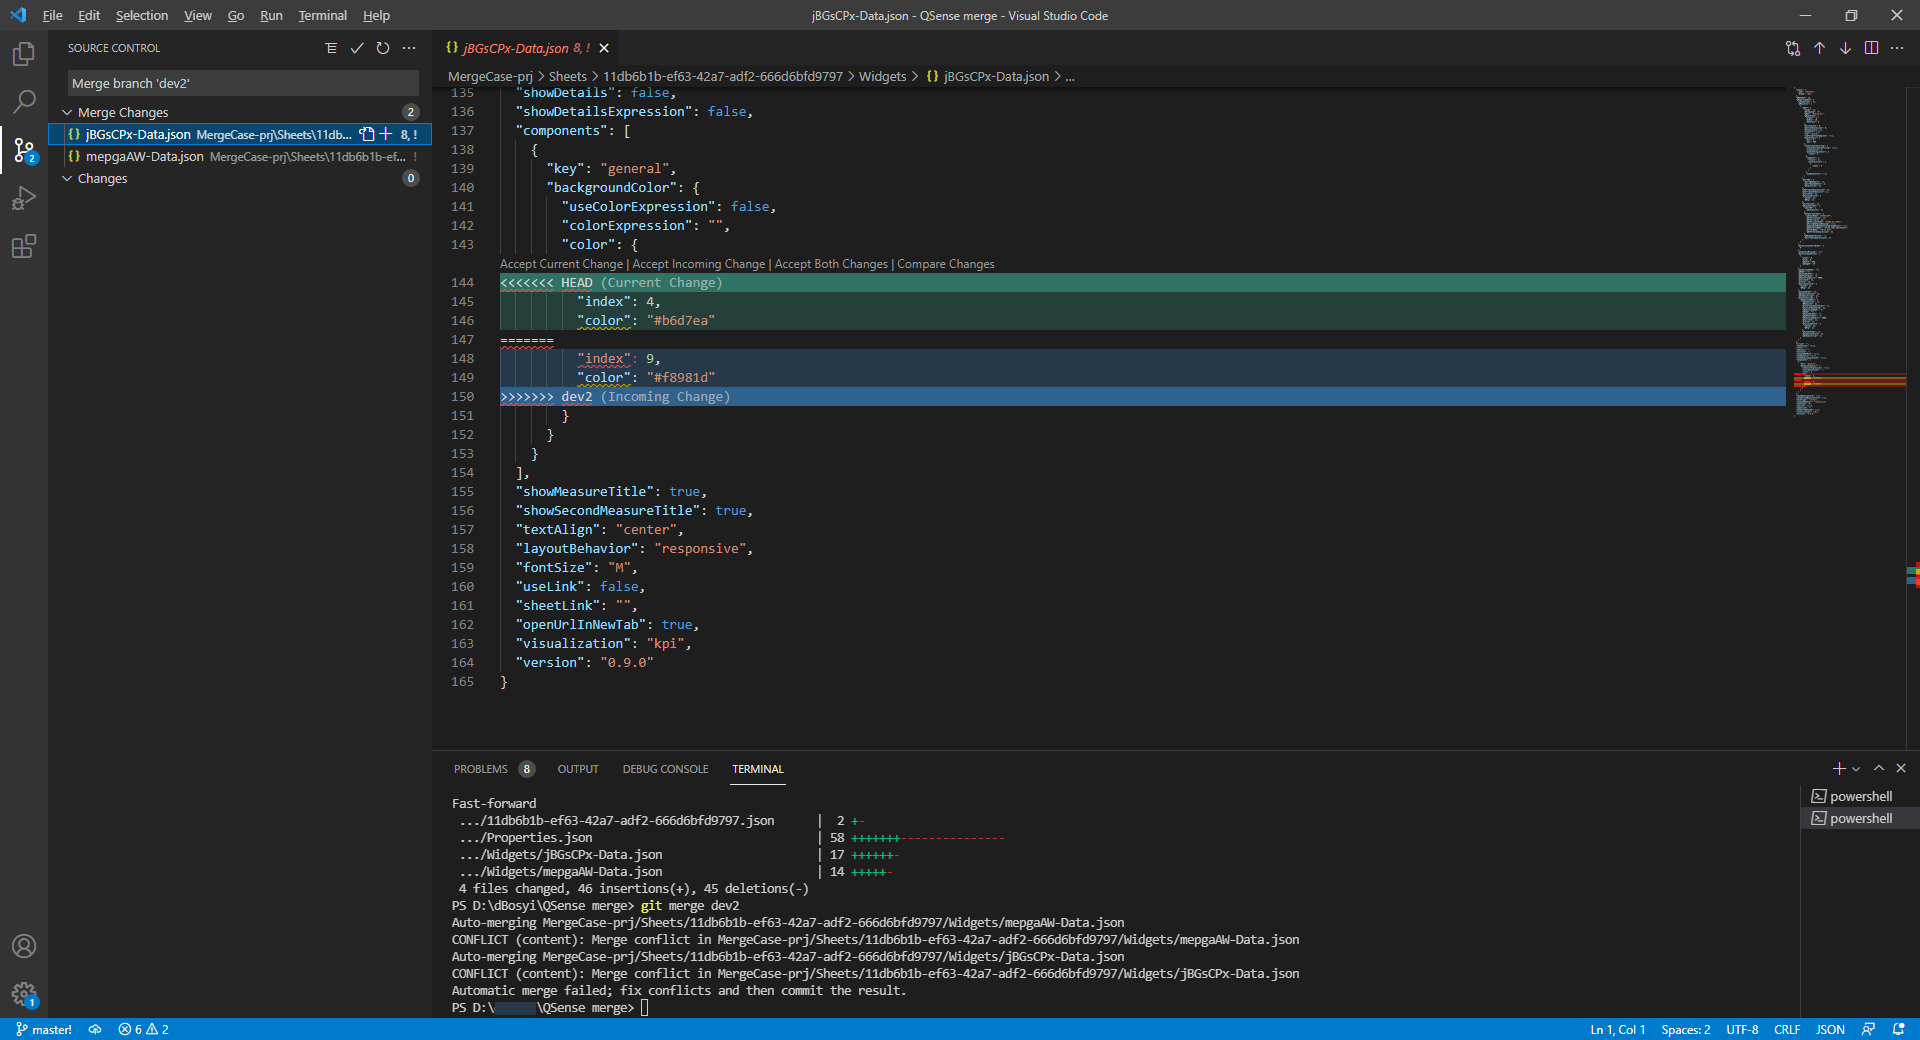
Since the changes occurred on the same lines at the source level, when merging dev1 -> master and dev2 -> master, a merge conflict occurs in the last variant. Resolving a merge conflict requires deciding which of the options should be present in the reduced version. The VSCode development tool allows to interactively make this decision. However, this puts additional responsibility on the IT specialist who will perform the merging.
There is a risk of receiving from both developers code parts for a common element in a final application that may not be compatible. For example, after a merge, it is possible to get the following result when the first object is set to Accept Incoming and the second is set to Accept Current.
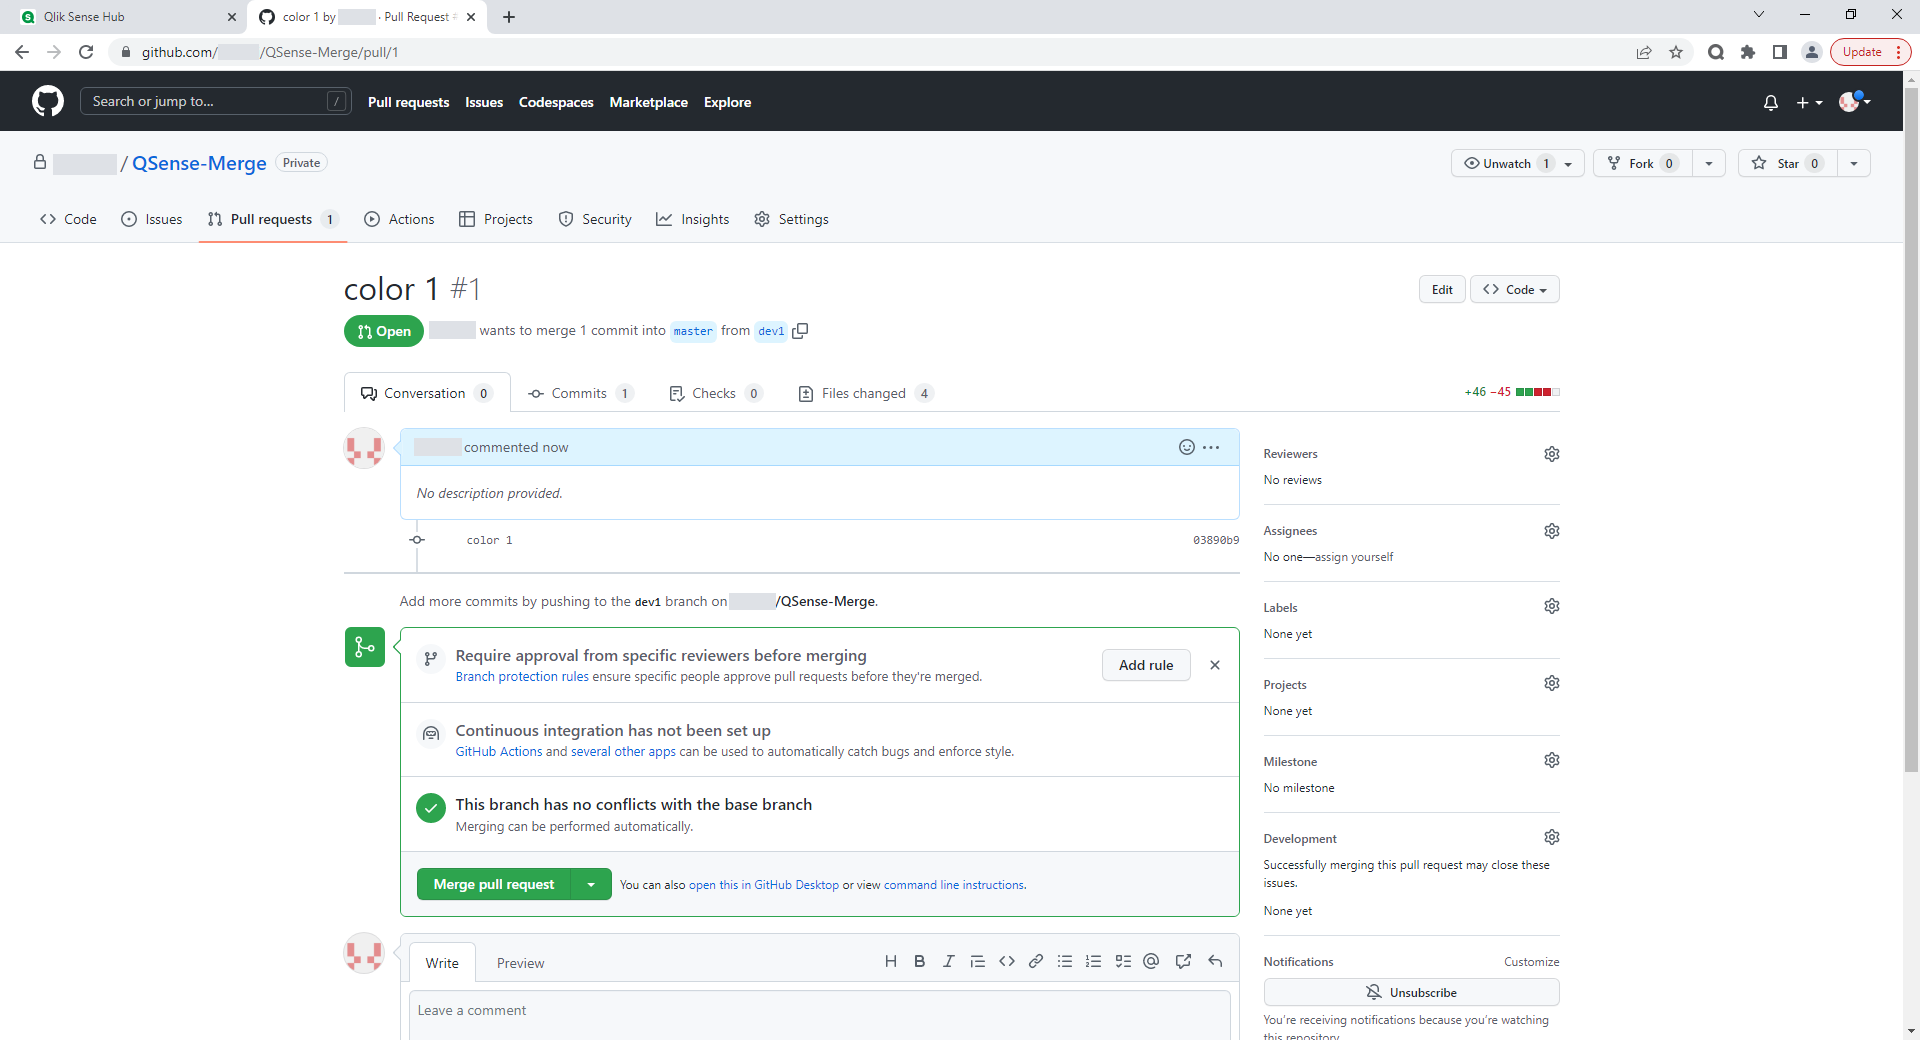
It is convenient to merge source codes using the web interface of version control systems. Below is the progress of a Pull Request on GitHub with a conflict-free merge.
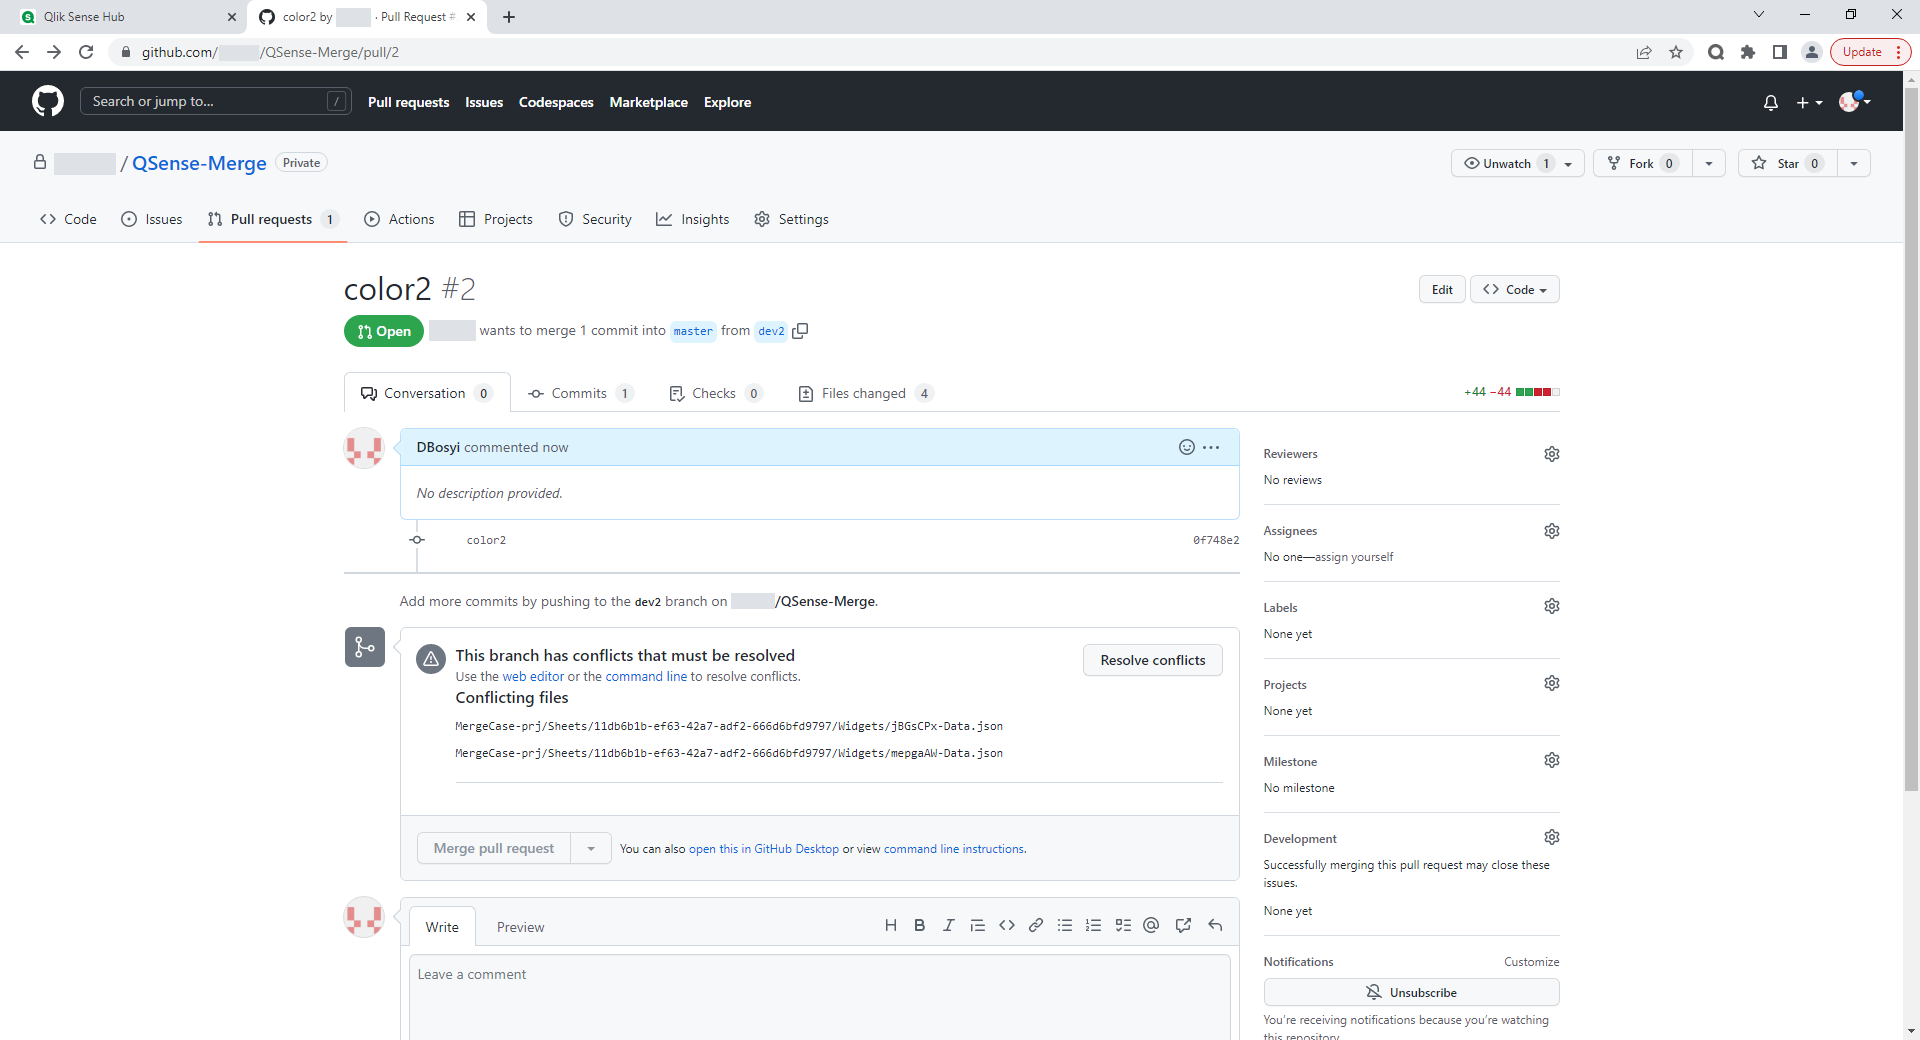
The presence of conflicting changes leads to the output of the corresponding warning and additional information.
GitHub interface allows to resolve merge conflicts in small files, while the user needs to manually edit the source code marked as conflicting and confirm the changes. If this operation can’t be performed through the web interface, GitHub will ask to resolve conflicts locally.
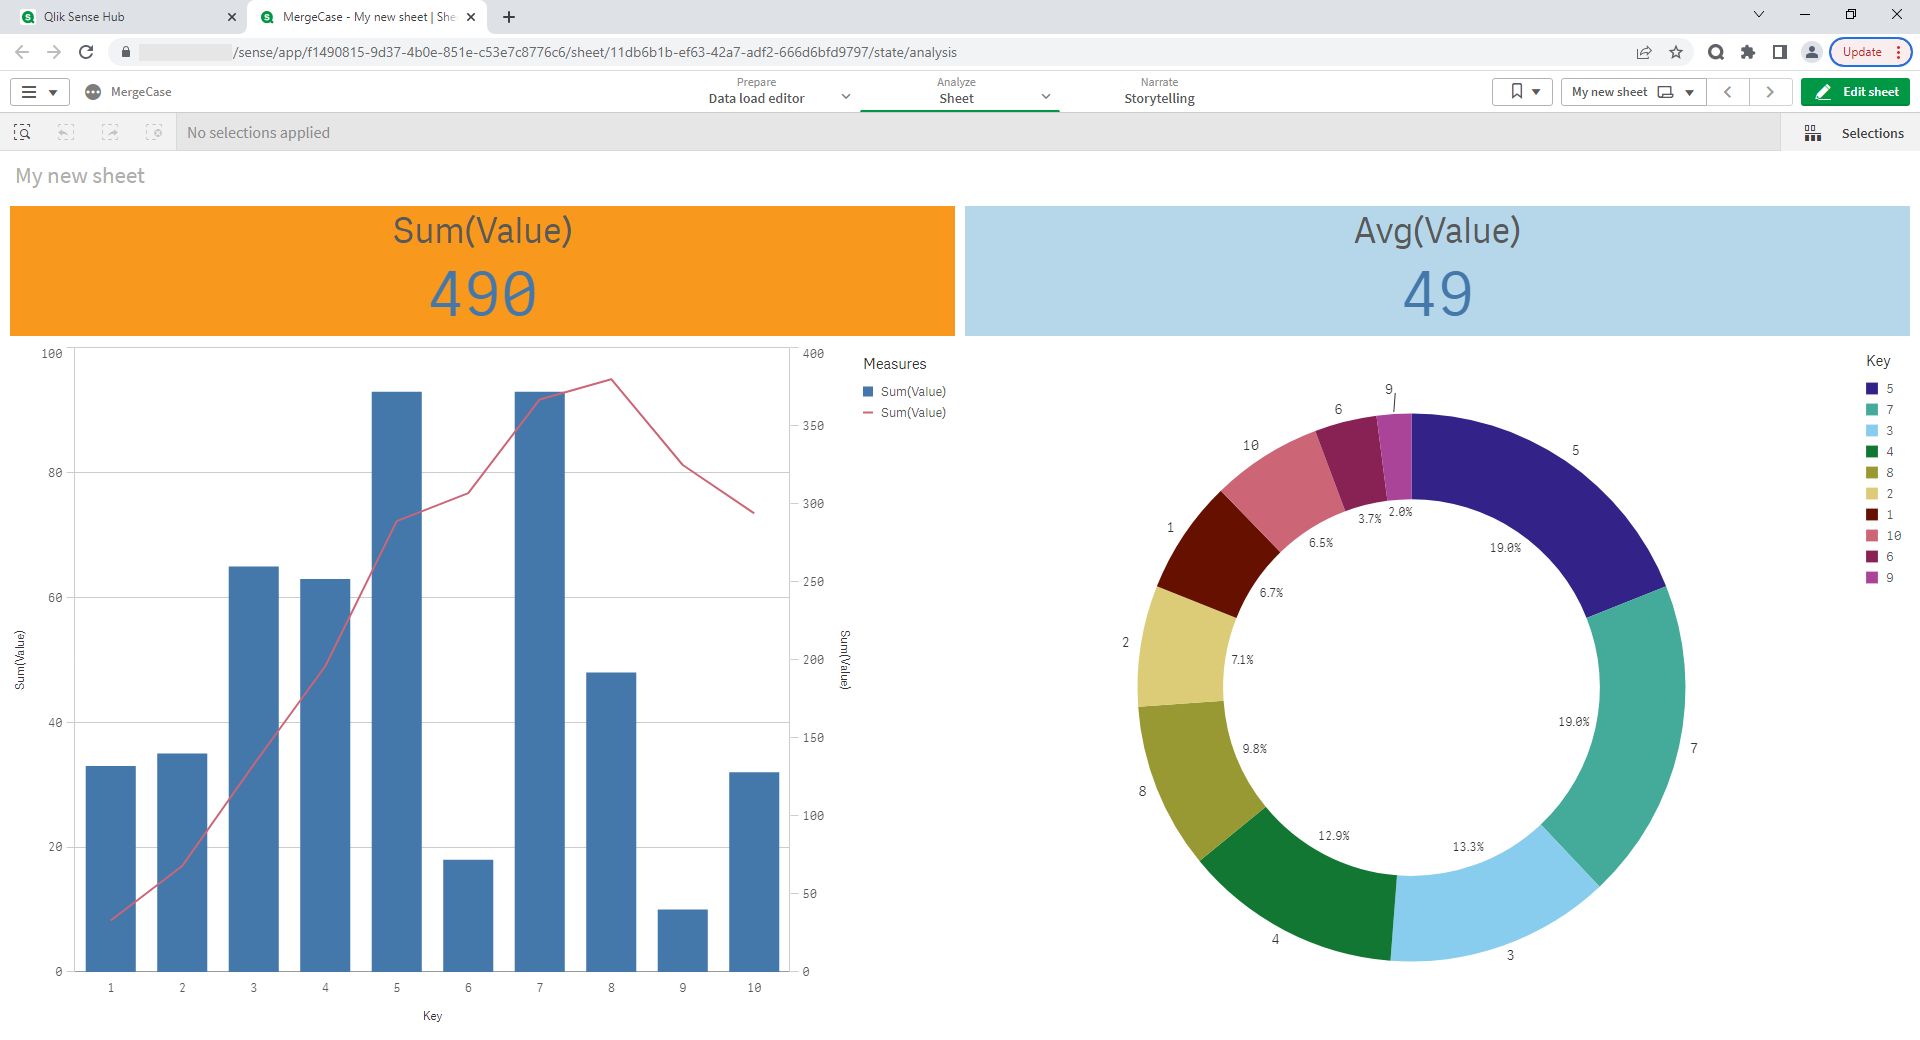
Also, let's resolve the existing conflict in the opposite way. As a result, we get the expected result with the opposite coloring of common elements.
Continuous integration (CI – Continuous Integration) and continuous delivery (CD – Continuous Delivery) are one of the typical DevOps practices that allow developers to deploy software changes reliably and quickly. The key difference from manual development lies precisely in the automation of testing and code assembly.
For a long time, due to tools lack in the Qlik ecosystem for fully extracting application source code and its corresponding automatic assembly from source codes, the practice of CI / CD approach implementation was not available for developing and effectively managing projects based on Qlik technologies.
For Qlik developers QOps utility provides opportunities that were previously available to all other developers using a git repository for storing source codes and configured runners for automated tests and deployment.
Let's take a look at the main aspects of the concept of CI / CD as a DevOps practice
Continuous Integration. Developer regularly makes changes in the applications development process. And these changes are uploaded to the repository. Automated testing and verification are provided through special tools such as events, that initiate the integration as a process consisting of stages and steps set. The execution of each step is accompanied by logging, that reflects all changes.
Continuous delivery automates deployment in any environment (production, test environment, development environment). Automated testing and deployment process provide developer with opportunity to focus on improving the software.
The advantage of CI/CD is to reduce the time spent on developing a software product, minimizing and identifying errors and defects in the early stages of code creation, reducing the time to correct errors, and reducing feedback cycles.
For example, there is a site that displays sales analytics for a certain company. The architecture of this solution includes a backend (can be represented by a database with a specific ETL process for data processing) and a frontend (in the case of using Qlik technology, the frontend is provided by an installed web server). During development and updates, individual developers make changes to one or both parts. Then changes are merged into the repository at the source code level, go through the entire pipeline and, ultimately, the changes are reflected immediately in the entire product.
CI/CD cycle stages:
Creation (writing a certain part of the code and subsequent testing; after successful testing, code parts are combined into one whole and transferred to the working development branch);
Assembly (version control implementation using Git, automatic assembly taking into account changes and received code testing);
Testing (code verification implementation by a team of testers);
Release (code transfer to release, creation of a working build to update the current version of the product);
Deployment (broadcasting the update on the developers' servers to update the software to the latest version);
Support (monitoring user reviews);
Planning (creating a list of changes for future versions).
Using QOps in the Development Life Cycle of a Qlik Application
Automation of integration and deployment processes is performed by the installed GitHub/GitLab runner, that is integrated with a repository. Bitbucket automation tools can also integrate with the Jira tracking system. It simplifies the task management process, makes it possible to see in which repository branch the desired update is located and follow its further progress. To receive commands from a runner, QOps must be installed on the same server as the runner. This makes it possible to include QOps teams in the integration and deployment pipeline of Qlik applications.
Benefits of using QOps
no need to manually transfer code from one development environment to another;
possibility of dividing the project into more tasks that can be performed in parallel;
absence of routine operations in the deployment process, that helps to save time.
An example of using QOps in the integration and deployment pipeline of a complex Qlik application
The following pipeline is integrated to automate the processes of supporting and updating complex Qlik application of one of company's clients using GitHub Actions.
Qlik application has a 4-layer structure (transformers – model – dashboard – extractors) and is made in QlikView architecture.
The pipeline is built in such a way that the stages of its execution are determined by the name of Git repository branch. All changes are tracked there.
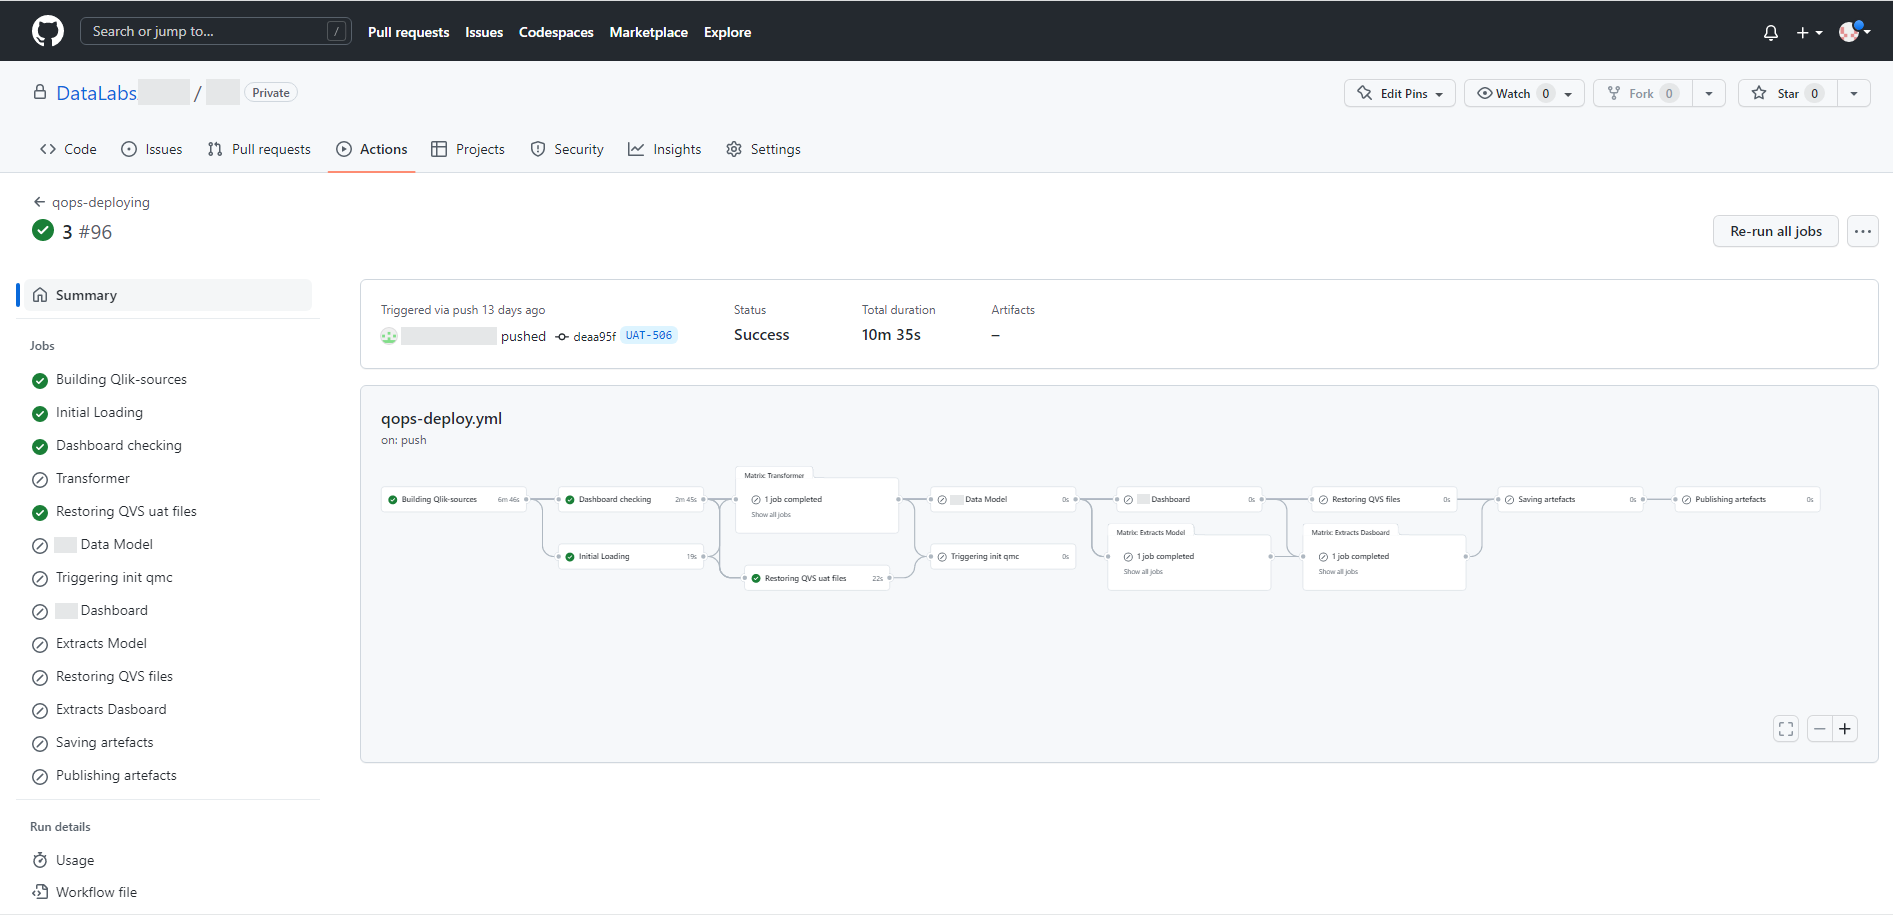
Below are the active steps that will be executed if a branch named UAT-* is used. The task of this approach is to prepare the necessary files in a separate folder for the trial deployment of a new task when creating a new branch.
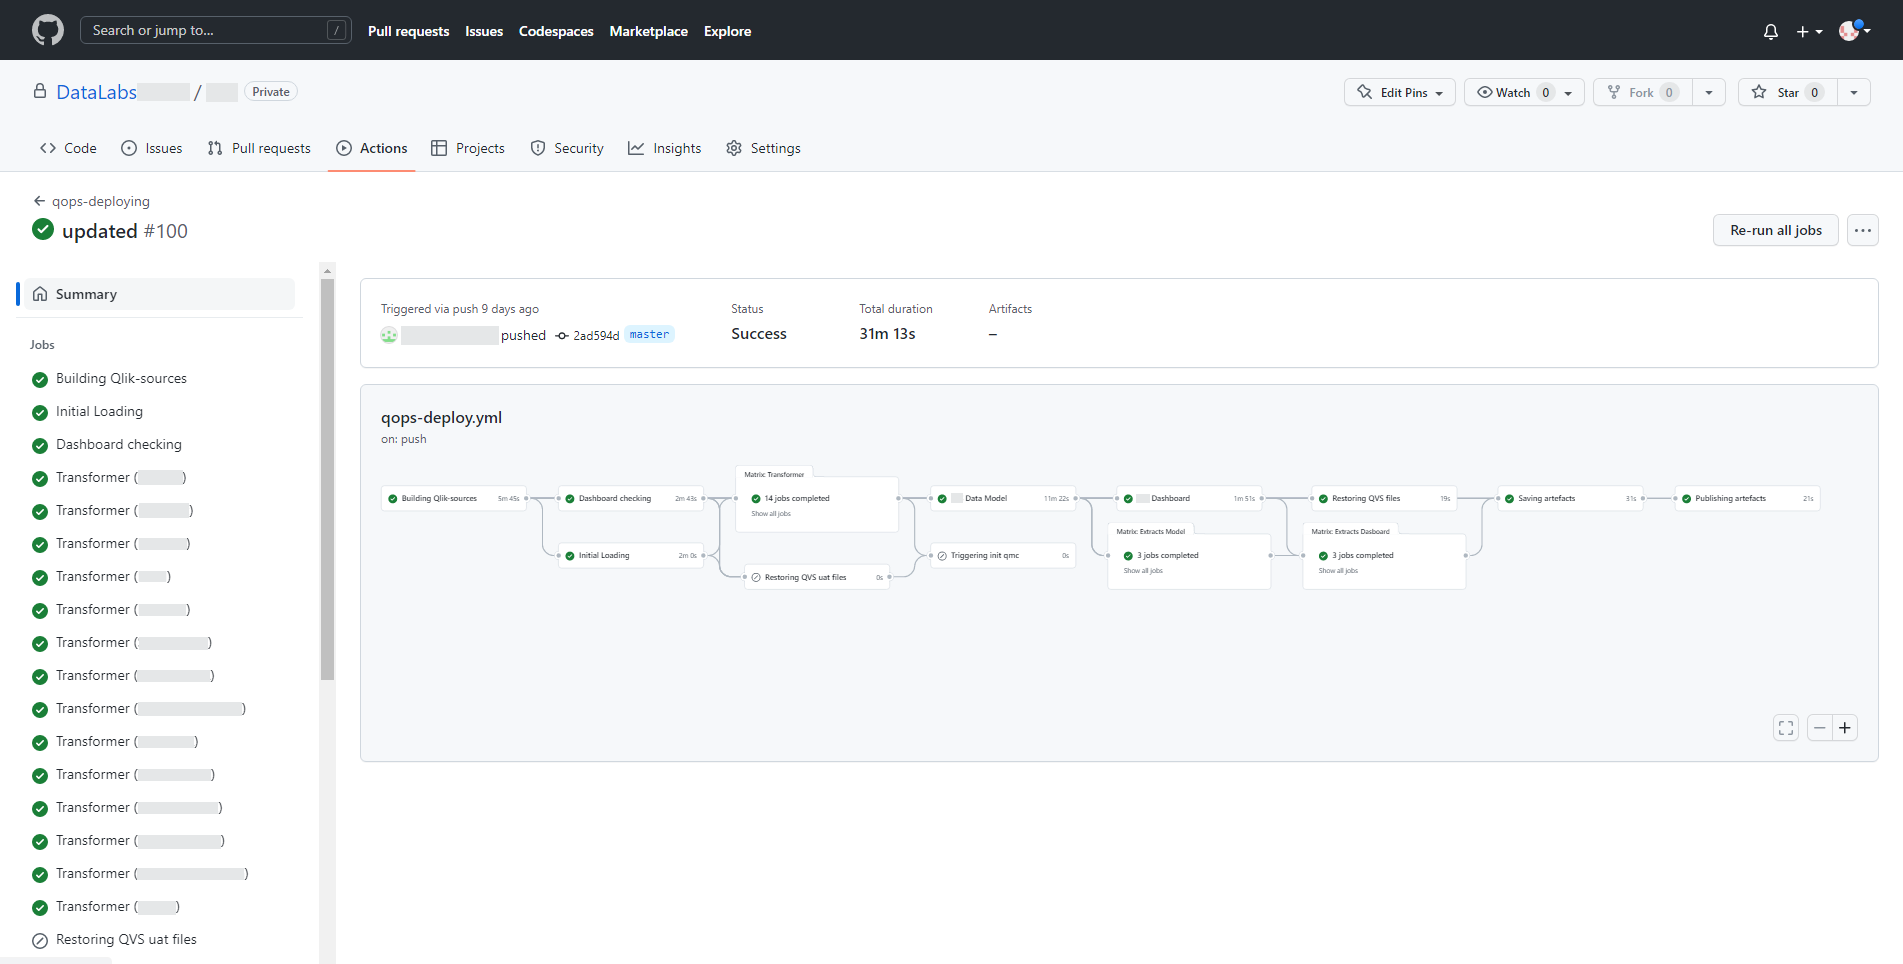
After confirming task completion current development is merged with the main repository branch and execution of all process stages is initialized. At the same time, the pipeline uses the logic of selecting only those application files that have been changed. These files are transferred to a given environment, for example, to production.
Development process of the pipeline greatly simplifies runner functionality in the form of using matrix operations on a list of same type applications. This approach is convenient to process transformers that have a similar structure and purpose.
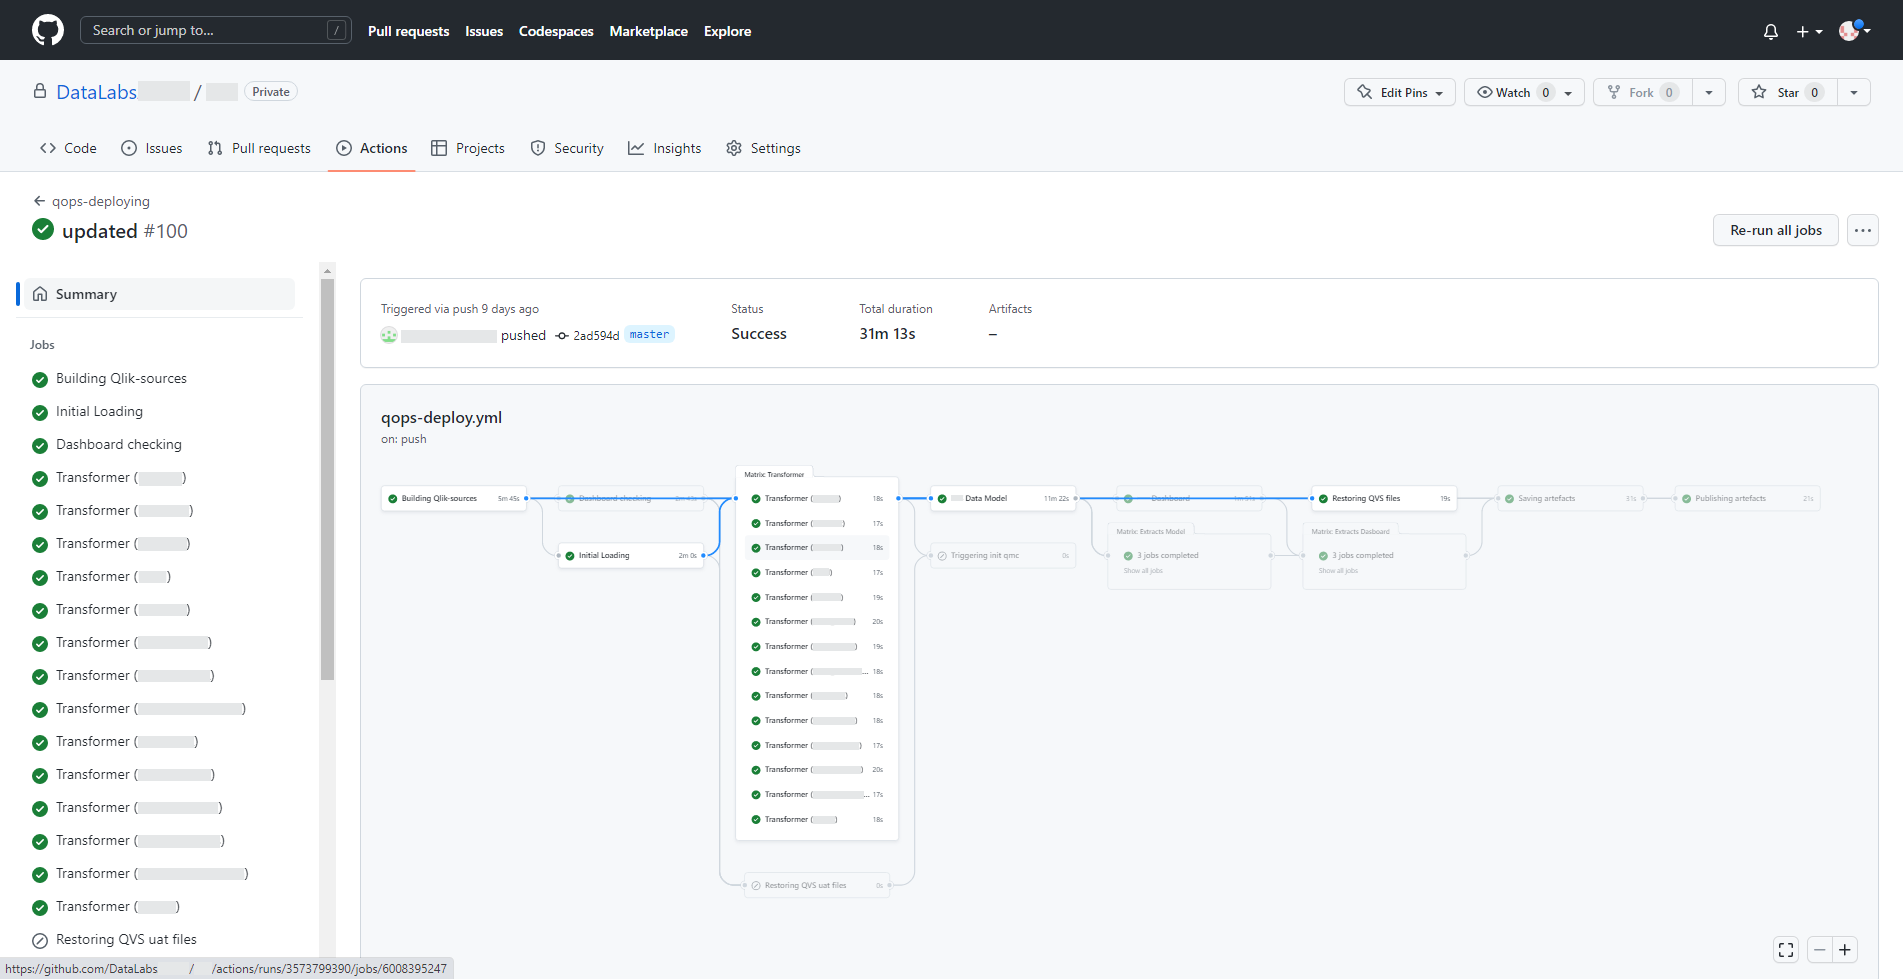
This is how the result of executing successive pipeline steps within one stage looks like. Some steps depending on the conditions set can also be skipped, ignored, or stopped if errors are found.
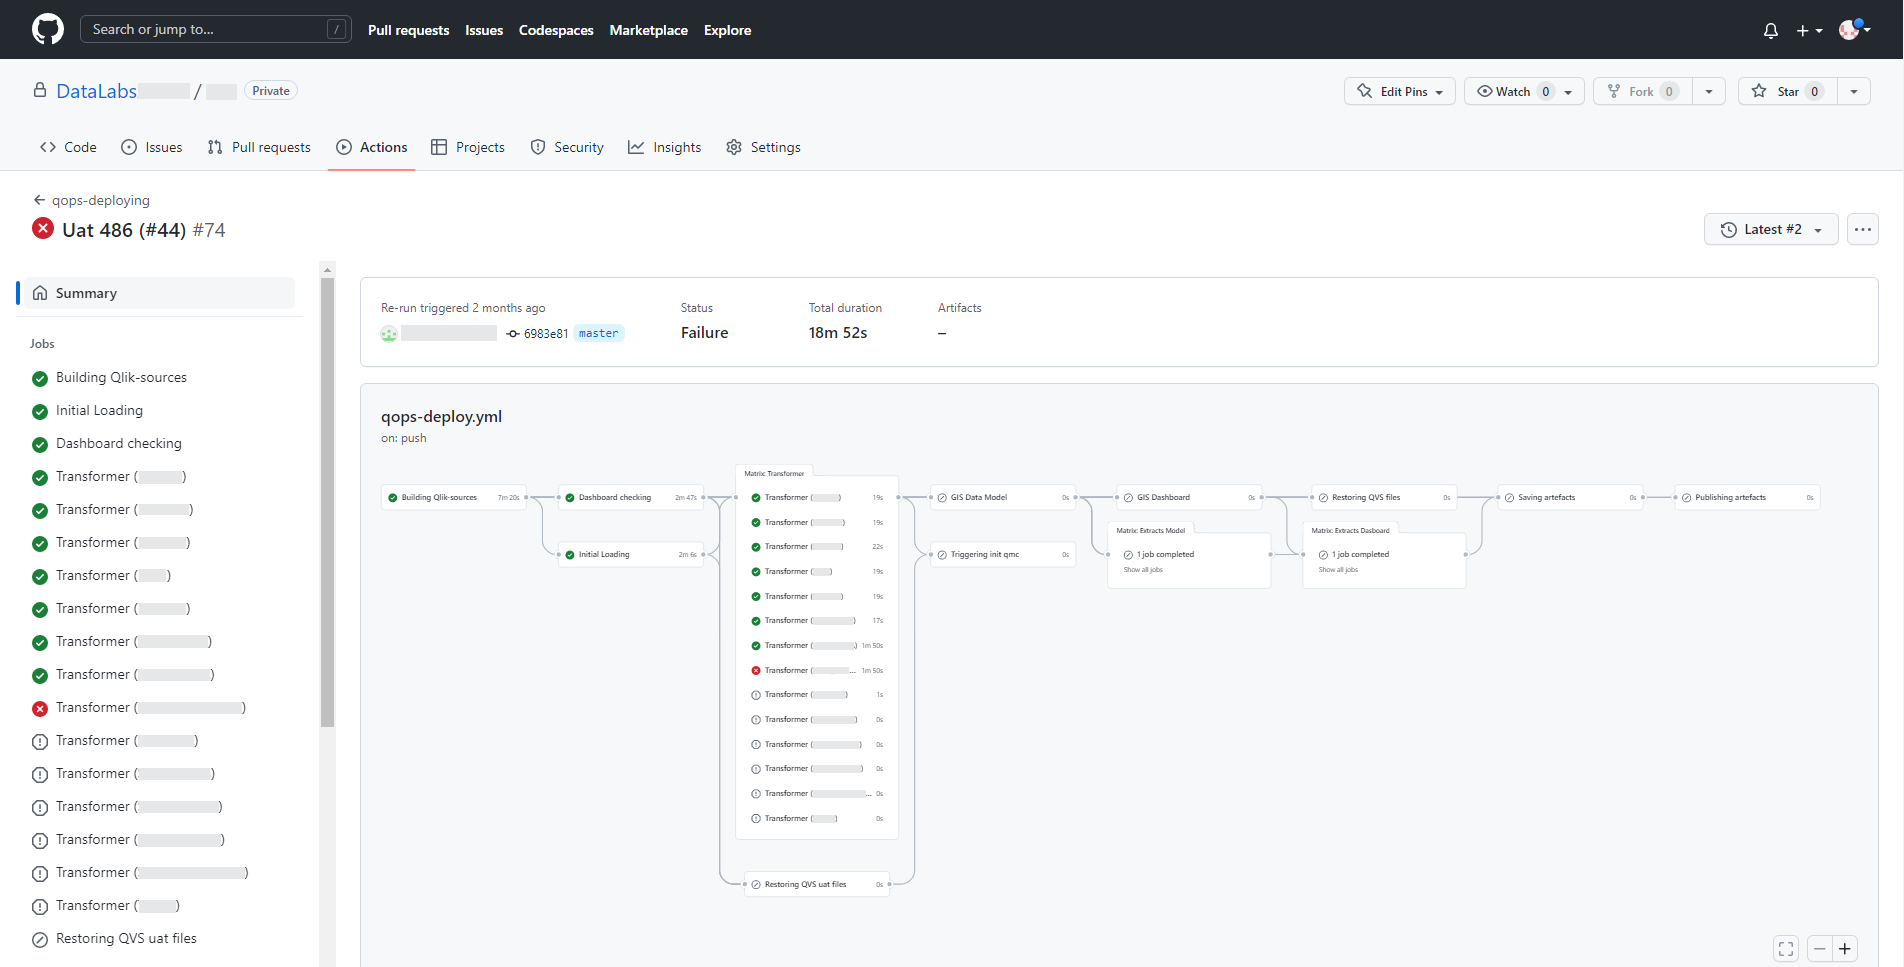
In case of a runtime error, the pipeline will signal it as follows.
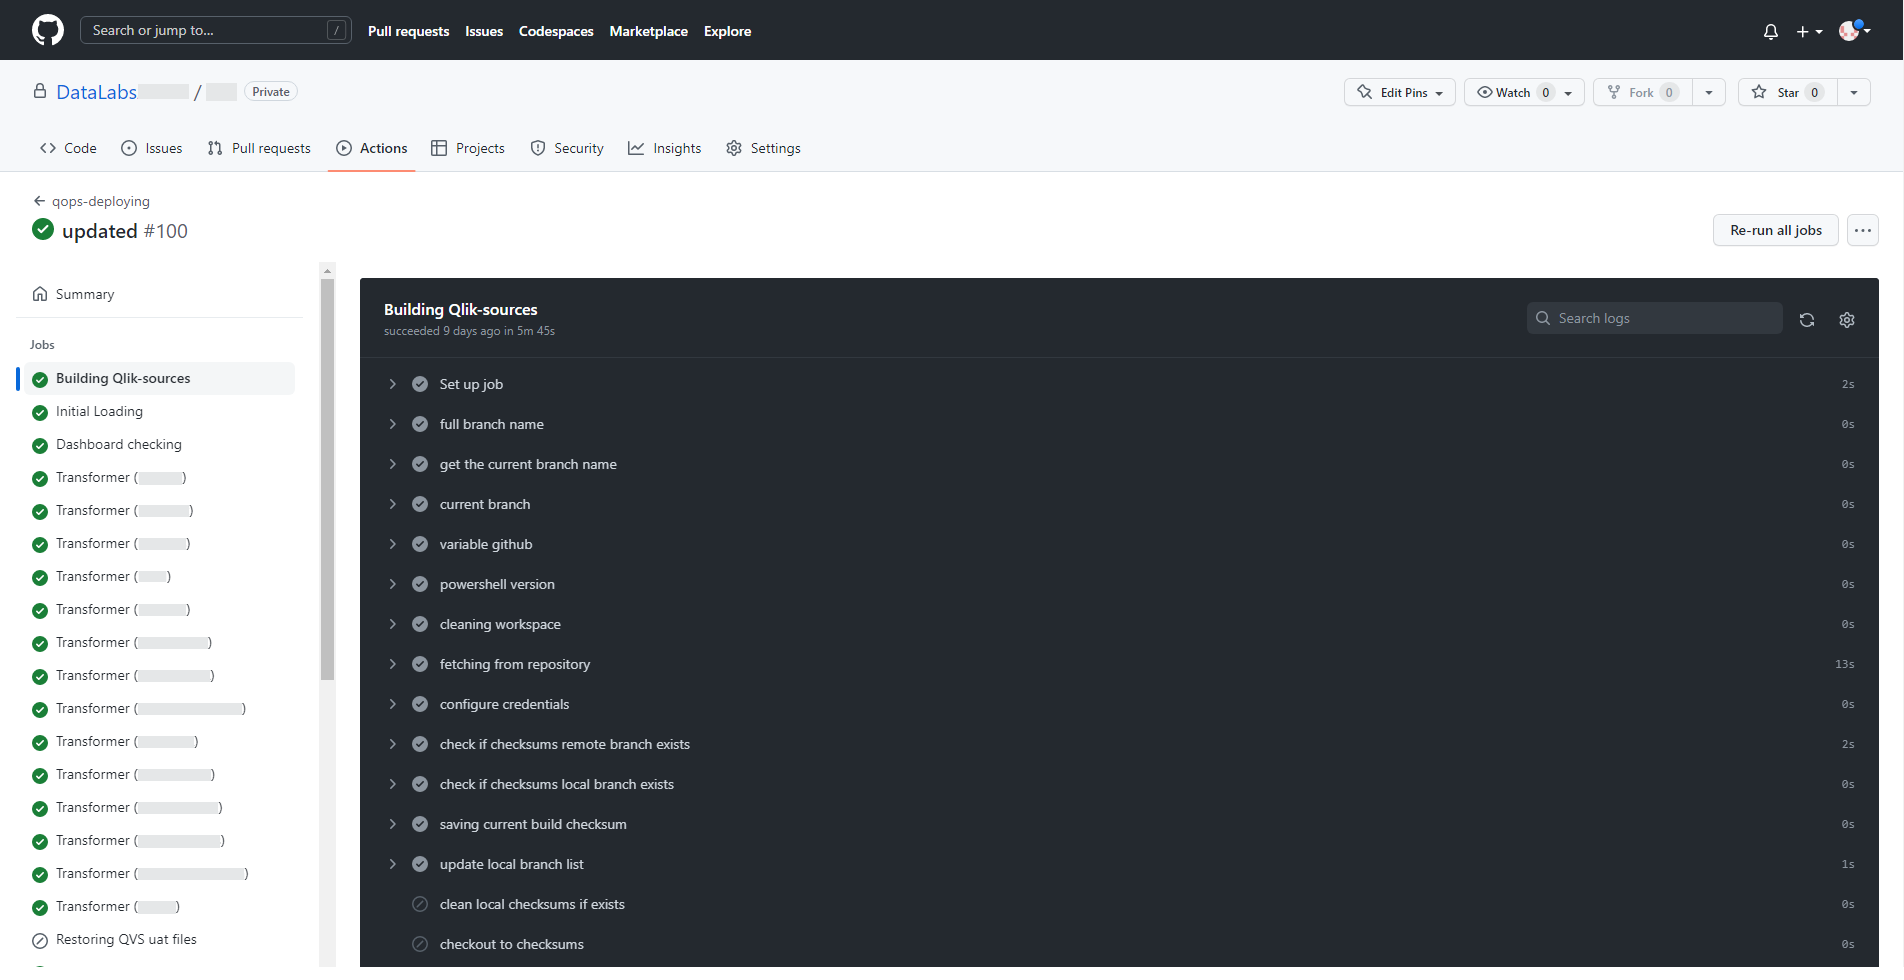
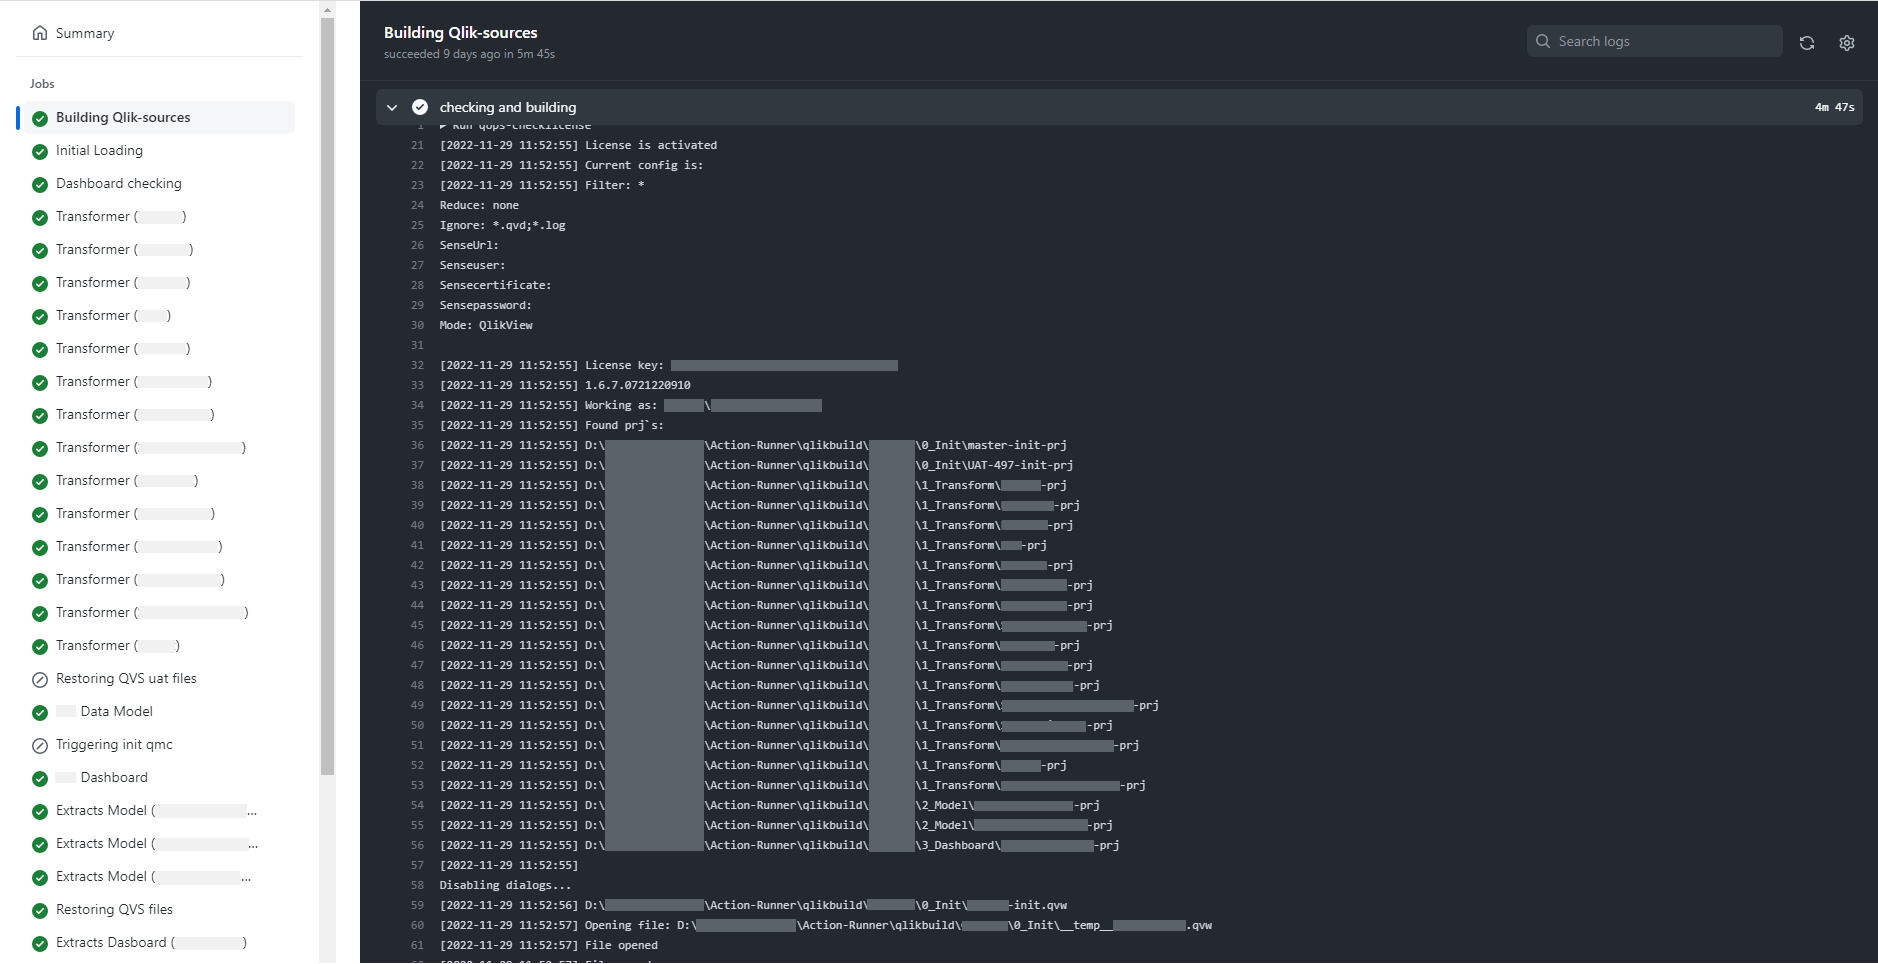
For a more detailed study of each execution step, console output is available at each stage. This makes it convenient to track and resolve errors that occur.
So, CI/CD introduction into Qlik application development and maintenance process has reduced the time spent on converging the results of parallel development and greatly simplified the process of preparing application files for further deployment.
CI/CD pipelines help to minimize potential risks in the process of integrating code changes into the repository, isolate the impact of possible errors and simplify fixing process. The main CI/CD goal is to speed up development process and value delivery to the end user. However, there are always ways and tools to make the process even more efficient. The matrix approach is one such option.
The basic pipeline structure involves the execution of tasks simultaneously at a certain stage. Tasks at the next stage can be completed if the previous ones are completed. This process continues at all stages. Different tasks in a pipeline take different times to complete. So, team members must wait to make their changes to the project. This significantly slows down the workflow and reduces productivity. Also, the presence of the same pipelines and creation scripts can lead to pipelines blocking. To optimize resources and increase productivity, it makes sense to create tasks clones and run them in parallel.
Previously, it was necessary to manually define tasks for their parallel execution. With the advent of parallel matrix jobs, it became possible to create jobs at runtime based on specified variables.
The matrix strategy uses variables when defining a job and allows to provide automatic creation of multiple job executions. This strategy can be used in the process of testing code in different languages and/or different operating systems. The matrix can be created with different job configurations specifying one or more variables. By defining variables (one or more), task will be applied for each variable combination.
It is also worth considering one feature. So, organizations often use mono-repositories for better project management. However, pipeline performance is degraded when there are many projects in the repository and one pipeline definition is used to run different automated processes for different components. Using parent and child pipelines makes pipelines more efficient. This approach minimizes the chance of merge conflicts and allows editing of pipeline parts if necessary.
On the one hand, pipelines optimization reduces the time developers spend on maintenance. On the other hand, it frees up time and space for new ideas, creativity and increased productivity. For example, using a matrix, it is possible to break down large pipelines into manageable parts for more efficient maintenance and maximization of tasks amount that run in parallel. The order in which jobs are created dictates the order of the variables in the matrix. The first variable is the first job in the run.
The complex Qlik application architecture consists of several layers (transformers, model, dashboard and extractors). And when using QOps, the matrix strategy is the best suited for managing applications of the same type within the same layer. These include applications in the layer of transformers and extractors.
GitHub, GitLab and Jenkins allow to build pipelines based on a matrix strategy that iterates over the available tasks according to cartesian multiplication. This was done to expand CI/CD capabilities, namely in testing on different platforms or, for example, with different frameworks versions.
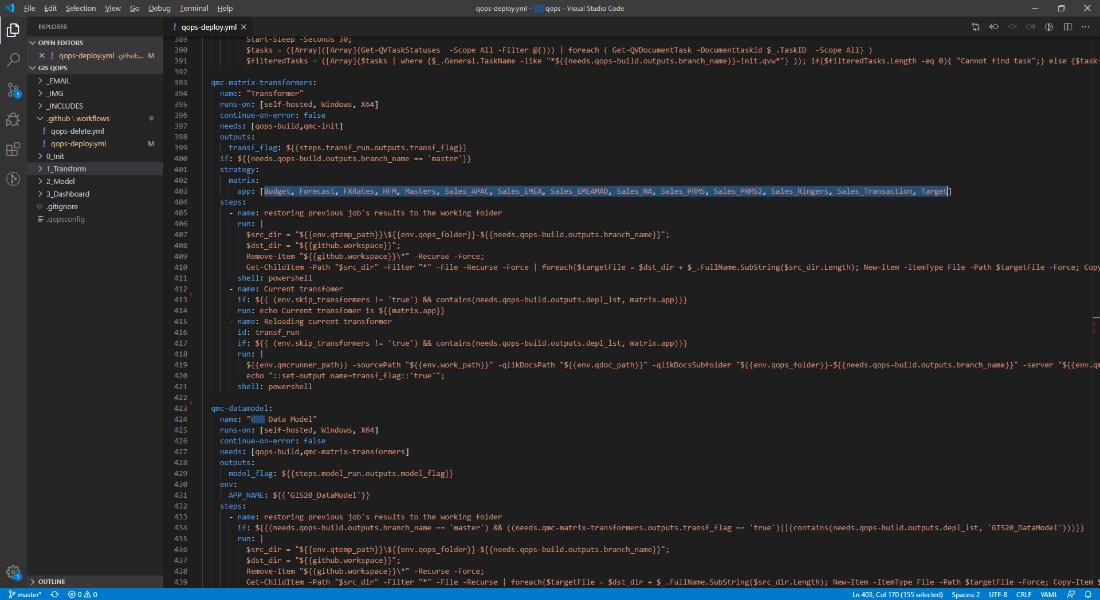
The screenshot below contains an example pipeline source file for GitHub, where transformer overloading is implemented using a matrix strategy. The keyword for this is matrix in strategy block. The required list of applications is specified as a list on line 403. In this case, the substitution of the iterated application will be performed each time matrix.app is specified.
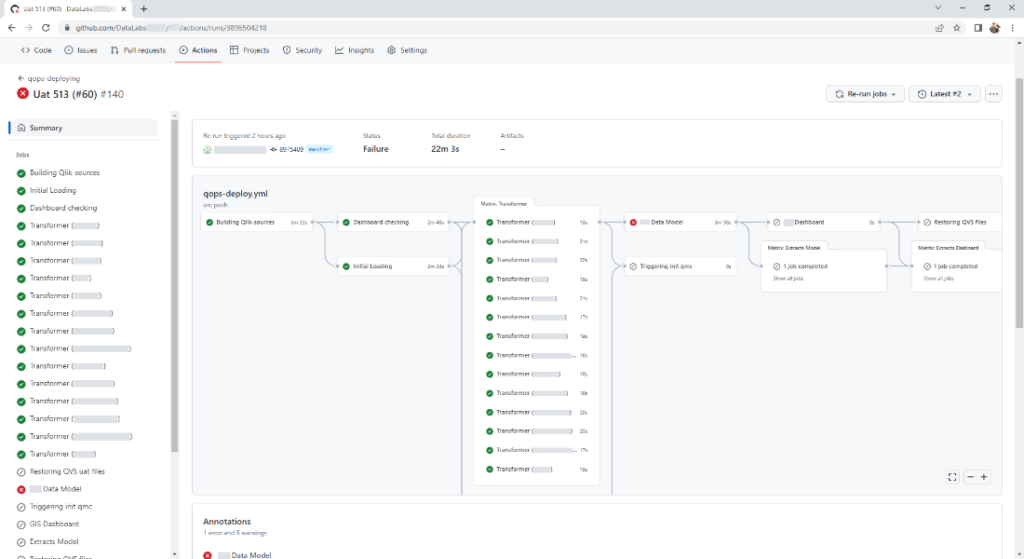
This is how used applications list in GitHub graphical interface looks like when executing the pipeline. At the same time, scaling the number ofprocessed applications is easily performed. To do this, it is enough just to change their list and not make changes to the executable part of the code.