Keep your Qlik apps in their own folder with AppSubfolders

A repository that holds Qlik apps usually holds other things too: pipeline files, scripts, documentation. Having every app folder sit at the top level next to all of that gets crowded. With AppSubfolders you give the apps a folder of their own, such as apps/, and keep the repository root for everything else.

One line in the repository configuration

AppSubfolders is a setting in the repository's .qopsconfig. It lists the folders where QOps should look for apps, written relative to the repository root and separated by ;:

AppSubfolders: apps;partners/emea

QOps always checks the repository root. Each folder you list is checked as well. In every one of these folders, QOps treats each child folder that contains an App.yaml (or App.json) as an app. You can set the value in the file, with QOps-SetConfig -AppSubfolders, or in the Portal under the repository's settings, in the App subfolders field.

A layout that works well:

my-repo/
  .qopsconfig            AppSubfolders: apps
  apps/
    Sales-prj/App.yaml
    Finance-prj/App.yaml
  pipeline/
  docs/

What to keep in mind

  • Plain folder paths. List each folder by its path. Wildcards are not applied.
  • One level deep. QOps looks at the child folders of the repository root and of each listed folder. To use apps/team, list apps/team.
  • An empty list means the repository root only.
  • QOps-SetConfig checks your entries. If a folder does not exist, it says so and changes nothing.

What happens in each command

  • QOps-Prepare finds an app's existing folder in the root or in any listed folder and updates it there.
  • QOps-Build and QOps-Release take their apps from the root and from every listed folder.
  • A new app that Prepare writes for the first time is created next to the .qopsconfig, as <Name>-prj. Move that folder into apps/ once. After that, Prepare and Build keep using it where it is.

The configuration at the repository root

You can keep the .qopsconfig at the repository root and run QOps from anywhere inside the repository. QOps walks up from the current folder until it finds the configuration, moves there, and tells you which folder it chose.

To move an existing setup, put the .qopsconfig at the root, add AppSubfolders: apps, merge the .gitignore lines for App.local files into the root .gitignore, and run a build for one app to confirm it is found.

In the Portal

Prepare, Build and Release started from the Portal follow AppSubfolders. The Portal's own app list looks for folders ending in -prj anywhere in the repository, so name your app folders <Name>-prj and the list and the commands agree.

The full guide, with example layouts and the messages you may meet, is in the Portal's Help panel under How-to guides: Keep applications in subfolders with AppSubfolders.
QOps is more than a CLI now: meet the QOps Portal

QOps started as a set of PowerShell commands for Qlik developers. It is no longer only that. Over the last couple of months QOps has grown the Portal: a browser window where you run commands, edit files, work with Git, keep QOps up to date and manage your settings. The Portal runs the same QOps commands you would type, so the results are the same. Each release it covers more of the daily work, and we are steadily heading toward a point where you do not need the command line at all. QOps also has an MCP server and a chat now, which we come back to at the end.

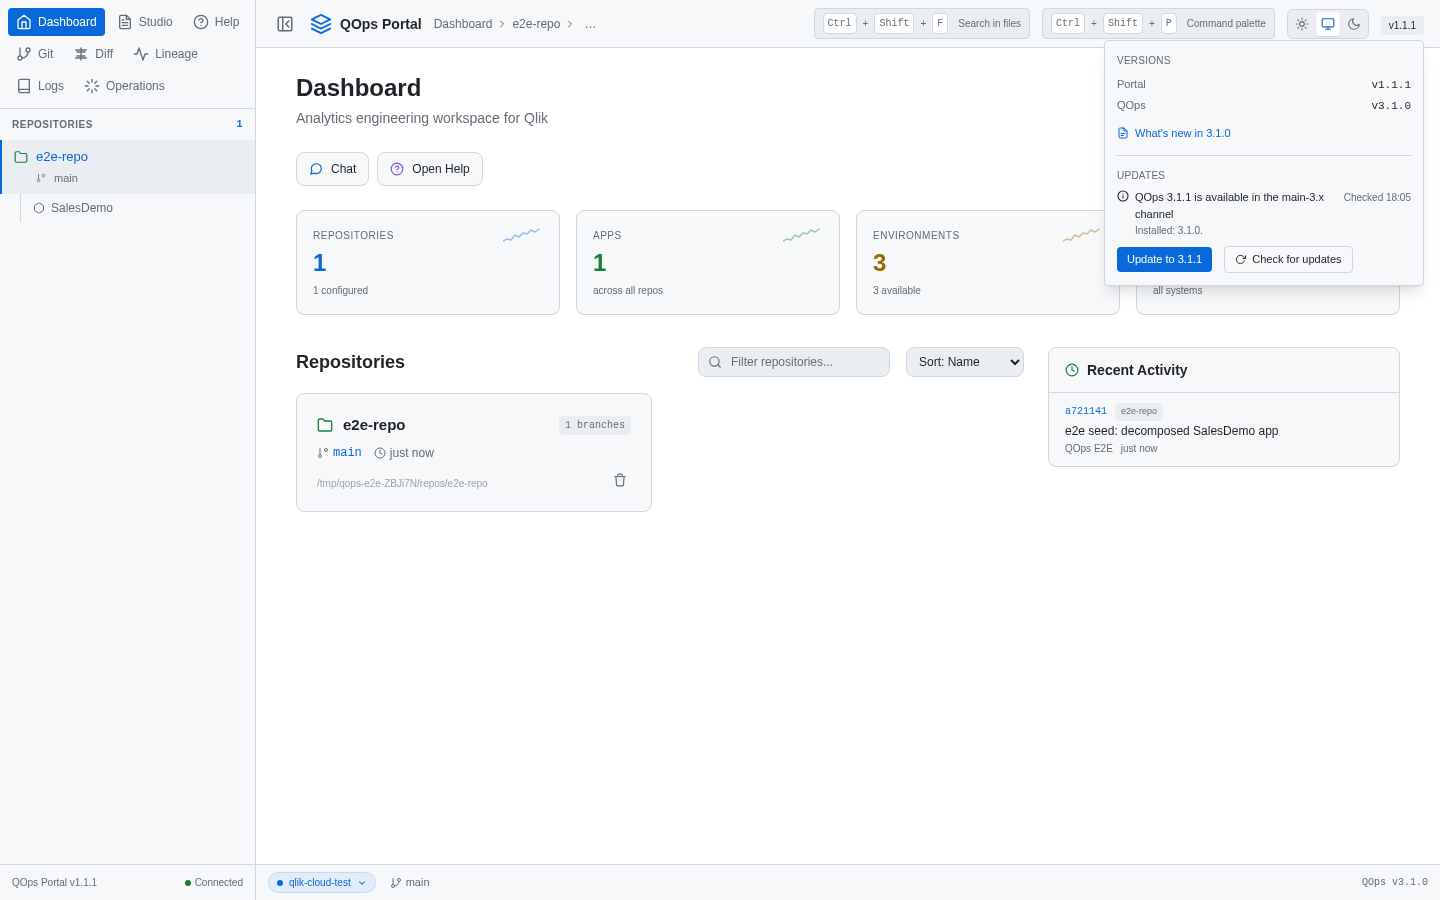
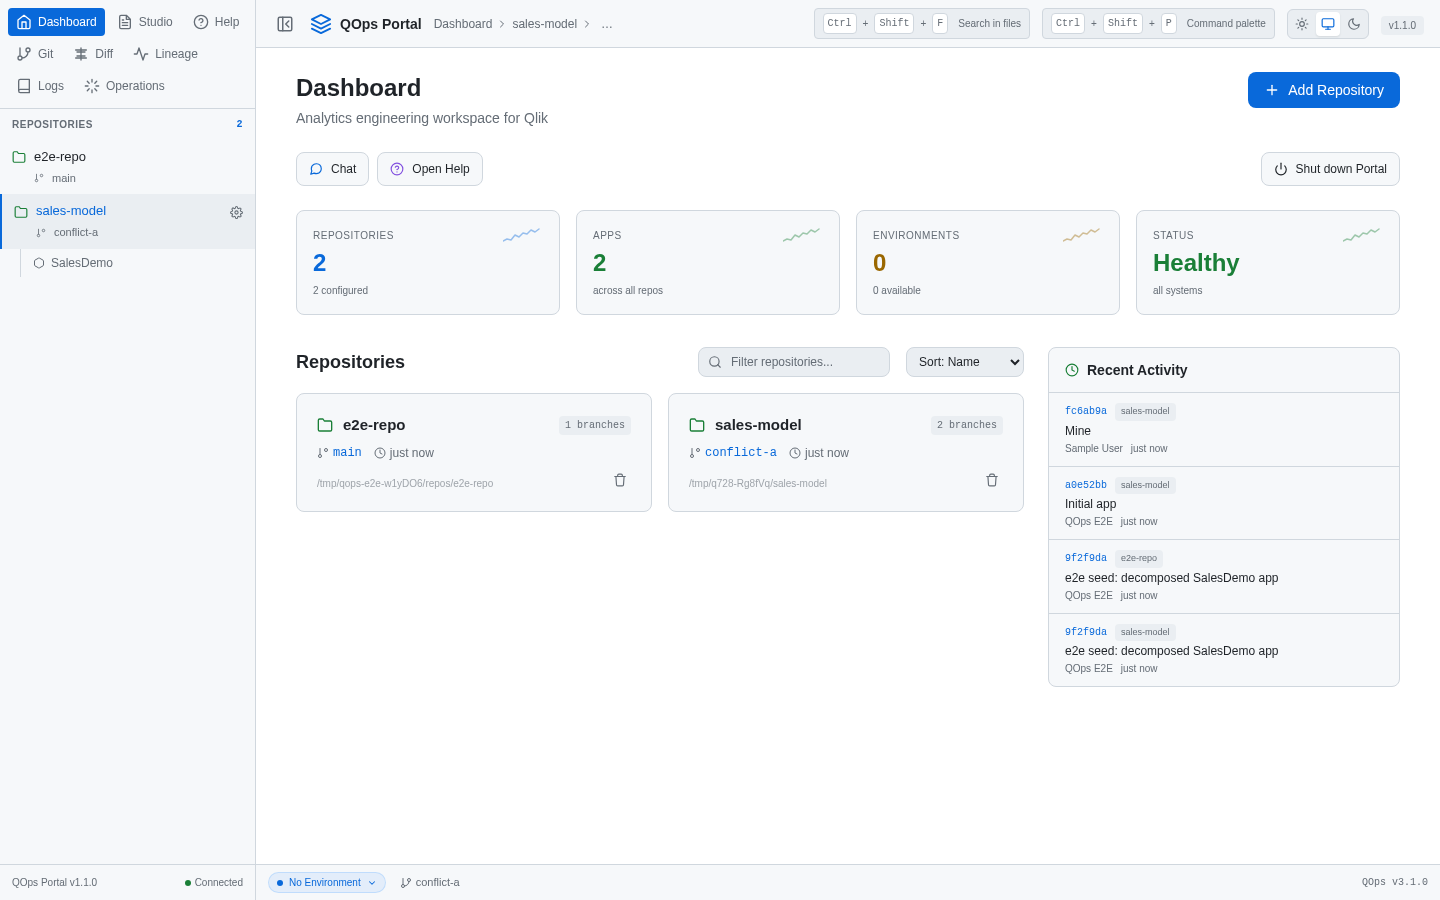
The Portal Dashboard with repositories, environments and recent activity

One window for the whole workflow

You start the Portal with QOps-StartPortal, and it opens in your browser on your own computer. On Windows, if you installed QOps with the installer, you can also start it from the QOps Portal shortcut on the desktop or in the Start menu. The Dashboard lists your repositories with their branch, apps and recent activity. From the menu you reach Studio, Git, Diff, Lineage, Logs, Operations and Help, and the repository you picked stays selected as you move between them.

Run commands

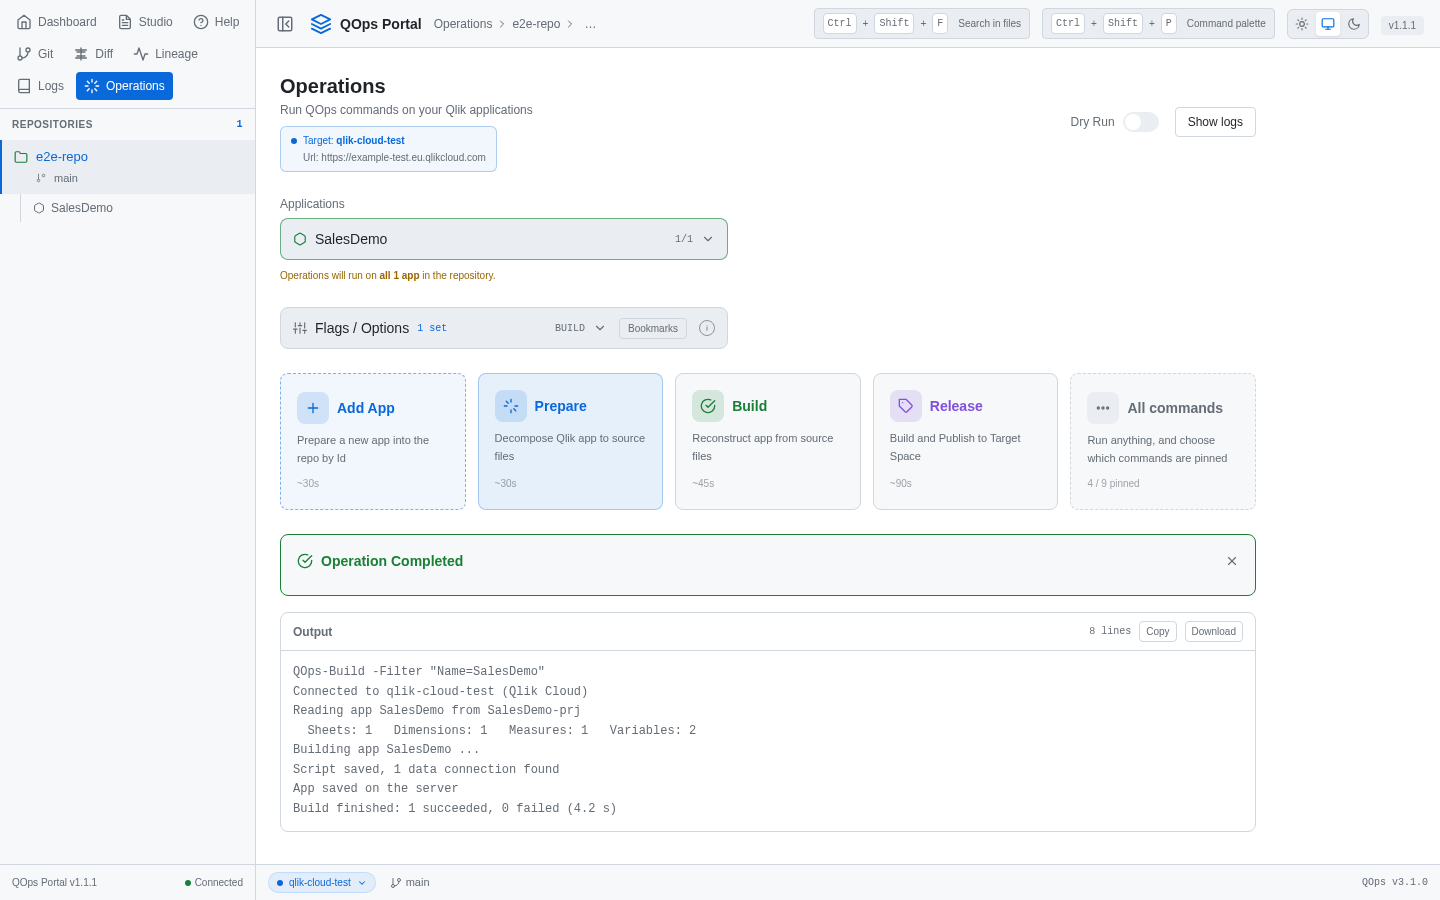
The Operations panel has a button for each step of the QOps workflow: Add App, Prepare, Build and Release, plus All commands for everything else, including Reload and Publish. You choose the apps (one, a few, or all in the repository), set the options for the command, and read the live output as it runs.

  • Dry Run shows the exact command that would run and starts nothing.
  • Options such as Update only on Build are switches, so you do not have to remember the flag names.
  • Long runs can be stopped, and every run is kept in the history with its log, which you can copy or download.
The Operations panel after a Build with Update only, with the finished log

Edit files

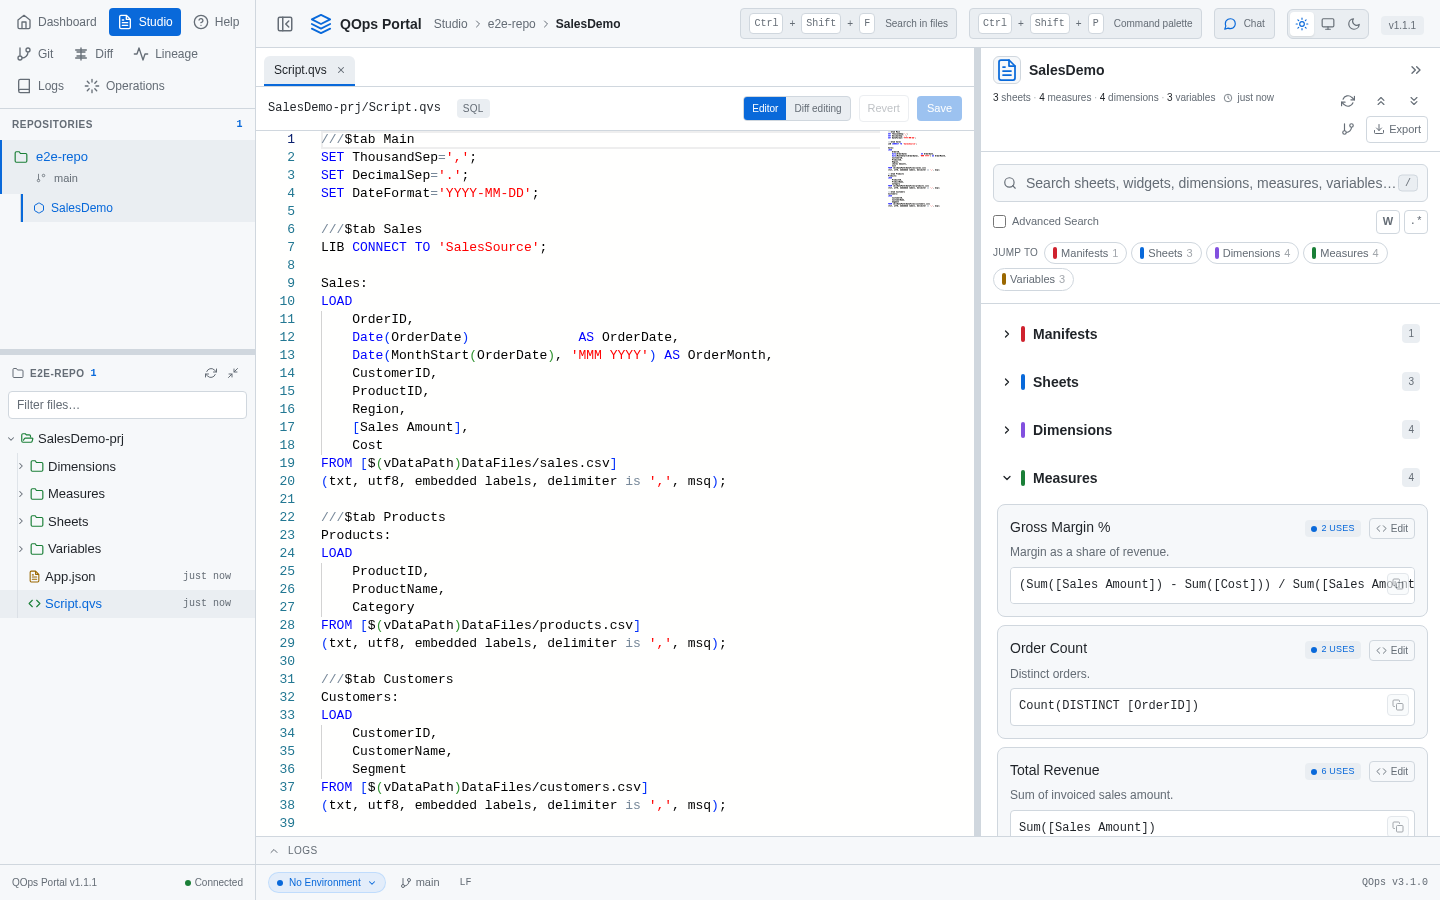
Studio is where you work on an app's source files. It has a tabbed editor and a file tree, and you can create, rename and delete files there. Next to the editor sits the generated documentation of the app: sheets, master measures and dimensions, variables. You can search it, see where a master item is used, and export it. Right-click an app folder or any object in the tree to run Prepare or Build on exactly that part, without leaving Studio.

Studio with an app selected: the load script open in the editor and the app's documentation in the side panel

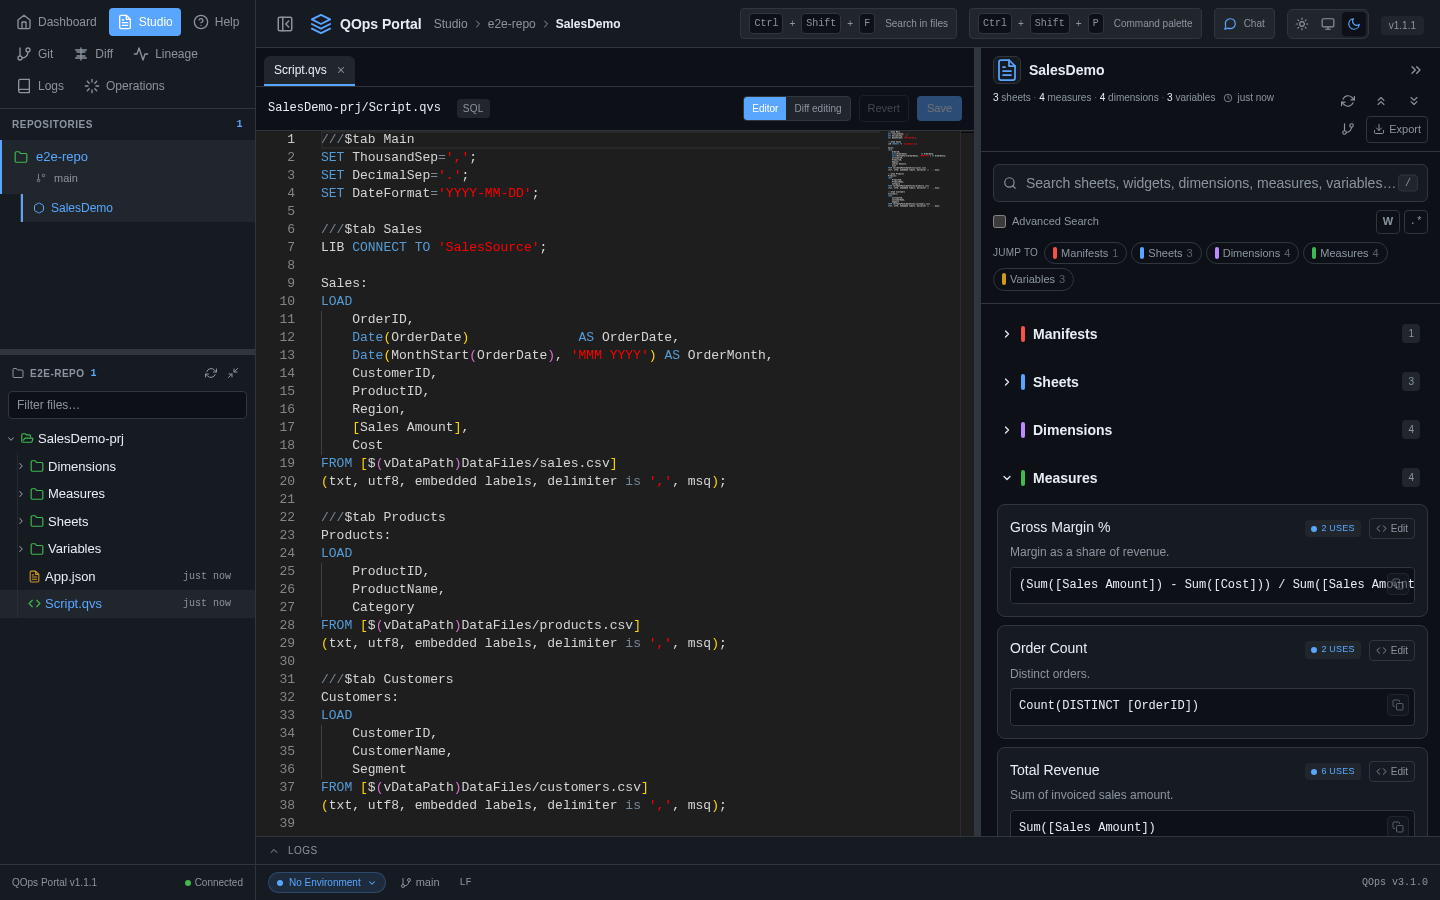
The Portal also comes in a dark theme. Use the theme buttons at the right of the header to pick light, dark, or follow your system setting; the browser remembers your choice.

The same Studio view in the dark theme

Work with Git

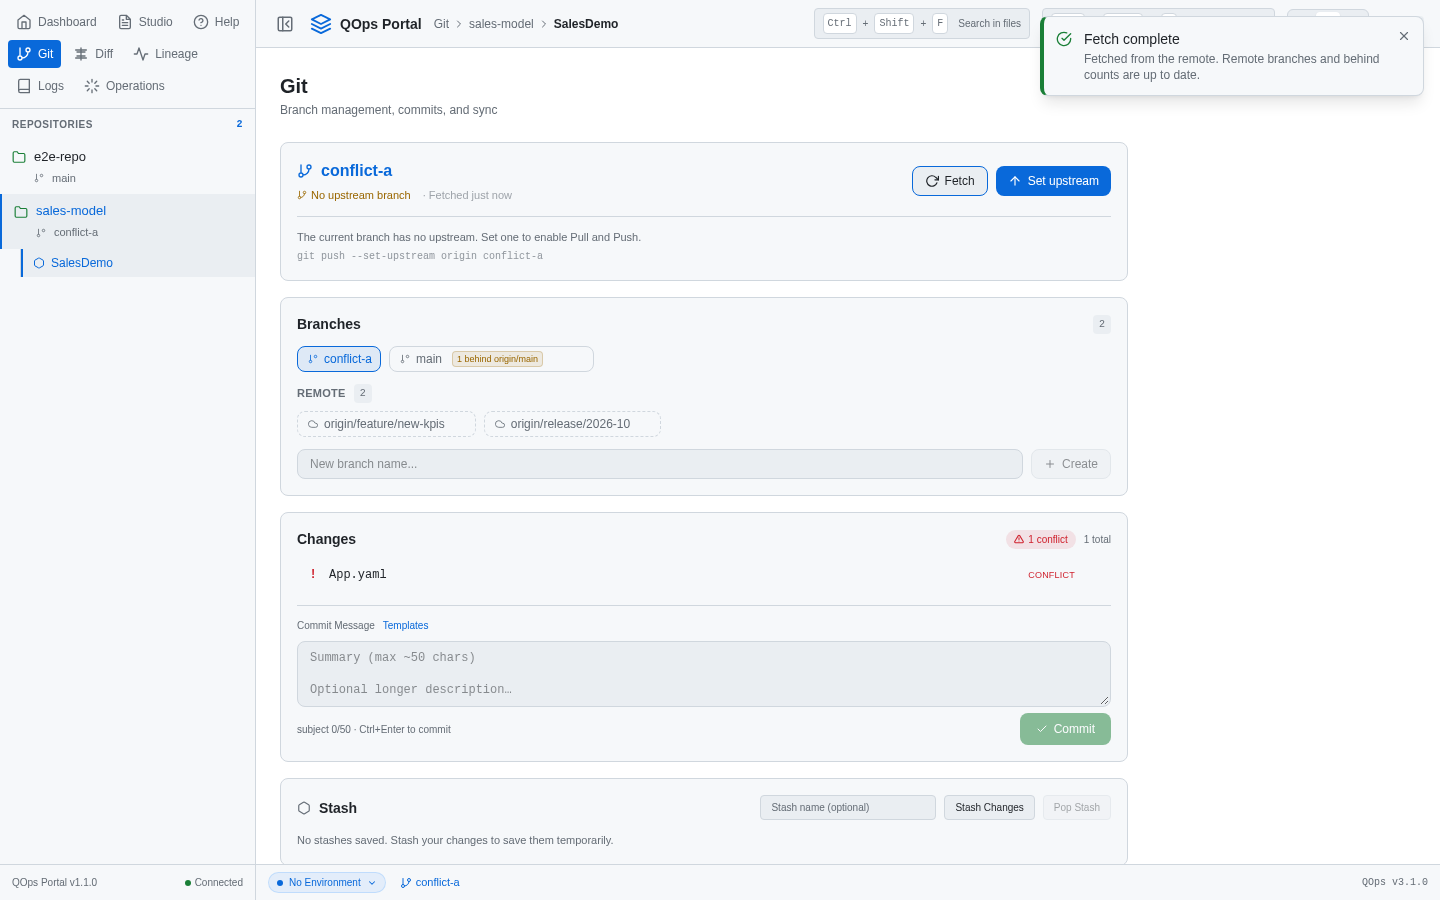
The Git panel covers the daily routine: stage, commit with templates, push, pull, stash, create and switch branches, and browse the history. The Branches card lists the branches of your remotes next to the local ones. Fetch refreshes them and shows how far behind you are, and one click checks out a remote branch as a local one.

The Git panel with local and remote branches

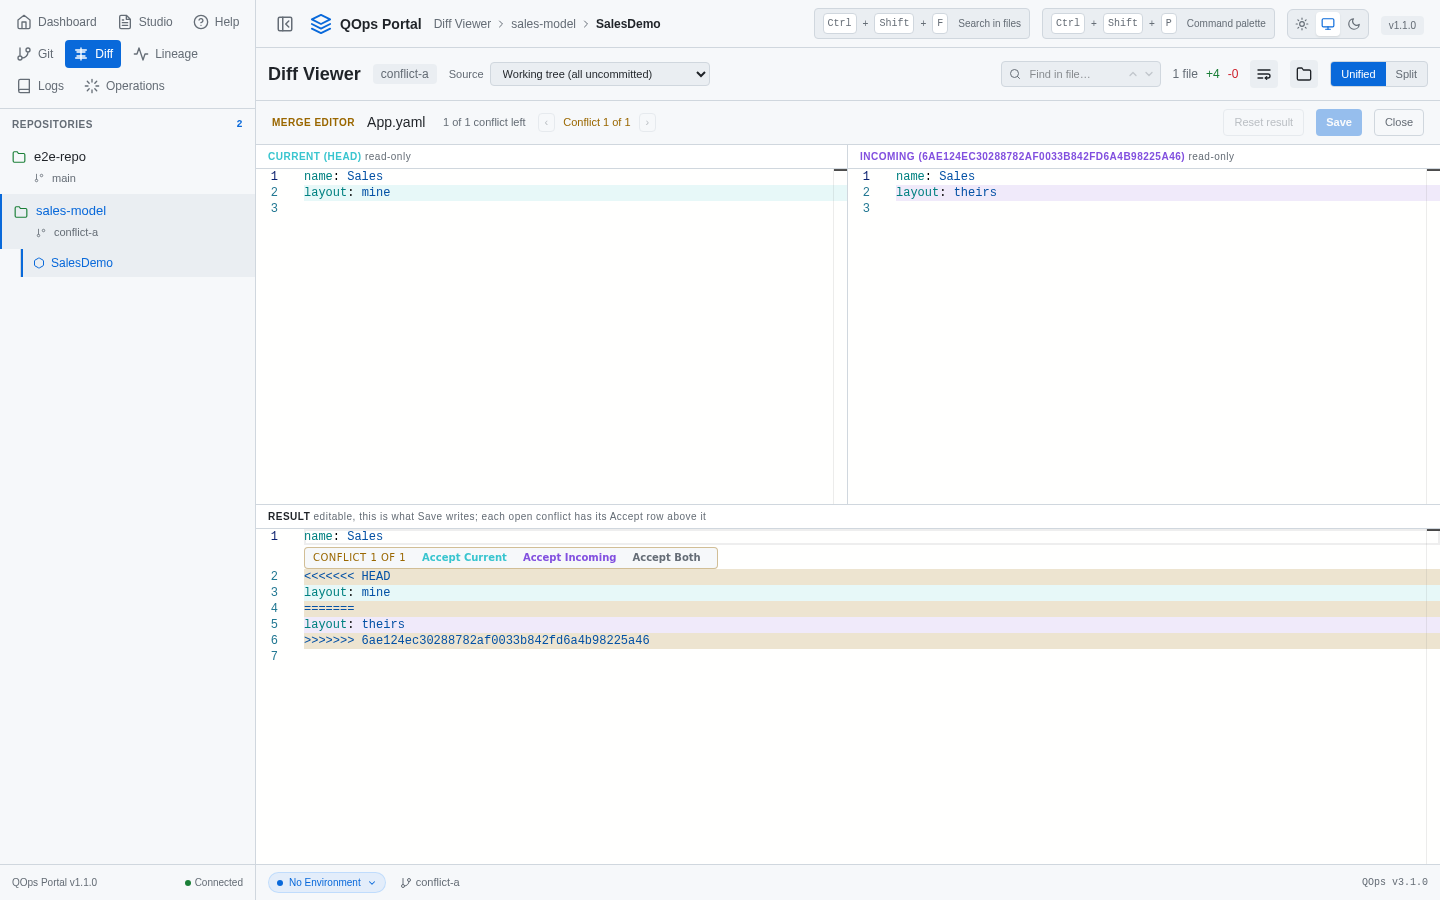
When a merge leaves conflicts, the merge editor shows Current and Incoming side by side with an editable Result below. For each conflict you accept current, incoming or both, and you can fine-tune the text by hand before you save.

The merge editor with Current, Incoming and an editable Result

Keep QOps up to date

Click the version number in the header to open the Versions panel. It shows the Portal and QOps versions and links to the release notes for the version you run. Check for updates tells you whether a newer build exists in your update channel, and Update installs it after you confirm. When a Portal started with QOps-StartPortal has a new version installed, it can restart itself on it at the same address.

The Versions panel with an update available

Settings and environments

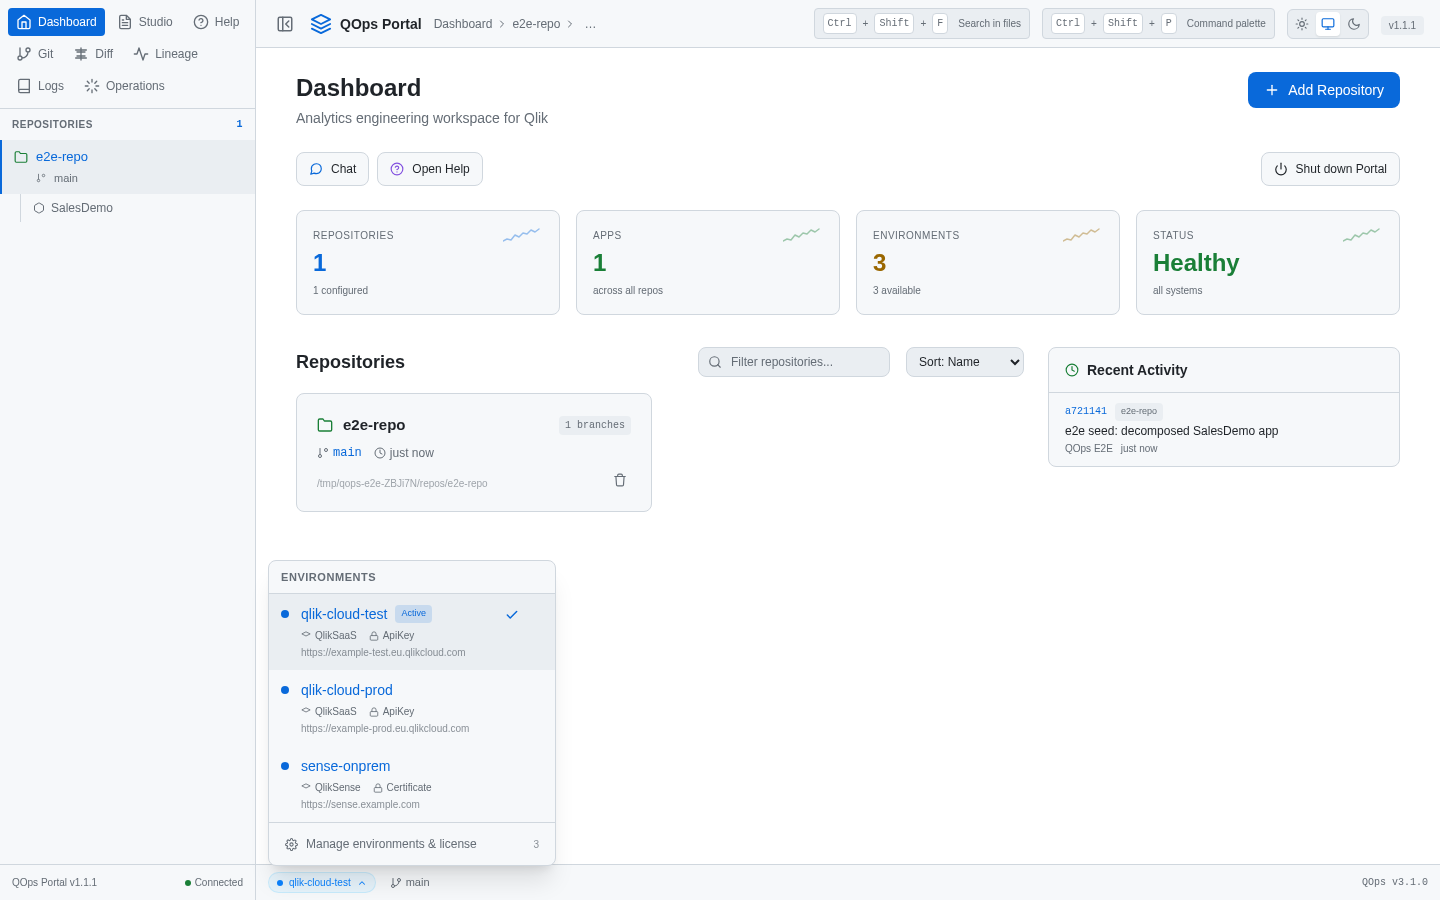
The environment switcher in the status bar lists your connection profiles, for Qlik Cloud and Qlik Sense, and shows which one is active. Pick another and the next run uses it, so the same sources can go to test and then to production.

The environment switcher with three profiles

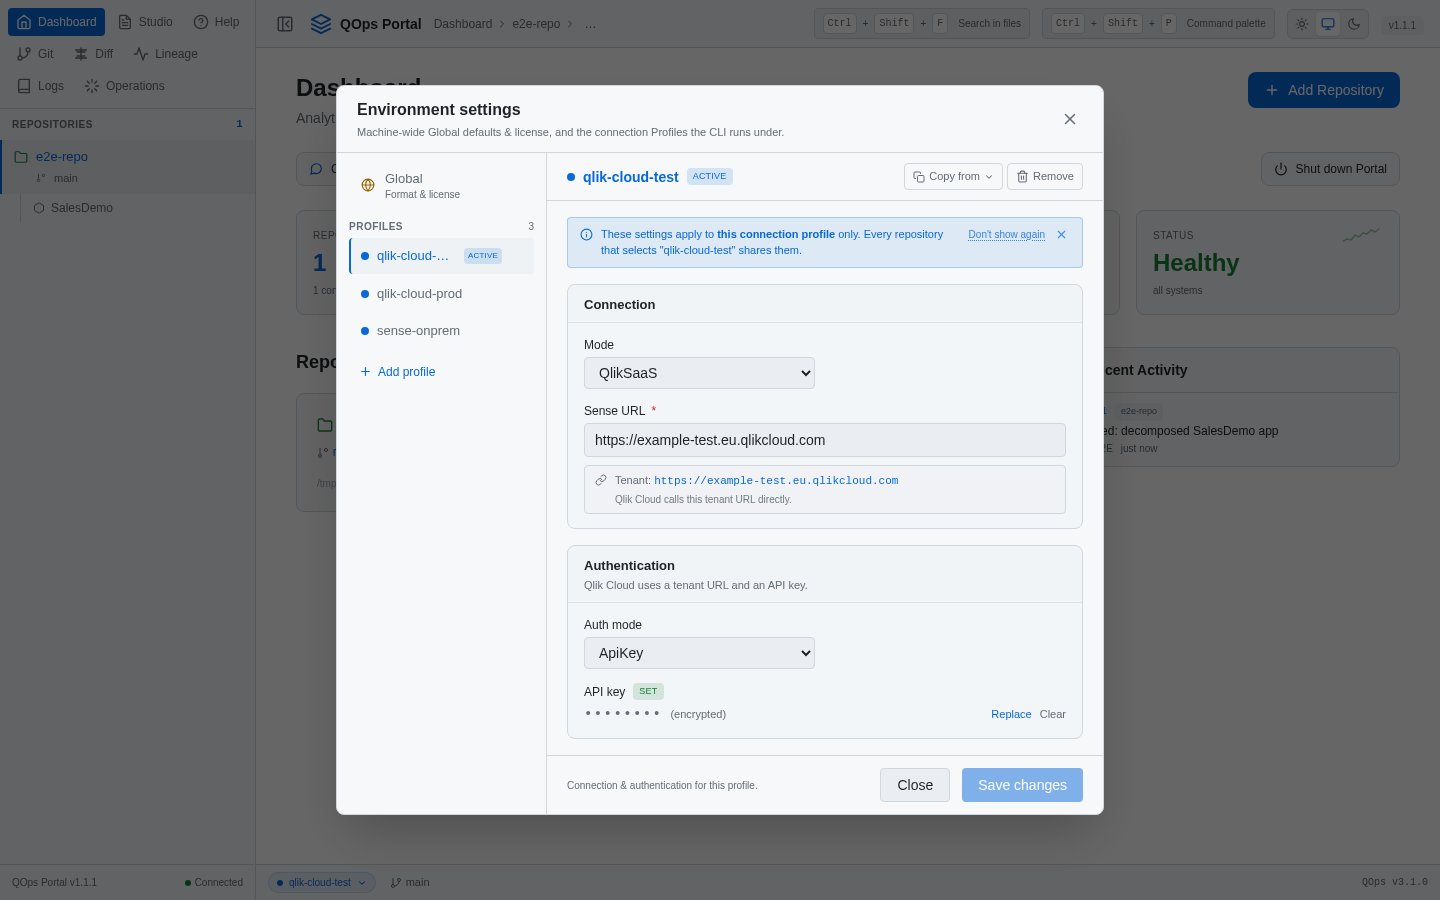
Manage environments & license opens the settings. There you edit each profile's connection and sign-in, and the defaults that apply to the whole machine: serialization format, line endings, license and a GitHub token for updates. Secrets are stored encrypted and are never shown again. Per repository, Settings holds placeholders and hook scripts.

The settings for one connection profile

Chat and MCP

QOps also has an MCP server, so AI assistants can work with your repositories and apps, and the Portal has a chat built on it. You choose the provider and model, and the key stays on the Portal's own server. We cover both in the MCP post.

Get started

Open PowerShell and run QOps-StartPortal, or on Windows use the QOps Portal shortcut. The Help panel has a reference for every panel and step-by-step guides, for example for connecting a freshly cloned repository to your existing apps. Everything you do in the Portal can still be done from the command line, so use whichever suits the moment.

Ask your Qlik apps in plain language: QOps 3.1 chat and MCP server

QOps 3.1 brings a new feature: an MCP server that gives an AI assistant the tools to work with your QOps repositories and Qlik apps. The easiest way to try it is the chat in the Portal, where you ask in plain words instead of looking for the right command: "Which apps are in this repository?" "Make a sheet with Total Sales and Order Count as bars and Average Order as a line, by Region." "Run Prepare, then Build." The server runs on your own machine and uses the connection profiles and licence you already have. Your Qlik credentials are never passed to the assistant.

Try it in three steps

1. Update to 3.1

Run QOps-Update, then start the Portal with QOps-StartPortal.

2. Add your key in Settings

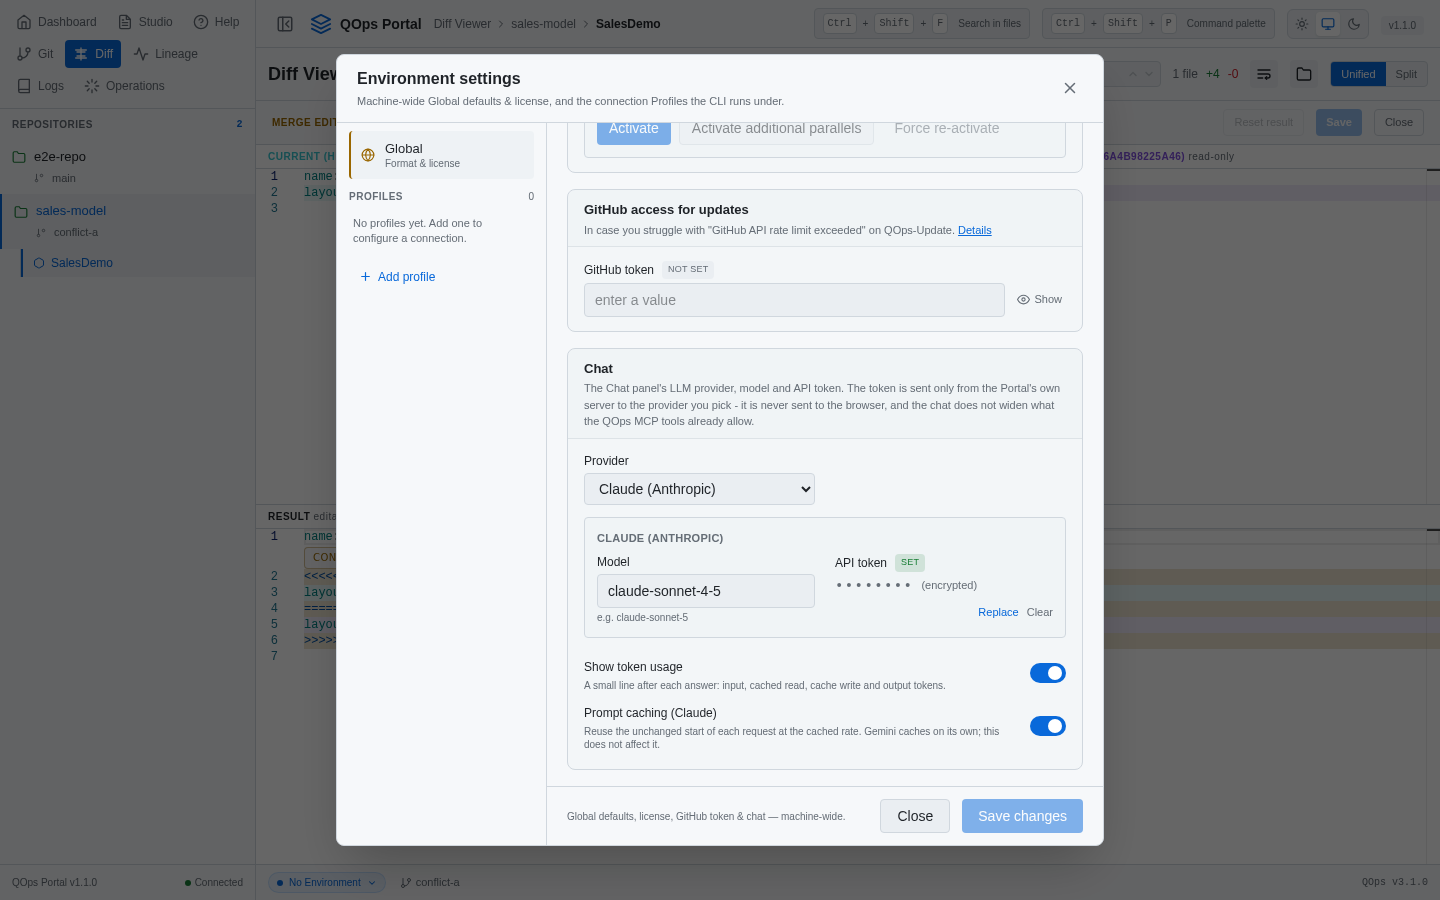
The chat uses your own AI account, so it needs a key before it can answer. Under Settings, Global, Chat you choose Claude or Gemini, pick a model and store your own API token. The token is kept encrypted on your machine and is sent only from the Portal's own server to the provider you chose. It never reaches the browser.

Settings, Global, Chat: provider, model, masked token, token usage and prompt caching
  • Provider and model per chat. The header of each chat has a provider and model picker, filled from the provider's own model list. Change them halfway through a conversation if you like.
  • Prompt caching. On by default for Claude, so long chats use fewer full-price tokens. You can switch it off.
  • Token line. Turn on Show token usage and each answer ends with a short line showing the input, cached, and output tokens it used.
  • Saved chats. Chats are saved, listed under History, and can be copied or downloaded as Markdown.

3. Open the chat from the Dashboard or Studio

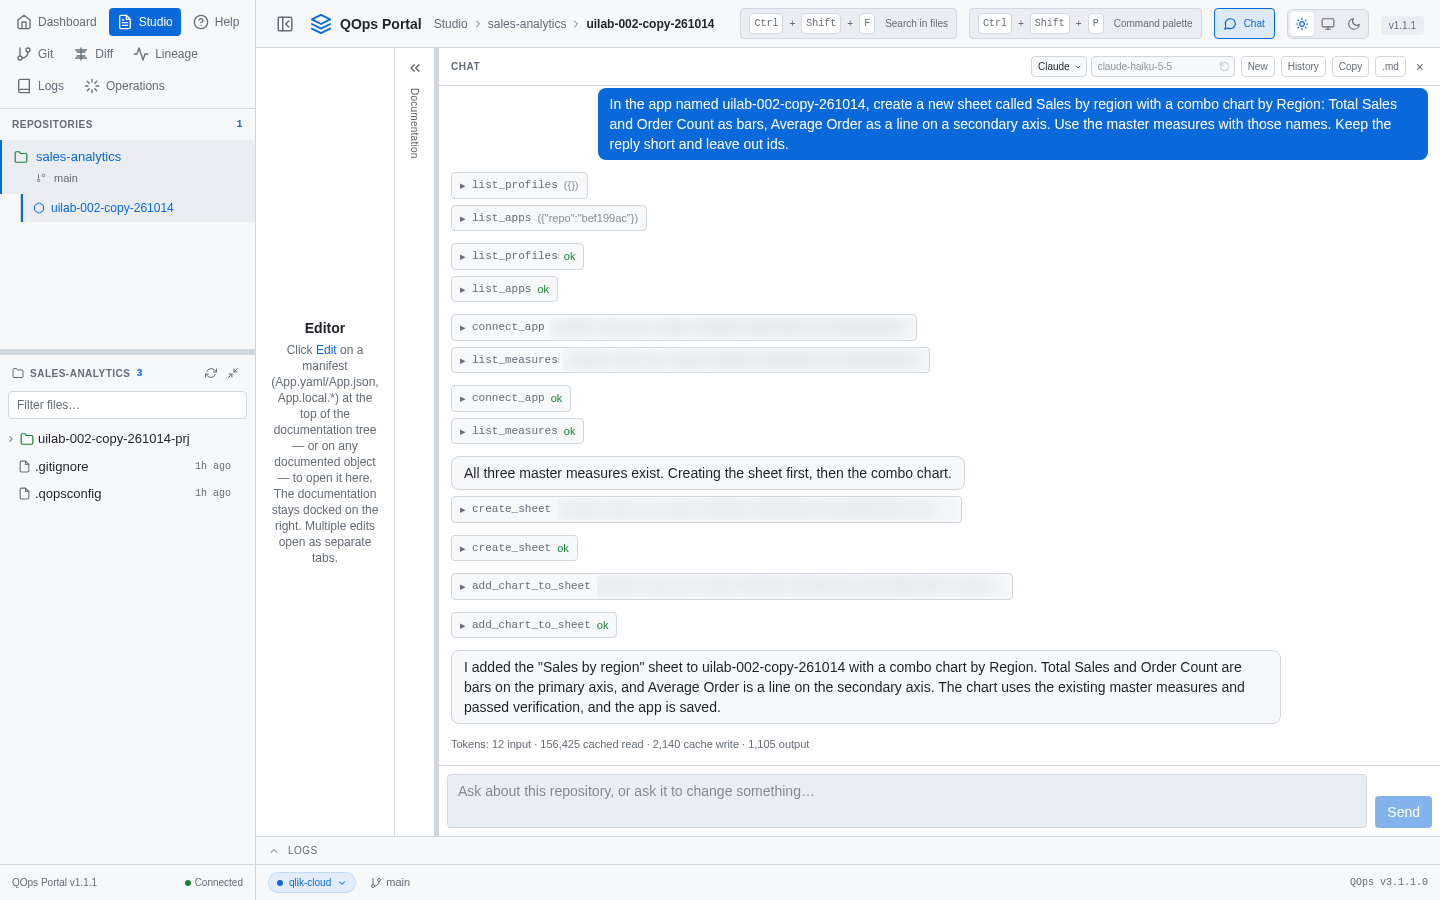
Open the Chat panel from the Dashboard, or dock it beside the editor in Studio so it stays open while you work. Then ask for a sheet in plain words, for example: "Create a new sheet called Sales by region with a combo chart by Region: Total Sales and Order Count as bars, Average Order as a line."

The Chat panel docked in Studio: one request in plain words creates a sheet with a combo chart from three master measures, and every tool step is listed above the answer

In the example above the request names the app and the master measures the way you would say them: Total Sales, Order Count and Average Order. The assistant finds the app in your repository, looks up the measures by name, creates the sheet and the chart, and reads the result back before it answers. Each tool step it took is listed in the chat, so you can see what was done.

Or connect your own assistant

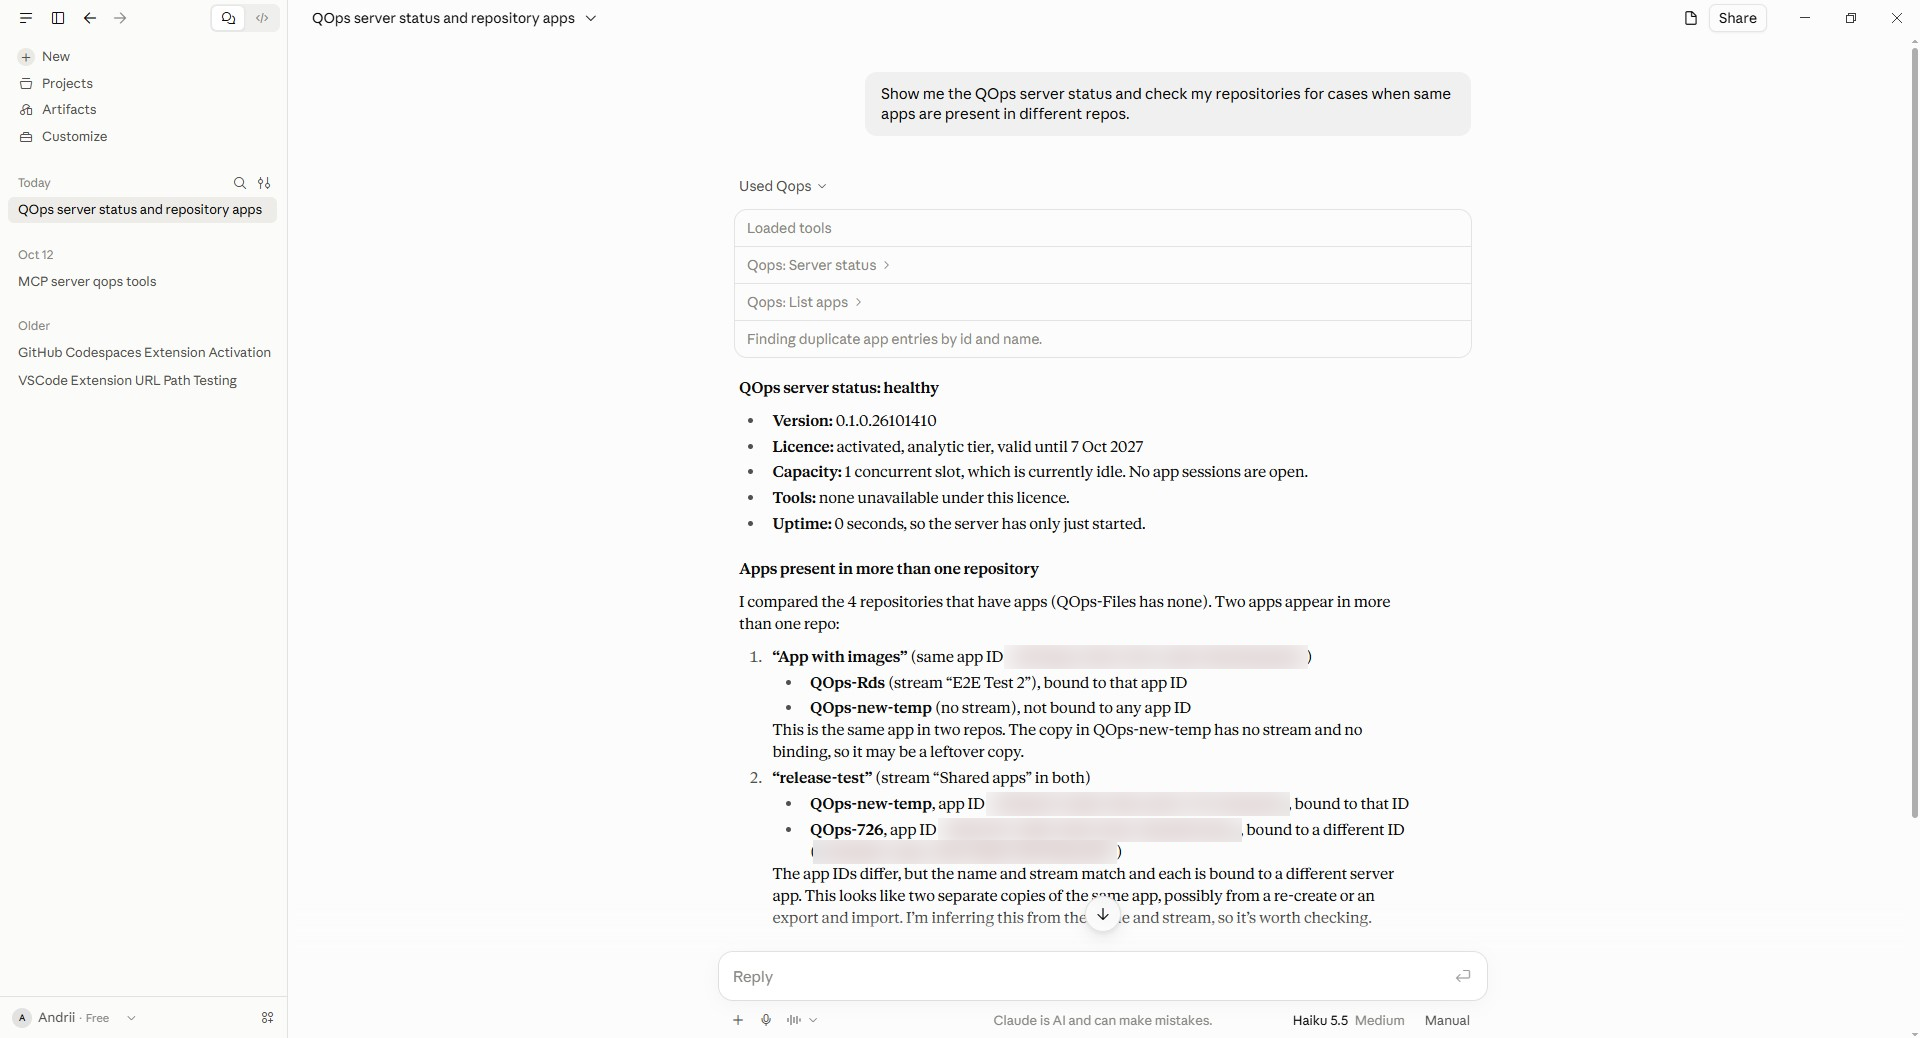
You can also chat from your own client. If you prefer Claude Desktop, Claude Code or Cursor, you can connect them to the same tools. Run QOps-StartPortal once. It writes a small launcher file to a fixed place and prints its path. Point your assistant at that launcher. Because the launcher never moves, the connection keeps working after QOps-Update.

Claude Desktop with the QOps server connected: one question returns the server status, the licence tier and the apps that appear in more than one repository

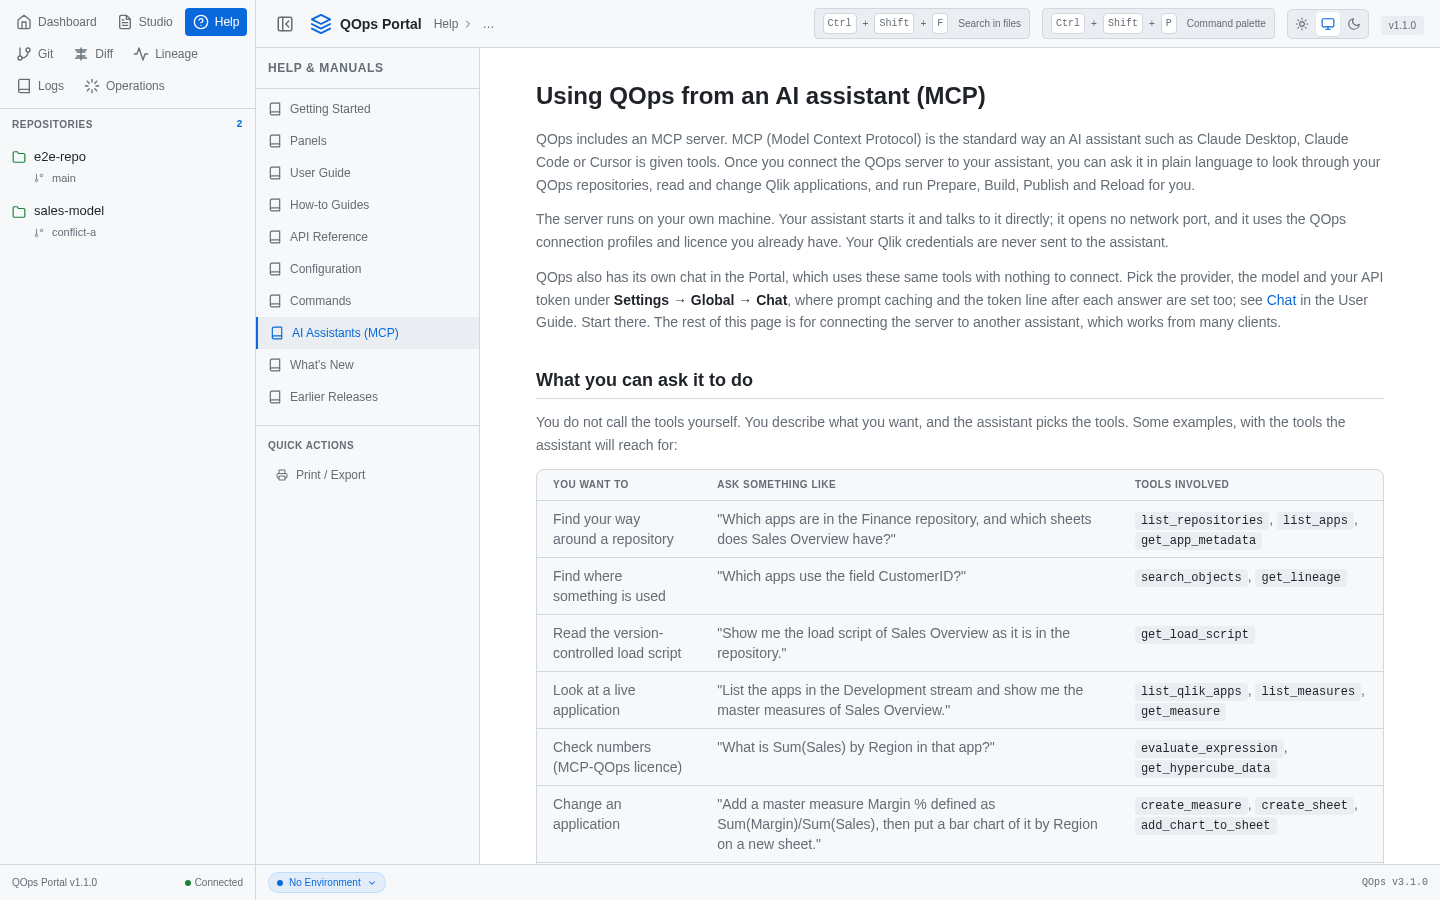
The Help panel has a full page on this, with the settings to paste for each assistant.

The AI Assistants (MCP) page in Help

What the base level can do

  • Repositories: which apps and sheets a repository has, where a field is used, and what the version-controlled load script says.
  • Live apps: list apps, read master measures, sheets and charts on Qlik Sense or Qlik Cloud.
  • Build and change: create master items, variables, sheets and charts, and edit the load script. Charts cover bar, line, combo, pie, table, KPI, scatter, gauge, treemap and pivot table. Refer to master measures by their names, for example "Total Sales and Order Count as bars, Average Order as a line on a second axis".
  • Share a sheet: on Qlik Cloud, ask the assistant to make a sheet public.
  • Run QOps: Prepare, Build, Publish and Reload in a repository folder, exactly as the commands do.
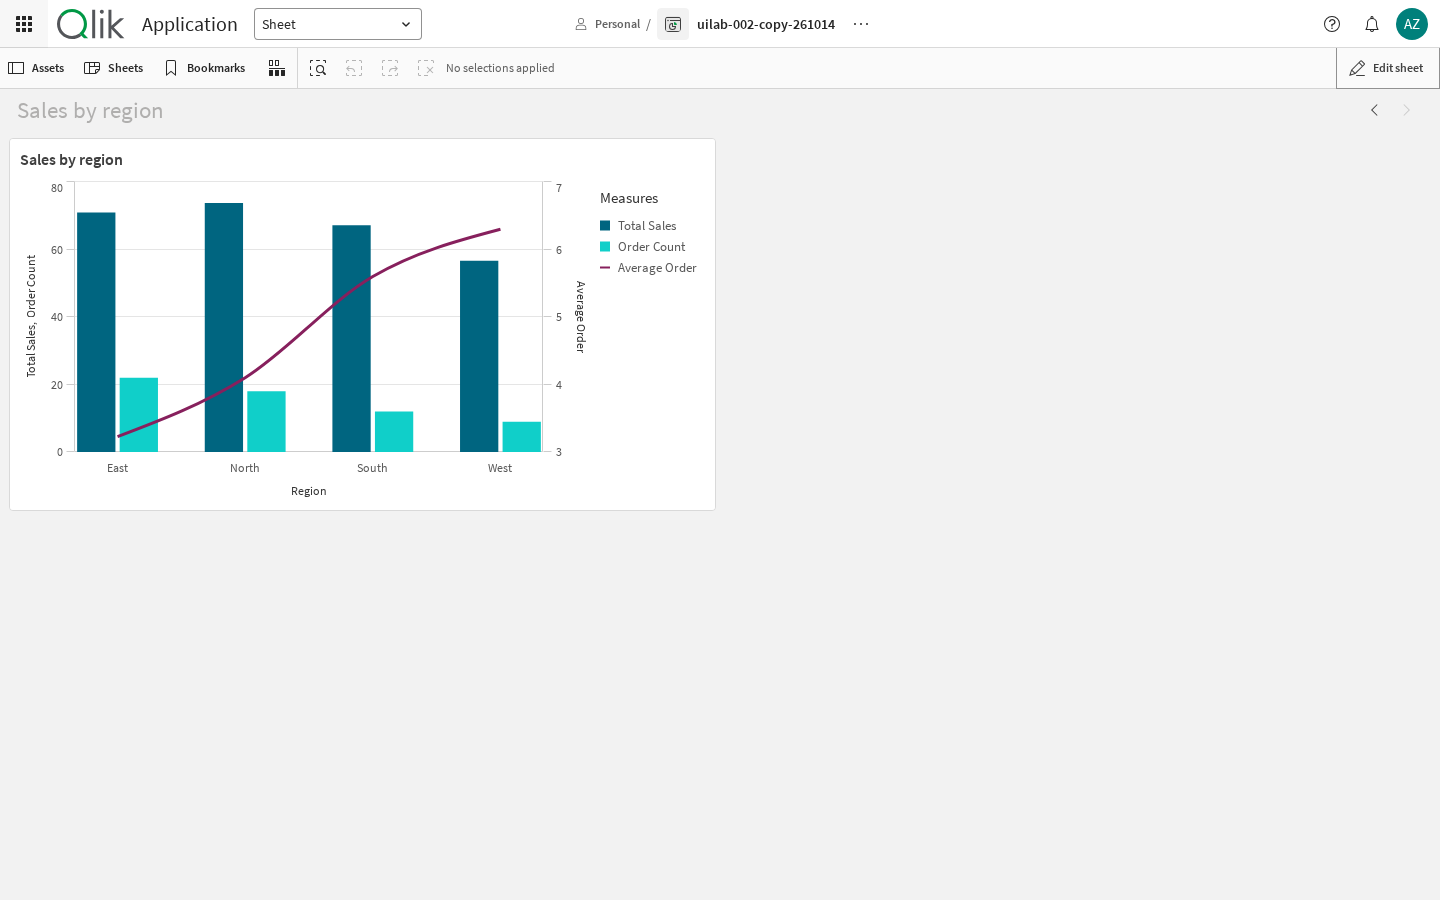
The sheet from the chat, open in Qlik Cloud: Total Sales and Order Count as bars and Average Order as a line on its own axis, by Region

Two licence levels

There are two licence levels.

  • QOps licence. Covers every tool except the analytic ones. The assistant can read how an app is built, create and change sheets, charts and master items, and run QOps, but data values are left out of what it sees.
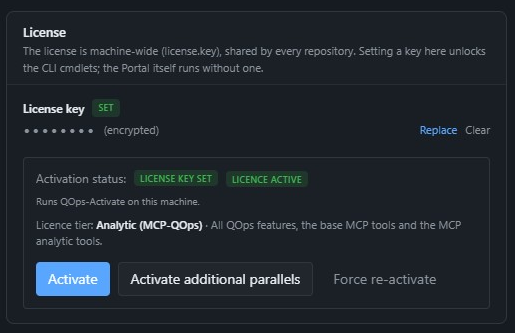
  • Analytic level (MCP-QOps licence). Includes all of QOps and adds the analytic tools, which let the assistant calculate from the data in an app: field values, calculated expressions and selections.

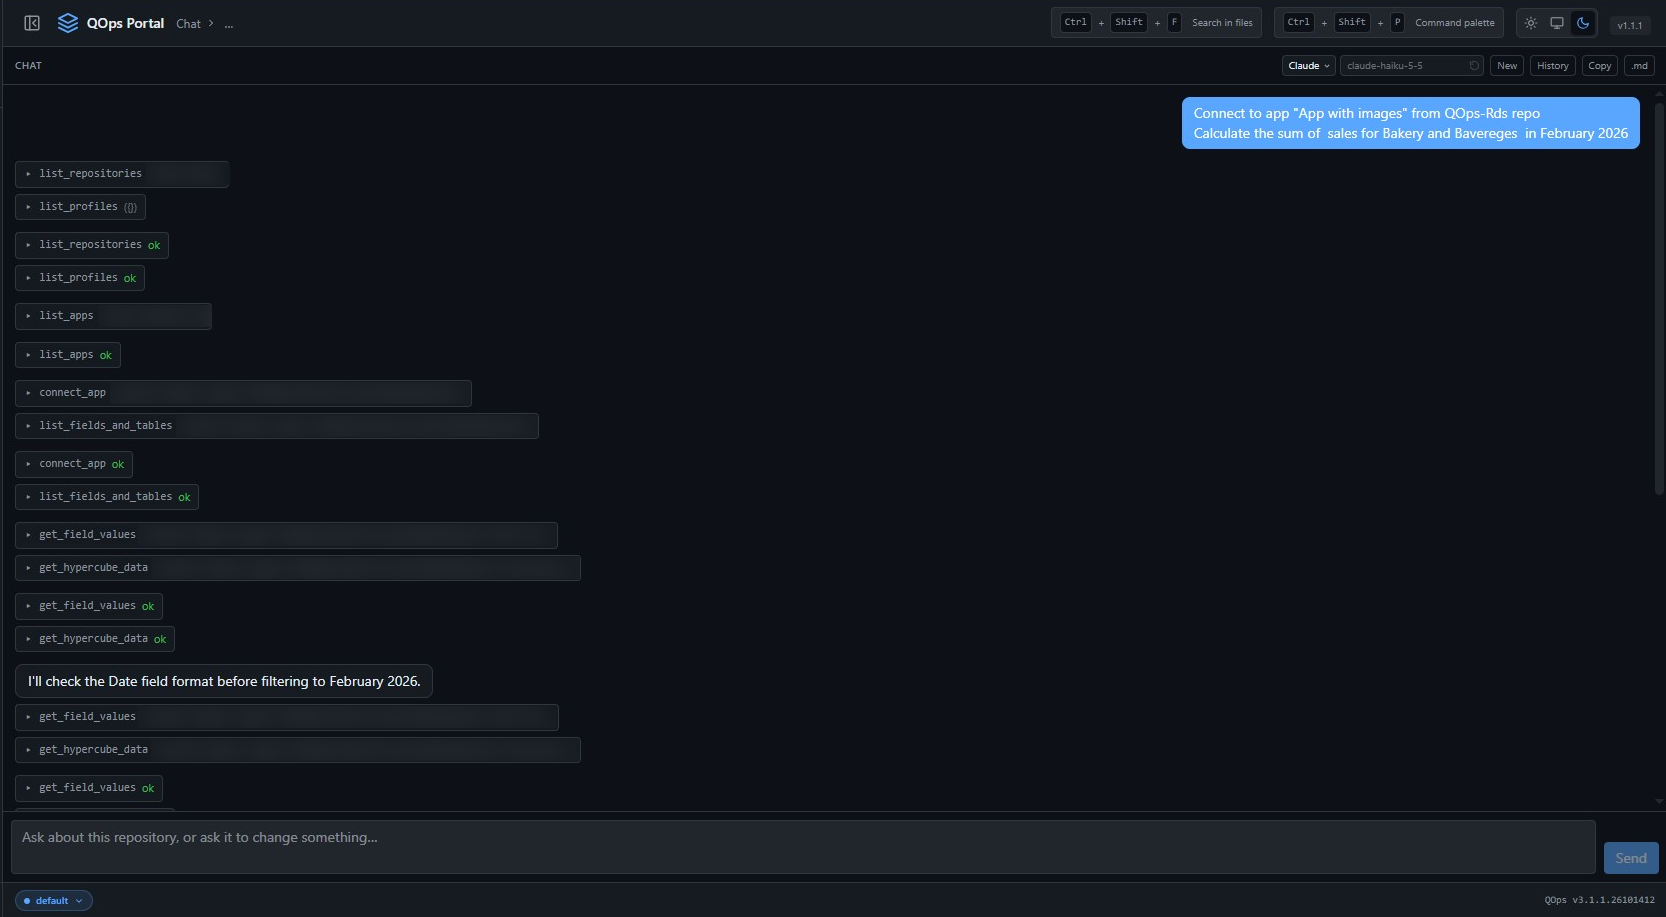
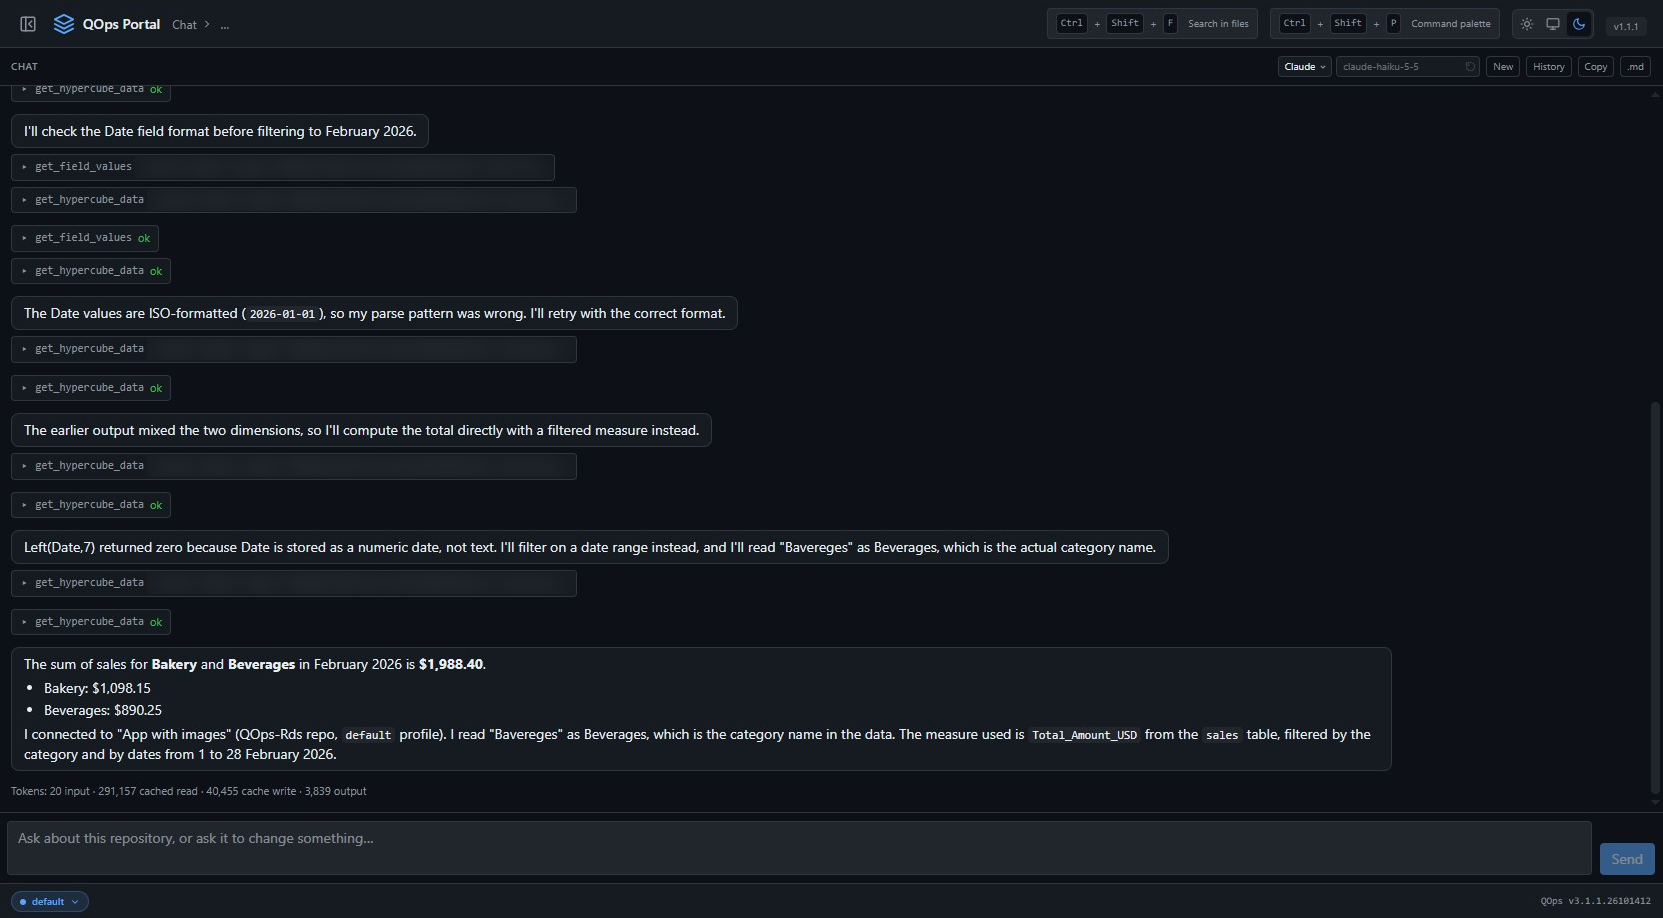
For example, with the Analytic level you can ask "Connect to App with images from the QOps-Rds repo and calculate the sum of sales for Bakery and Beverages in February 2026". The assistant looks up the fields, checks how dates are stored, filters by category and date range and returns the totals.

The chat working out a calculation on app data: each tool step is listed as it runs
The answer: sales for Bakery and Beverages in February 2026, with the measure, table and date range it used

Settings, Global, License shows your level.

Settings, Global, License: the licence key is masked and the tier reads Analytic (MCP-QOps)

Safety you control

You can ask the assistant for each of these in plain words.

  • Read-only. Connect to an app read-only and every tool that would change it is refused.
  • Checked writes. After each write the assistant reads the result back. It reports a broken expression, a chart that cannot draw, or a change that was not stored as sent.
  • One save for several changes. Keep changes in the open session and save once at the end.
  • Deleting an app needs the app's Id repeated as confirmation, and cannot be undone.